


Never has it been so easy to capture aerial images of some of the world’s most stunning (and sometimes hard to reach) places. The drone—a sky-high flying, unmanned camera—is undoubtedly the wildest photography development in recent memory. Almost like a remote-controlled toy for the photo obsessed, drones are as much fun as they are revolutionary.


As the desire for drones has risen, the price has dropped, making it easier than ever to get a camera in the air. But with so many factors to consider—whether you’re just planning to get into drone photography or have already gotten one—getting started can be a challenge.
13 Tips For Getting Started
Drone photography has become one of the biggest growth areas in photography in recent years. The ability to put a high-quality camera in the sky and capture stunning aerial photographs of the landscape below is extremely compelling, and the results can be out of this world. In this article, you’ll discover eight tips which will help you understand the practical, safety and legal considerations, which equipment you’ll need, where to go to get vital training and certification (if you plan to work commercially), and show you breathtaking examples of drone photography.


1. Equipment: What You’ll Need For Drone Photography
Drone photography equipment ranges from off-the-shelf solutions which have everything you need to take aerial photos and video footage, through to individual components you can purchase and assemble to create a very unique and personal solution.
Now, let’s look at the most important components used in drone photography.
The Drone
A drone is a flying device with multiple propellors which allows it to fly around and hover in one spot.
One search of “drone” in Google will shock you with the mind-boggling number of drones available out there. But what are the things you actually need to consider in getting one for yourself?
The two most common types of drones you can choose from are those with a built-in or on-board camera and those of which you can attach your own. Drones with a built-in camera are often larger, and their cameras might not have a very high resolution—which can compromise the quality of your photos. Smaller drones which allow you to attach your own camera, such as a GoPro, on the other hand, could be easier to manage since you already have the hang of your camera and really only need to learn how to fly.
One of the most important things to consider is how well you can fly a drone. For beginning drone photographers, sturdier, lighter, and cheaper drones are available. They aren’t as expensive as heavier and more advanced drones either because they have less features. Look for a drone that matches your skill.
You also need to know what your drone can do. For instance, some drones can only be flown indoors. Some drones are also equipped with lighting that can be used for shooting at night. Some fly farther than others. Decide what you want to achieve with your drone, check out the features of the drones you are choosing from, then choose one that best satisfies your needs.
Channels like That Drone Show and Drone Camps RC on YouTube test, review, and compare different drones and accessories. You might consider watching the videos before purchasing your drone.
Drones vary greatly in size. There are tiny plastic toys for indoor use. You can buy larger, drones with integrated gimbals and cameras for outdoor use. There are also professional, large, carbon-fiber drones with retractable legs and longer flight times. These offer serious performance and the best drone photography results.
More Capability, Not Less
Aerial photography via drone opens up a new and exciting world for the uninitiated. As a result it is more likely than not that the purchaser will possibly find many more uses for the drone and its imaging system than was initially anticipated. It can be very beneficial to have a drone capable of handling a range of projects, whether they require thermal imaging & mapping, or high-resolution imagery for commercial real estate. Therefore, it is often wise to invest in a higher-resolution camera, more battery power and more range than you might initially think you need.
The other option is to simply get into imaging via drawing with an entry-level system with plans to use it as a backup or to replace it once you have a greater a better idea of just how far you want to take video capture via drawing.
A Learner Drone
A good learner drone that won’t break the bank is the SYMA X5C-1 RC Quadcopter. Priced at just under $60 it comes with a proper transmitter rather than the smaller, toy-like transmitters found on other cheap models, and includes many spare parts.
It can be used indoors, if you have enough room, but also outdoors in light winds. The camera isn’t its strong point, but as a cheap way to learn the basics of drone flight, this is a good option.


Intermediate Drones
If you want a drone with an integrated gimbal and camera which is capable of more professional results, then look at the range of drones from DJI.
At the budget end of the spectrum you have the $549 DJI Spark which includes a camera capable of video and 12MP still images, GPS positioning, 16 minutes flight time, and an FPV headset which lets you see what the drone’s camera can see.


At the other end of the consumer-oriented product line, you have the DJI Phantom 4 PRO Drone Quadcopter, which costs around $1800, and includes a 20MP camera mounted on a proper 3-axis gimbal to keep the camera level at all times.


Advanced Drones
If you’d prefer more camera options, perhaps using your own mirrorless camera or a small DSLR, then look to the DJI Spreading Wings S1000+. It’s an octocopter, with eight motors/propellors, retractable, carbon-fiber legs, and is compatible with Zenmuse gimbals and gimballed cameras, as well as other third-party gimbals.
The gimballed cameras DJI offers include the Zenmuse X3 for $900 and the Zenmuse X5 for $1800.


Using the appropriate gimbal, you can attach any camera you like to the DJI Spreading Wings S1000+, so long as the total weight (including the drone, batteries, gimbal, and camera) doesn’t exceed 24 pounds.
A Gimbal
For the ultimate in shooting flexibility, look for a drone featuring a camera mounted on a 360-degree gimbal. This allows you to rotate the camera in any direction you want when the drone is in flight.
A gimbal is a stabilized harness or frame suspended beneath the drone. It’s designed to carry a camera, keeping it level, or allowing it to be pointed remotely in a specific direction.
Like drones, gimbals vary in price and size and it’s important you choose a drone which can lift your choice of gimbal and camera, and a gimbal which can handle the weight and size of your chosen camera.


Zenmuse are a popular, reliable gimbal manufacturer, but there are literally hundreds of cheap, Chinese models available. Whichever you choose, be sure it fits your chosen camera, and preferably make sure you can find good reviews from reliable sources.
A Camera
Naturally, you’ll need a camera too. Drones are available to carry anything from a tiny, dedicated camera, GoPro action cameras, compact and mirrorless cameras, DSLR cameras through to high-end movie cameras.
You may be tempted to build your drone photography system around your existing camera and lenses, but before you do that, consider the size and cost of a drone big enough and powerful enough to lift your relatively heavy DSLR.
It might be more cost effective to look at a smaller, mirrorless camera as your drone camera. These are much lighter than a DSLR and therefore easier to lift with a more modest drone setup.
A Transmitter
To control your drone, you’ll need a transmitter or controller. These range from simple devices with very few communication channels, to extremely advanced transmitters with many extra channels for controlling additional drone and camera features.


FPV Goggles Or Screen
While you can take great photos with your drone-mounted camera without the benefit of seeing what the camera can see, you’ll always get better results when you can. FPV, or First Person View, is the most popular way of seeing what your camera sees.
It works by taking a video feed from your drone-mounted camera, and relaying it to a pair of FPV goggles or an FPV screen which you, the pilot, wears or uses.


As you maneuver the drone, or change the camera gimbal’s position, your FPV view changes to reflect what the camera is now looking at.

When you’re happy with what you see, you can trigger the camera’s shutter remotely by pressing a dedicated button on the transmitter.
Batteries, Battery Charger & Other Accessories
Lastly, there are several accessories which will keep your drone powered up and airborne. These include spare batteries, a battery charger, spare propeller blades, tools for drone maintenance, spare parts and carry cases. The most important of these accessories are the batteries and battery charger.
Drones typically use Lipo batteries. These are capable of being charged fairly quickly, and also have the ability to provide a lot of power output in a short space of time. Because of this, they are relatively volatile and, if handled incorrectly, potentially dangerous.
While budget batteries and chargers are available, stick with the better-known brands, such as Gens Ace, Floureon, or Turnigy, as these will behave more predictably and should withstand more intense use without failure.
Repeated charging and use of a battery in quick succession can cause the battery to overheat. Therefore, it’s sensible to have several batteries and use them in rotation, giving each battery a chance to recover and cool down before re-use.
Just like any other camera, drones also have different add-ons that you can use to improve flying or the quality of your photos.
Batteries
Some drones offer only half the capacity of others in terms of flight time. For example, a value-priced drone may operate off of a lithium-ion battery which offers perhaps 7-10 minutes of flight time. On the other hand, if you want to keep your drone aloft for as long as 20 to 25 minutes or more, a more elaborate system with LiPo battery power is important. For extended operation, an investment in multiple batteries is ideal, so it is wise to consider the cost of extra batteries.
Again, it’s a matter of matching your needs to the right drone. Major manufacturers like DJI and Parrot offer a series of models which allow one to match camera capabilities to your needs.
One big, limiting factor to keep in mind – drones don’t have the longest battery life. An average drone will fly for about 10 minutes, while high end drones will allow you to fly for around 20-25 minutes. To avoid spending half your time by a power point or having to call it a day without getting the money shot, consider investing in an extra battery (and remembering to charge it). They’re not cheap, but as a beginner, can you afford to shoot on such a limited time frame?
Propeller Guards
Crashing a drone or getting it stuck in things, like plants, especially when you’re just starting out, is not uncommon. Getting too close to the propellers could also result in a minor injury. Get propeller guards that will help avoid damaging your drone or hurting yourself and others around you.
Extra Propellers
Propellers can also be fragile and are detachable, so they can easily get lost. While you’re still learning, buy extras just in case. They don’t cost much and will ensure you’re always on the go.
Extra SD cards
Don’t miss out on the hero shot because your SD card fills up. Drone shots take up a lot of memory space—a 2-minute 4k video takes up around 1GB. No matter how big or small, get extra SD cards, so you never miss a shot.
It’s not all boring essentials. Once you’ve got the responsible stuff, you can accessorize. Whether it’s a funky light kit that makes night flying a breeze to camera filters that add an automatic flair to your flight photos, manufacturers are taking advantage of the popularity of drones and churning out loads of amazing accessories.
Mini drone landing pad
Equal parts cool and functional, having a drone landing pad helps ensure your UAV won’t be landing on something that could potentially damage it.
LED lights
Never lose your drone in the dark! LED lights mean you’ll can always keep track of your drone. Plus, it looks sweet.
Undoubtedly a powerful tool for photography, drones have opened doors to shoot from angles and locations like never before. While they certainly aren’t for everyone (with a lot of people skeptical about their inception), they have made a huge impact on photography and aren’t looking to faze out anytime soon, so why not hop on the train?
Just remember, mastering drone photography doesn’t come to everyone over night. It can get seriously tricky, but with practice, planning, and time, you can take your shots from amateur to amazing.


We designed this guide for both experienced photographers and those of you who are new to drone photography. We’ll cover some basic background items, how to properly adjust your camera settings, shot tips while in the air, and post-processing techniques for when your work is complete.
2. Study the instruction manual carefully
Reading the instruction manual is nowhere near as exciting as soaring your camera over the ocean, but if you want to give yourself the best chance of nailing drone photography, get to studying.
Your instruction manual holds everything you need to know about your new drone. It will give you the answers to a bunch of questions you might not have even known you had. Knowing what your drone can and cannot do, you’ll be spending less time tinkering with it and more time improving your shots.
3. Federal, State And Local Drone Regulations & No-Fly Zones
Drones have become more and more popular over the past several years, not least because of media interest, falling prices and a proliferation of exciting after-market accessories.
This popularity has meant drones easily fall into the hands of irresponsible owners, which has led to high-profile news stories which the press has been quick to jump on, stirring up hysteria about drones and their uses.
Therefore, and not before time, the authorities have had to provide guidance and laws to protect the public – both in terms of their safety, but also in terms of their privacy and civil liberties.
If you’re in the USA, your first port of call for everything related to the legality of flying drones can be found at the FAA / Federal Aviation Administration’s website.
Because of how many people have gotten into these little unmanned aircrafts, there’s been a lot of developments into the legality of where, how, and who can pilot one.
For instance, in the USA, UAVs weighing between 0.55 and 55 lbs. require a Federal Aviation Administration (FAA) registration. This means that before you take to the sky, you must make your aircraft known—much like registering a car. It’s a simple process: just hand over a small fee and your name, address, and email.
There are also regulations on where you can fly your drone. For example, you (fairly obviously) can’t go flying your drone around another aircraft, so airports are a no-no.
Whilst most laws and regulations are quite obvious and easy to understand, a lot are still quite messy—especially surrounding fines. The laws surrounding registration also vary for every country. The best thing to do is to take the time to check the legality of drones (which you can do online) before you launch your camera.
Registering Your Drone
In the US, if you wish to fly a drone whose total weight exceeds 0.55 pounds you’ll need to have the drone registered. It’s not difficult to register and costs just $5. Bear in mind that if you don’t get your drone registered and are caught flying it you could be fined as much as $27,500. Register your drone here: https://www.faa.gov/uas/registration/
All registered drone users receive a unique identification number which has to be written on the registered drone.
The national laws on drone use should be your first consideration, but note that some states have local regulations regarding drone use which take precedence over national laws. Therefore, the onus is on you to make yourself aware of all the prevailing laws relating to where you intend to use your drone.
No-Fly Zones
Strict no-fly zones exist, and again, it’s your responsibility to know where these no-fly zones are, so you can avoid flying in them and breaking the law.
The drone manufacturer, DJI, has created a no-fly database which you can check here. DJI uses the database behind this tool to automatically prevent its customer’s drones from entering a no-fly zone.


Commercial Drone Use
If you intend to use your drone commercially in the US, you’ll need to apply for Section 333 Exemption, also from the FAA. It’s not straightforward to get this exemption and most applicants rely on legal representation to make a case. This all takes time and there’s no guarantee you’ll be successful.
Lastly, because this industry is still in its infancy, and the authorities have been slow to put regulations and safeguards in place, you should assume that any existing laws are subject to change and improvement. Therefore, the responsibility for keeping up to date with the latest laws and best practice falls on you, not the authorities.
4. Learn To Fly A Drone Before You Attach A Camera
Can you imagine spending a lot of time and money on a shiny new drone, hooking your expensive camera up to it, and then losing control and watching it plummet to the ground? Don’t set yourself up for tragedy—test drive your drone.
Every drone is different; thus, they all fly differently. Taking your new toy out to a big open area, like a field or park (keeping clear of large crowds of people, private buildings, and cars) will allow you to get the hang of the controls all while minimizing the risk of breaking or damaging your drone.
Just like other photography techniques, drone flying is all about practice, practice, practice. Learn how to fly your drone to get the most out of it.
Most drone pilots started out with a “toy” drone – something cheap that they can learn the basics on without risking expensive damage.
These smaller drones can even be used indoors, which gives you more opportunities to practice, regardless of the weather, or time of day. The skills you’ll learn on a “toy” drone are totally transferable to a larger, more professional drone.

Camera Basics for Beginner Photographers
The miniaturization of high-resolution cameras and the advent of smaller, more powerful lithium-ion batteries has allowed the imagination of the videographer to take flight. Today, camera-equipped drones can capture images with amazing clarity during drone flights lasting 20 minutes and more.
Most of today’s prosumer drones come with cameras equipped off the shelf. If you’re a beginner just getting started with drones and you want to use a camera with one, it is important to understand a few of the basic variables when looking at the best camera to use with the drone. Although it is possible to add a camera like a GoPro to a non-camera drone, most drones come with built-in camera systems.
Imaging Considerations
Today, the same technology that allows you to capture amazing high-resolution videos and still images on your smartphone makes attaching lightweight cameras on drones possible.
IMAGE RESOLUTION
Drone cameras capture video at varying resolutions. Here are the three most common:
In today’s drone market, this is about the lowest resolution camera you will find. It is a low-cost option that still meets many needs.
IMAGE CAPTURE RATE
Some drone cameras will shoot at 30 frames per second (fps) while others will shoot at 60 fps. Users interested in occasional slow-motion playback will want to consider more frames-per-second to maintain image quality.
Other Camera-related Considerations
The camera is just one part of an overall drone system, and to make the best purchasing decision it is important to consider how all the variables work together in relation to your specific needs and desires. For example, some cameras will only capture a maximum of 64 GB on a memory card. Here are some other key considerations:
LIVE STREAMING
Early drone cameras captured video exclusively on an SD card, and you downloaded the images at the end of the flight. Many newer drones, including the DJI Mavic, Phantom, and Inspire series, feature a combination of high-definition video and live streaming. That is, the video will stream to your smartphone as it is being captured. This real-time or almost real-time imaging offers increased flexibility. Some systems will live stream from as far as four miles away.
Before your very first flight, you’ll want to make sure you’ve taken some important precautions:
-Choose a wide, open area to fly in.
-Keep away from obstacles such as power lines, buildings, trees and bridges.
-Keep your drone well away from members of the public or their pets while you’re learning.
-Avoid flying on a windy day.
An important reflex to learn is to let go of the throttle if you’re about to crash or lose control. Spinning propellers can cause a lot of damage, to anyone or anything they come into contact with, but also to the propellers themselves. So, stopping the propellers from spinning should be your priority in an emergency.
There are several exercises you can practice to improve your flying skills, but before you start, always take off from a flat, level surface, and have your drone facing away from you.
Exercise #1: Take off, hover and land
This is where it all begins. Practicing take-off, hovering and landing, are the bare essentials of drone flight. Just increase the throttle gently until the drone lifts off the ground.

Once it’s in the air, back off the throttle a little to prevent the drone from rising further, and find a throttle balance that keeps the drone hovering in the air in front of you.
When you’re ready to land, simply back off the throttle very gently, bringing the drone back down to the ground smoothly. Be careful not to back the throttle off too suddenly or the drone may simply drop to the ground heavily, possibly causing damage.
Repeat this take-off and landing exercise over and over again until you’re able to take off and land smoothly every time.
With this exercise, remember to keep the drone facing away from you at all times.
Exercise #2: Lateral Movement
Getting slightly more advanced now, you’re going to practice moving the drone from side to side, and forward and backward.
Get your drone airborne, then, move the drone left and right by moving the right stick to the left or right respectively. Once you’ve moved it one way, bring it back the other way. Repeat this until you’re ready to stop, and land the drone safely.


Next, with the drone airborne again, move the drone forward and backward by moving the right stick forward or backward respectively. Once you’ve moved the drone forward, bring it back toward you. Repeat this until you’re ready to stop, and land the drone safely.
Again, with this exercise, keep the drone facing away from you at all times.
Exercise #3: Square And Circles
This exercise really tests the skills you’ve learned in the previous two exercises. Pick a fixed marker on the ground that you can use as a target. This could be a discolored patch of grass, an X marked in the dirt, a flat stone, or a plastic lid, for example.
Next, with your drone airborne, fly the drone in a regular pattern around the target. Start with a square. Using the skills you practiced in Exercise #2, move the drone forward a little, left a little, back a little, then right a little, until it’s back where it started. Repeat this, while trying to keep the movement and distances consistent.

It’s very easy to get carried away and pick up too much speed. If this happens, try smaller movements of the right stick, and make sure you complete a movement in one direction before attempting the next.
Once you’ve mastered squares, try and fly your drone in circles around your marker, keeping your drone facing away from you at all times. This is a very dynamic and tricky exercise because you’re always doing more than one thing at a time. You’re moving the drone forward or backward at the same time as moving it sideways.

To do this, simply move the right stick in a gentle circle. As with the square exercise above, it’s easy to get too carried away, so always use a gentle touch on the stick, and be ready to bring the drone safely back down to the ground.
Exercise #4: Yaw (Rotation)
When your drone is facing away from you, with its back towards you, flying it is fairly intuitive. Left is left, right is right, forward is forward, backward is backward, etc. However, with the drone pointing in any other direction, things get tricky quickly!
It’s one of the hardest things to learn about flying a drone, but the most rewarding because it gives you the most amount of control and precision, which is especially useful for drone photography.
With this exercise, you’re going to keep the drone fairly low, certainly no higher than you’re prepared to have your drone fall with some force. Four or five feet should be ok.
With your drone airborne and in front of you, move the left stick gently to the left until the drone has turned 90 degrees to the left. Then bring the stick back to the right until the drone has returned to face away from you.
Now, move the left stick to the right a little more, rotating the drone to the right 90 degrees. Then bring it back to face away from you.
Repeat this 90-degree exercise over and over until you’ve nailed it.
Then, repeat this exercise but go to 180 degrees, with the drone turning to face you.
When you’re feeling confident with the above, go for the full 360 degrees.
Exercise #5: Landing Practice
This is a fun exercise, and as easy or challenging as you want to make it.
Simply choose two take-off and landing points which are at ground level. This minimizes problems if you miss the landing.

Take off from the first one and fly to the other, landing as accurately and steadily as you can. Then take off again and fly back to the original point. Do this over and over again.
Rather than sticking to these two take-off/landing points, choose different points, at different distances and different heights. Use the features you find around you, a tree stump, a picnic table, or a drainage inspection cover.
Your goal is to take-off smoothly, fly neatly to the other point, and land gently and with as much accuracy as possible.
FAA Guidelines
The FAA has published a set of safety guidelines you should follow:
-Keep the flight height below 400 feet above ground level
-Don’t fly within three miles of an airport or a landing strip
-Keep your drone within the pilot’s sight at any given time during the flight
-Keep the drone away from National Oceanic and Atmospheric Administration (NOAA) zones, as well as from temporary flight restriction zones
-Adhere to flight safety rules (keeping the drone away from wildlife, buildings, and pedestrians)
-Respect all the no-fly zones
5. Understand The Drone Controls & Settings Available To You
Before attempting to fly your drone for the first time, you’ll need to understand the controls and settings. These are so numerous that we’ll just cover the basics in this article.
Arming & Disarming
When you switch your drone on, it will be in a “disarmed” state. This means the drone won’t take off until it has been “armed”. To discover how to arm your drone, consult your user guide.
Transmitter Modes
There are two transmitter modes available to you. Both of these modes relate to how the drone behaves based on the transmitter’s stick positions.
In both modes, the left stick’s sideways motion controls yaw (rotation), and the right stick’s sideways motion controls roll.
With mode 1, the left stick’s forward and backward motion controls pitch, while the right stick forward and backward motion controls the throttle.
In mode 2, the left stick’s forward and backward motion controls the throttle, while the right stick forward and backward motion controls pitch.
Most drone pilots use mode 2, and since switching between modes is counterintuitive and difficult, it’s best to start out with the mode 2.
Flight Modes
There are several flight modes. The most basic drones may only offer one or two of these flight modes. More advanced drones provide most, if not all, of them.
Standard: In this mode, the drone levels itself when the sticks are released. The amount of tilt the drone can achieve is limited to make it easier to fly.
Advanced: This is the same as standard mode, but with a less restrictive maximum tilt.
Manual: In this mode, all stabilization is turned off and no maximum tilt is applied.
3D Mode: Again, no stabilization is applied and the 50% throttle stick position cuts the power to the motors. Greater than 50% throttle stick position generates positive thrust, but less than 50% throttle stick position reverses the direction of the motors, allowing upside down flying!
GPS Mode or P Mode: This mode is only available on drones with GPS fitted. It allows your drone to fly at a fixed altitude, hover in place, and automatically adjust for gusts of wind.
Trim
Most drone transmitters allow you to make small adjustments which correct imbalances in the drone’s motors and flight controller. A typical scenario might be where your drone wants to keep rotating anticlockwise – or yawing. A small adjustment to the yaw trim will cancel out this unwanted rotation.
Drones offer various features that help optimize your flying time. Learning these will ensure you shoot efficiently with your drone.
While they vary for each brand and type of drone, these are the typical features you will encounter:
This tool is great for beginners as it allows you to see exactly what your drone is capturing, increasing your chances of a great shot.
Smart Mode
Smart mode essentially translates to “beginner mode.” This innovation is put in place to essentially help newbies get the most out of their shots.
For example, if you’re inexperienced and it’s a windy day, chances are you won’t have the chops to fly your device without it looking like your photos were caught up in an earthquake. Smart mode will have some form of stabilisation feature that will help to counter this.
Tracking
Drones sometimes also have a “follow-me” option. This combines futuristic visual recognition with your smartphone’s GPS to help you take the perfect photo.
If you want yourself in the shot, this technology will allow it: put your phone in your pocket, turn on the “follow-me” option, and the drone will make sure that you’re always in the frame.
Geofence
A geofence will restrict how far and how high your drone flies. Essentially, it locks your drone in an invisible jail, and the minute you try to escape, you’ll run into trouble.
Drone photographers have varying opinions on these features—some find them useful, and others don’t. Find out which features you can use to maximize your drone’s potential.
6. Pre-Flight Checklist & Preparation
Even if drone photography is something you intend to do purely as a hobby, it’s sensible to treat flying your drone seriously. Therefore, making pre-flight checks, and preparing for every eventuality, is a good idea.

Here’s a suggested pre-flight checklist you can use, or adapt.
Knowing what your drone can do and where you can fly it, you’d think it’s time to finally get it in the air, but before you do that, it’s advisable to first devise a pre-flight checklist. A pre-flight checklist will not only ensure that you have everything you need before you fly but also that everyone around you, including your drone, will be safe.
Before you fly, check these things off the list:
–Fly Zone: Where are you going to fly? Is it private or public domain?
-Weather: Are flying conditions good? Will you need to utilize anti-stabilization because of the wind?
-Surroundings: Will there be people around at this time of day? Will it be safe to fly low/high? Will they mind a drone hovering around them?
-Battery: Have you charged up all your batteries? How long can you stay in the air?
-Settings: What resolution do you need? How bright do you need to set your camera? What frame rate, shutter speed, and ISO are best for what you want to achieve in your photo?
-Propellers: How are your propellers looking? Are they nice and straight, or do they need replacing?
-Motor: is the motor and mounts in tact? Are the motors rotating freely? Is it making any unrecognizable sounds? Are the screws tight?
-Controls: If you’re using a smartphone or tablet, is it ready to go for your flight? Are other apps turned off? Is the fully charged? If you’re using a remote control, does it have batteries? Is it responding to your drone?
With all these in check, now comes the exciting part—flying your drone.
Day Before Flight
-Permissions obtained? (e.g. from authorities and/or land-owner)
-Drone, transmitter and camera batteries charged?
-Camera SD card formatted?
-First-aid kit packed?
Immediately Before Flight
-Inspect drone for faults, loose components or screws.
-Warn any nearby spectators.
-Set home point (if available, so you can bring drone home automatically later if required).
-Camera lens cover removed?
-Turn camera on.
-Propellors tight enough and can move freely?
-Correct flight mode selected?
-Wind-speed?
-Check for obstacles (trees, power lines, buildings) & people.
Take-Off
-Turn transmitter/controller on first.
-Turn drone on.
-Hover at 15ft for 15 seconds to check drone behavior and sound is normal.
-Check all controls respond as expected.
7. Research & Plan Your Aerial Shots
One of the hardest parts of drone photography is planning what to shoot. Unless you’re actually “up there”, how do you know what will be a good scene to shoot?
We’ve already talked about FPV – or First Person View. This is a good way of checking your framing and composition while your drone and camera are airborne. But you still need to be in the right general area in order to capture great subjects and scenes with your drone.
One trick the pros use is to scour Google Maps or Google Earth for likely subjects. Even better, use DJI’s No Fly Zone tool and you’ll save yourself the added effort of having to check if it’s ok to fly there.
The photo below shows the circular fields of Kansas as found in Google Maps with satellite mode enabled. You could plan our your entire aerial shoot using tools like this.


8. Camera Settings
Before you fly make sure you’re comfortable with these photography techniques first before taking off to get the most out of your flight time. This will help you enjoy your flight and not having to worry about anything else if you’re well-prepared. In addition, knowing these tricks will make your life much easier post production as well as allowing for a better image quality with higher resolution. It is best to follow these steps while on ground to avoid having to change anything mid-air so that you don’t feel hectic through the flight.
Image Format
We suggest shooting in the JPG+RAW setting on your DJI drone. Why? Basically, the JPG image format produces images that have low file sizes and look great. RAW image files contain all of the uncompressed data from the camera sensor, making them perfect for photo editing and enhancing without loss in quality. Taking drone photos in both formats means you get the best of both worlds. You get the great looking, smaller JPG files, and the higher quality, larger RAW files. We have a guide walking you through how to take both JPG+RAW photos on all DJI drones if you are unsure where to find the setting.
Color & Exposure
After you’ve made sure you’re taking both JPG and RAW photos, the next things to consider are two specific camera settings: color and exposure. You can find these settings in the DJI Go application. In the camera settings screen, the color settings can be found under the camera icon, while the exposure settings can be found under the aperture icon. Adjusting the color settings is important for making the JPG images look great. The different color profiles and styles add saturation and contrast to the JPG images, making them more visually appealing. The RAW photos will remain unaffected by these color settings as the enhancements added after the image is taken; they aren’t captured directly by the camera sensor.
These are the color settings you want:
White Balance: Aut0
Style: Standard
Color: Normal/None or TrueColor
Quickly walking through these: White balance adjusts the color temperature of the image. You want the white balance set on auto because the camera does a great job, and it’s one less thing for you to think about. The style setting can add or remove sharpness, contrast, and saturation to your images. We suggest leaving this on Standard (+0, +0, +0) because honestly the images don’t need any more sharpness, contrast, or saturation. It’s also easy to enhance your images after they are taken with free photo editing software. The color is the color profile you shoot with. We recommend using the Normal (also called None on Android) or the TrueColor profiles. With high contrast and a wonderful amount of saturation, the Normal color profile looks beautiful. It produces images that are vibrant, eye-catching, and sharp. However, the level of saturation may be too much for some, and switching to the TrueColor profile can yield more true-to-life color reproduction. TrueColor can also bring out more detail in high contrast scenes. Keep in mind you will also have the RAW image to work with if you dislike the color of the JPG image.
For exposure, we recommend leaving this setting on automatic. Like with white balance, the camera does an excellent job properly exposing the images, and it’s one less thing for you to think about. You can also use the “tap exposure” feature in the DJI Go app, where you tap on your subject to have the camera automatically adjust the exposure for that subject. Using additional settings like zebra stripes (called the over exposure warning in the DJI Go settings) and the histogram can also help you ensure your image is properly exposed.
Camera setting for casual fliers
Want to just fly your drone around and have the footage coming off the Micro-SD card look great with no editing? Perfect. These settings are for you:
Video Size – 4K, 30fps
Format – .MP4
Video System Standard – NTSC
White Balance – Auto
Style – Normal
Color – None or TrueColor
What makes these settings great? The footage coming off the drone looks bright, vibrant, and beautiful. There’s no editing or post production required; you can save the files directly from the drone and even share them with your favorite social media sites. Photos will look perfect for Instagram. Videos will be sharp and crisp for YouTube. And even if you’re simply viewing your footage at home on your computer or TV, everything will look great right off the bat.
If you’d like to get a little more advanced with your filming and try and get slightly better looking results, then we suggest setting a manual white balance and locking your exposure. Setting a manual white balance based on your flight conditions helps produce more accurate and consistent video footage. The white balance won’t change between shots (as it sometimes will with auto white balance), and the colors will look the same across all of your footage. Locking the exposure has a similar effect. Like auto white balance, auto exposure will adjust while the drone is recording, resulting in constant brightness shifts and changes. Tapping on the subject you wish to film and locking the exposure prevents these constant adjustments, providing more consistent and professional-looking footage.
Best Camera Settings for Professional Filmmakers
Want a super flat image with preserved detail in shadows and highlights ideal for editing and post production? Perfect. These settings are for you:
Video Size – 4K, 30fps
Format – .MP4
Video System Standard – NTSC
White Balance – Manual
Style – Custom, 0, -1, -1
Color – D-Log
These settings result in a super flat image profile perfect for color correction and grading during the post production workflow. Details in shadows and highlights are maintained, and the higher bitrate of 4K video allows for more editing without diminishing quality.
An important setting we’d like to touch on is the Style setting. Matt Harris from the Film Poets found when shooting with a sharpness of 0 in high-contrast environments, the Mavic Pro was actually applying in-camera noise reduction, resulting in very soft images. This softness is particularly noticeable in shadows–it’s as if the light parts of the image are in focus and the dark parts of the image are out of focus. To fix this problem, Matt suggests shooting with a sharpness of +1 in high contrast environments. Setting the sharpness to +1 turns off the in-camera noise-reduction, resulting in much sharper images better for post-production.
Framing
Framing is the last main element to consider. While the framing of shots is mostly creative and based on personal preferences, there are some tools you can enable to help you compose your images. We recommend enabling the grid lines and the center point. These guides will help you align your subject either perfectly in the center of the frame, or along one of the grid lines for following the rule of thirds. Again, when it comes to framing and composition a lot of it is personal preference, so feel free to explore with various compositions to learn which you prefer!
HDR
HDR stands for High Dynamic Range. The dynamic range is the difference between the lightest highlight and the darkest shadow in a photo. In certain lighting scenarios, usually during sunrise or sunset or shooting directly into the sun, no matter what your camera settings are, it is impossible to avoid having blown out highlights or completely black shadows. One solution for this is taking several photos at different exposures and compositing them together to make one, evenly exposed photo. Check out these examples from a commercial real estate shoot we recently completed in Draper, Utah.
How do I shoot HDR?
First thing’s first, always make sure your drone is set to shoot in manual, and it is taking RAW photos. Now we have a couple of options to choose from, depending on how much control you want to have over the final product.
1. The first option is to set your shooting mode to HDR. This is the simple and easy way to get a quick HDR photo. Your camera will automatically take bracketed photos and combine them into one HDR photo every time you click the shutter. But with this mode, you have no control over the processing of the image, you only get one already processed photo to work with, and not all drones have this option.

2. The next option is to have the camera take several bracketed photos at different exposures and process them into HDR photos later on. To do this, change the shooting mode to “AEB,” which stands for Auto-Exposure Bracketing. This makes your camera take take 3 or 5 photos in quick succession at varying exposures every time you click the shutter. These photos will be processed later on to make one HDR, and you can fine-tune each of the photos as you process them. The only issue with this option is that you cannot change the different exposures that your camera takes in AEB mode, it will automatically choose to take a photo one step above or below the correctly exposed photo.
2. The other option is to take several single-shot photos without moving the camera and manually change the exposure between each one. This allows you to decide how much to change the exposure between photos and gives you the most control over the final outcome. But manually changing the exposure increases the time between photos, and the longer the time in between photos, the higher the possibility of the camera moving, which can cause distortion in post-production. This is usually only necessary when there is a really large difference between the shadows and highlights in a photo and AEB mode cannot capture it all.
I recommend using the second option. AEB mode is very helpful because it captures several photos very quickly, eliminating a lot of movement between the photos, and in most lighting scenarios, it it able to get a large enough range of exposures to correctly expose for both the shadows and the highlights. This method gives the photographer enough control of the situation to get a good result, but also takes advantage of some of the drone’s automated functions that can help to eliminate human error.
White Balance

Simply, white balance is the temperature of your photo, or how warm or cool the colors appear. It is measured in units called Kelvin, after Lord Kelvin, a mathematical physicist and engineer, who researched first and second laws of thermodynamics. As photographers, we don’t necessarily need to understand all of the science behind this, but we do need to know what types of lights are warmer, and what types of lights are cooler. The number is somewhere between roughly 1,000 and 10,000, with lower numbers representing cooler temperatures, and higher numbers representing warmer temperatures. The goal when setting manual white balance is to get the temperature as close to neutral as possible. So if your photo is too warm, cool it off by lowering the temperature, and if your photo is too cool, warm it up by raising the temperature. This chart shows roughly the numeric values of different light sources. At this value, the light will appear neutral. With drone photography, we will almost always be shooting outdoors, so pay close attention to the values for clear blue sky, cloudy sky, daylight, morning/evening sun, and sunrise/sunset. The temperature of the light from the sun changes drastically depending on the time of day.
Why use manual white balance, not auto?
All light sources have different temperatures, and no two lighting scenarios are exactly the same. Automatic white balance can get you pretty close, but we can do better. Especially when shooting videos, as you pan across a landscape, the lighting conditions can change, and the auto white balance will correct itself. But ideally, we need to keep it consistent for the entire video. By using manual white balance, we can really fine-tune the colors and tone of our drone photos and videos, and keep them consistent throughout an entire shoot.
In Camera
To set auto white balance before you shoot, open up the DJI app, go to camera settings, and make sure you are shooting in manual mode. Here you can choose from a variety of settings. Drones, along with most cameras, have several automatic settings: auto, sunny, cloudy, incandescent, and neon. These can be a good starting point, but are not precise. Choose “Custom,” which allows you to choose any value for temperature. This is when your grey card comes in. A grey card is just a piece of thick paper that is a specific shade of grey (18%), which is going to be the foundation on which we choose our color temperature. If you can get the neutrals white balance correctly, the entire photo will be white balanced correctly. If you don’t have a grey card, you can do this with just a white piece of paper. Place your grey card (or white paper) in front of whatever your subject is going to be, and point your drone at it. The idea is to replicate the lighting scenario when you are flying so that it is consistent the entire time you are shooting. Now adjust the temperature of the white balance. Move the slider back and forth until the piece of paper looks perfectly white, or the grey card looks completely neutral. Now fly and shoot as normal!
Long Exposure
Long exposure photography is an under-appreciated tactic that can be used by drone photographers and can add an artistic twist that will impress your clients. In short, long exposure photography is the practice of shooting photos by using longer exposure times than necessary to capture a properly exposed photo. Exposure time is the length of time when the digital sensor inside the camera is exposed to light, also when a camera’s shutter is open when taking a photograph. Long exposure photography is perfect for many of the subjects typically shot by drone photographers, including landscapes, architecture, and bodies of water.
Neutral Density (ND) Filters
Now in order to take these shots, you need what are called neutral density filters. These filters are like sunglasses for your drone; they filter out the light and allow you to take longer exposures even when it is still bright outside. We recommend using filters by Polar Pro, as these are high quality filters that produce very clear images. They offer a variety of options, including some for the Phantom 3, the Phantom 4 series drones, the Mavic Pro, and the Spark. These filters are super easy to use, as they just slide over your drone’s camera and stay in place with friction. Make sure you put on and remove the filters when your drone is off to avoid accidentally damaging your gimbal.
We recommend Polar Pro’s ND filters, but the truth is, it doesn’t matter which brand you choose. What’s most important is that you get at least an ND 16 filter, as this reduces the amount of light by 4 stops and is ideal for getting these long exposure shots. You can also get an ND 32 or 64 filter if you like, which could potentially allow you to capture long exposures in broad daylight instead of closer to sunset.
Choose the Right Settings
So to achieve the long exposure effect, you will want to wait for around just before sunset and before taking off with the filter installed on your drone. Within the DJI Go application, you should adjust your camera settings to make sure you’re shooting in manual mode to manually adjust the ISO and shutter speed. Keep the ISO set to 100, and adjust the shutter speed until you can see an image on your screen. You can see shooting with typical shutter speed of 1/60th of a second yields a completely dark image with the ND 16 filter on, and I was able to actually decrease the shutter speed all the way down to 1 second before I getting an image. Like with all drone photography, we recommend shooting in the JPG + RAW mode, and we also recommend experimenting with shutter speed to see what time looks best for you. For these waterfall shots, I found I was using anywhere from a 1 to 4 second shutter speed to get these results. Also be sure to take lots of images, as sometimes the drone can drift in the wind and cause blurry photos. You really need the drone to be quite still to capture this effect. You can also experiment with shooting moving vehicles and attempting to do light writing, although these effects may require an ND 32 or 64 filter to get even longer shutter speeds of 4 to 8 seconds. Remember, as a drone pilot, you are not allowed to fly past civil twilight (about 30 minutes or so after sunset) without a waiver from the FAA.
So that wraps up this tutorial on how to take long exposures on DJI drones. Again, pick up an ND16, ND32, or even an ND64 filter, wait for around just before sunset, and then take to the sky. While you’re shooting, just remember to stay in manual mode, keep the ISO at 100, and experiment with shutter speed to see what looks best. Feel free to share this tutorial if you found it helpful, and consider subscribing to our YouTube channel for video tutorials like the one above.
9. Don’t Use Your Camera’s Zoom
Even if your camera has awesome optical zoom, don’t use it for your drone photography. The tiny vibrations caused by the drone’s spinning propellers can cause the camera to shake. Any amount of zoom will amplify this unwanted shake, resulting in blurry photos.
So, for best drone photography results, keep your camera focal length as wide as possible at all times.
Now, there’s no point travelling to an amazing location and getting your camera in the sky, only to have a weirdly-framed, unclear photo. There’s an art to panning across beautiful scenery, which can only be learnt with time and testing.
Here are a few tips to keep in mind:
Don’t forget the “rules: ”Sometimes it’s easy to forget the fundamentals of photography when you’re flying, but they all still apply to the world of drones. If you’re not familiar with beginner techniques such as the rule of thirds, leading lines, and golden ratio, then get back to basics and study up.
Look for symmetry and patterns: While you’re soaring high, keep on the lookout for interesting scenes of colors, shapes, and repetition. They form some of the most iconic aerial photos.
Keep it simple: Just like ground level photography, simple compositions can result in incredible shots that celebrate the subject.
Go slow and stable: Because of how stable some drones are these days, you can still use long-exposure, which can be particularly amazing when capturing swaying trees or the crashing ocean.
Celebrate light: The right light can be a huge advantage for drone photographers—shooting at particular times during the day can create long shadows and striking patterns.
There are so many techniques to discover and conquer. Never stop learning.
10. Use Composition Techniques To Create Stunning Aerial Photos
As with normal photography, drone photography benefits from careful composition. While it’s a little harder to do while the camera’s airborne, it’s still possible.


Remember to include a person (if it’s safe and legal to do so), to create a sense of scale.

Shoot when the sun’s low for harder shadows which add depth to the scene.

Look for opportunities to include strong colors.


Seize the opportunity to capture textures and patterns in the landscape.

Look for symmetry in your drone photography, even though this can be tricky with drone photography. It’s perfectly ok to complete your composition in post edit, using the rotate and crop tools.

11. Capturing Great Imagery While in the Air
Getting beautiful and cinematic drone footage can sometimes be challenging to capture. Check out our video below where we cover 5 simple and easy cinematic drones shots and how to execute them! These shots look great and are absolutely worth trying.
I. The Pull-Away Shot
This shot is one of my favorites. It always looks great and it’s one of the easiest to capture. Simply hover your drone in front of your subject, and then gradually push up on the left stick and pull back on the right stick. The drone will move back and up, and as simple as this shot is, the footage looks great! Practicing slower control stick movements will result in smoother, more cinematic footage, however you can also go full throttle in both directions for a faster shot. Additionally, you can also try putting the drone in Tripod Mode for guaranteed smooth and slow footage.
II. The POI Shot
Point of Interest is an intelligent flight mode on DJI drones, and while it may sound like cheating, using this automatic flight mode results in excellent drone footage. When in the POI mode, the drone slowly circles a subject while simultaneously adjusting the camera angle to keep the subject in frame. This is super simple to do and the footage looks amazing. Watch the video for a full rundown of how the POI mode works!
III. The Fly-Up-Tilt-Down Shot
Flying up while tilting down is another simple shot which looks great. This shot does take some practice to execute, however you can make it easier by adjusting what’s called the “gimbal pitch speed.” The gimbal pitch speed is how fast your camera tilts up and down. Changing the pitch speed to around 10 or so will result in a smoother and slower camera tilt, which is perfect for executing this shot. Again, all you’re doing for this shot is positioning your drone in front of your subject, slowly flying up, and as you’re reaching the top of your subject pulling on the gimbal pitch dial to tilt the camera downwards.
IV. The Flyover-Tilt-Down Shot
This shot looks awesome, and it is great for showing off a property or location. The trick to filming this shot is to actually record it in reverse. By starting above your subject and then flying backwards and tilting up, you’re guaranteeing the shot will end perfectly above your subject and you will not accidentally miss your mark. So again, what you want to do is start directly above your subject with the camera facing downwards (you could even start a little bit past your subject if you’d like). Begin flying backwards and slowly tilt your camera up to keep the subject in frame. Continue this move before gradually tilting up to the skyline. Like the Fly-Up-Tilt-Down shot, it’s a good idea to adjust the gimbal pitch speed to around 10 or so for a nice, smooth camera tilt.
V. The Low-to-Ground-Tilt-Up Shot
This shot is nothing short of epic. It looks incredible, has a lot of energy, and is a great way to reveal your subject. So how do you pull this shot off? First, hover your drone as close as you feel comfortable to the ground, keeping in mind the closer you are to the ground the faster your drone will appear to be flying. (I had my drone just 1 foot above the ground for this shot). Keep your camera facing downwards, and begin to fly forwards. As you’re flying forwards, gradually to tilt the camera up to reveal your subject. Like in previous shots, a slower gimbal pitch speed of around 10 or so is ideal for pulling off this shot. It may take practice getting the timing down, but I think the end effect looks stunning and I highly recommend giving this shot a try.
12. Post-process your photos


Whether it’s color correcting a batch of photos you’re unhappy with or editing something out of the shot, what you do after the drone’s packed away can be just as important as actually taking the photo. Drone photography almost always relies on post-production to make it shine.
The thing is, editing drone photos takes just as much learning and practicing as capturing them. Even if you’re already a gun at post-production editing, editing photographs taken from high above—considering the differences in lighting and angles—is a whole new skill.
Try various software like Photoshop or Lightroom, which have different interfaces and areas of focus, to see which one can best help you achieve the outcome you’re going for.
It might be time consuming and, often, tedious, but every good drone photographer is also a great editor.
Rest assured that if you follow the step above, post photo production is going to be pretty easy. Even though some photos might not turn out perfectly but not to worry. Photo editing software nowadays has made photo editing much easier and more convenient. There are plenty of techniques for you to try and you can find some of them below.
I. White Balance
If you forgot to set your white balance before shooting, don’t worry! If you shot in RAW, you can easily fix this in post production. Also, sometimes, even if we manually adjust the white balance before shooting, it still might not be perfect. So make sure to take a quick photo of your grey card or white sheet of paper before shooting, and we can use that photo to really fine tune the rest of the shoot in post production.


Photos:
In Lightroom, you can adjust the white balance manually by moving the sliders labeled “Temp” and “Tint.” Or, select the eyedropper tool, and click on any part of the photo that you want to be neutral. If you took a photo of your grey card or white sheet of paper before shooting, just click on it and you’re all set! If not, choose any part of the photo that is pure white, or pure grey. Now you can sync those settings to the rest of your photos, and they will all be color corrected.
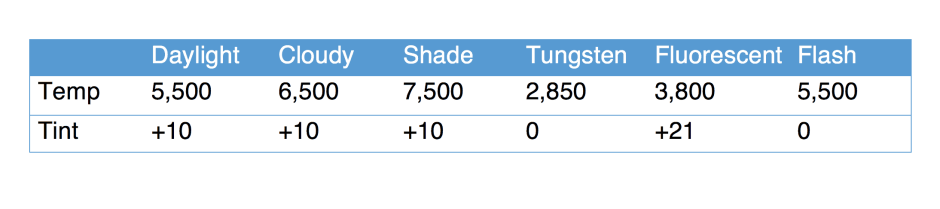
Lightroom has several automatic settings as well (auto, as shot, daylight, cloudy, shade, tungsten, fluorescent, and flash), which have specific temp and tint values. You can try these, but I find that custom is almost always the way to go.


II. Eliminating Fisheye Distortion
As drones have taken over as a leading tech tool for aerial photography, what’s known as fisheye distortion (or the barrel effect) can become a major problem for optical clarity. You’ve perhaps already seen what can happen with this problem after using wide-angle lenses on your drone. The reason fisheye distortion happens in drone photography is because the lens’ field of view is wider than the size of your image sensor.
Eliminating fisheye distortion in aerial photography isn’t too complicated if you have the right type of software available. Yet, maybe you’re still mystified as to why it’s called fisheye, or the “barrel effect.” On a more technical level, this happens because the camera squeezes the field of view so it fits into the image. It causes straight lines in the photo to looked curved, or like a barrel shape.
The term “fisheye” means virtually the same thing due to wide-angle lenses having short focal lengths. GoPro cameras cause this same problem, but here’s how to solve this based on the corrective software you use.
Using Adobe Lightroom
No doubt you’ve worked with Adobe products before when it comes to photo editing. Adobe Lightroom is excellent software to use for editing your aerial photography taken from drones. This Adobe program is already a full-fledged photo editing tool, though they make fisheye distortion particularly easy to solve.
This starts by importing and isolating the photos where barrel distortion is a particular problem. Once you do, use their menu to click “Develop”, then scroll down to “Lens Correction.”
What makes this so easy is they let you enter the type of camera you use into a profile section. The distortion problem gets automatically corrected based on the camera you selected.
While some photos might require more tweaking to completely remove fisheye, it works on most vertical and horizontal objects in the photo.
Using GoPro Studio
Those of you using a GoPro camera for your aerial photography have some advantages in being able to use GoPro Studio. While you have to buy the software separately, they make it as easy to use as Adobe does above. The exception: to correct fisheye distortion in your photo, the file has to come directly from your GoPro camera.
Once you’ve imported and converted your photo in the program, select “Advanced Settings.” You’ll instantly see a box that says “Remove Fisheye.” Click this and press OK.
To save, you have to move the file to the Conversion List where you can convert the clip. It’s one of the simplest procedures out there, though you’ll find other photo editing software sometimes doing a more thorough job.
Using PTLens as a Smaller Application
Sometimes the big names aren’t the only ones giving you good photo editing results. PTLens is a small application and maybe one you’ve never heard about or used. Nevertheless, it’s a good source for correcting fisheye distortion without hassles.
One great thing is it’s simple to download, install, plus has versions for both Windows and Mac. Above all, you may appreciate its ability to let you fix fisheye distortion manually. It gives you a digital interface to fix the problem on your own with various controllers and sliders.
Some photographers may prefer fixing barrel distortions this way rather than relying on one-click quick fixes. The latter sometimes fails in more complex aerial photography. With manual controls, you assure each horizontal or vertical line in your photos are truly straight for more photo accuracy.
III. Making Drone Photos Pop
Editing drone photos is very similar to editing regular ground photos, the only difference here is the subject matter. Commercially captured aerial photos are very often created with marketing purposes in mind and, with that, bring their own unique set of requirements. With drone photos, often times there is no human subject, which means we can be a bit more creative with colors and toning. When retouching people, we need to keep them looking human, so we can’t go overboard. We aren’t trying to make our landscapes look unnatural, either, but we can have some more freedom with colors and toning.
Camera Settings
But before we get into post-production, let’s make sure we are shooting with the most appropriate camera settings. All the post-production in the world can’t save a truly terrible aerial photo, or one that is technically incorrect. Always shoot in manual, and always shoot raw. We created another post and accompanying video that provides a more detailed explanation of the difference between RAW photos and JPEGS. But to summarize, shooting in RAW gives us much more information about each photo, allowing for much more detailed editing. To set your drone camera to shoot in RAW in the DJI GO or DJI GO 4 application, go into camera settings, and select just RAW, or JPEG + RAW if you would like to have both.
I use Lightroom for the majority of my photo editing. Lightroom is a great resource for batch editing a large number of photos because it makes it easy to synchronize the same settings on many photos. All you have to do is edit one photo how you like it, then copy and paste those same settings onto other photos with similar lighting scenarios. To import your photos to Lightroom, select them all and drag them to the Lightroom icon, or open up Lightroom and click File, Import Photos and Video. Once you have imported your photos, you’re ready to start editing.
1. PROFILE CORRECTIONS
I always start by scrolling down to the profile corrections and checking the boxes for “Remove Chromatic Aberration” and “Enable Profile Corrections.” This gets rid of any chromatic aberration, lens distortion, and vignetting that could have happened while flying. If you shoot in RAW, each photo has the data to tell Lightroom what kind of lens was used, so Lightroom automatically chooses the necessary lens corrections, or you can click “Manual” and decide precisely how much you would like to correct.


2. BASIC CORRECTIONS
Basic corrections can start to change the fundamental characteristics of the photo. Here we can change things like temperature & tint (white balance), exposure, contrast, highlights, shadows, clarity, vibrance, and saturation.
A lot of times, I pull the slider much too far in either direction, then find middle ground that looks right, but sometimes more than one setting can be “right.” This is where your artistic license comes in. In this example, I edited the same exact photo in two very different ways: one with the shadows lightened to see the subject and a cool tone, and one with the subject as more of a silhouette, with a warmer, moodier tone.


There is no right or wrong here necessarily, so feel free to play around and figure out exactly what you want your photo to look like. In this photo, I darkened the exposure a bit, boosted the contrast, and brought down both the shadows and the highlights.


3. COLOR TONING
This section is where we can start to get creative with colors, and really fine-tune the colors of the photo to look exactly how we want it to.
HSL stands for hue, saturation, luminance. This part really depends on the photo you are working on, there is no general rule that applies to all photos. Some aerial photos need a lot of color toning, and some need very little, and it also depends on personal style. Some photographers like to keep their photos looking as realistic as possible, while some like to exercise their artistic license and manipulate their photos quite a bit
For this photo, after the basic edits, I scrolled down to the HSL panel and moved the sliders back and forth until I liked the result. And that’s really all there is to it! Have fun with it, but it’s easy to get carried away and make your photo look unrealistic.


4. GRADUATED FILTER TOOL
Sometimes, you need to make adjustments to only one part of a photo, and not other parts. If necessary, you can use the graduated filter tool to select exactly what you would like to edit. Underneath the Histogram the graduated filter tool is the fourth icon from the left. To use this, select the icon, then click and drag on the part of the photo you want to edit. Then, when you move the sliders back and forth, they will only change the selected part of the photo. In this photo, I needed to brighten the exposure of the ground, but when I did so, I blew out a lot of the color and texture in the sky. So I edited the ground and mountains, then added a graduated filter on the top for the sky.


5. COPY AND PASTE
Opening up an entire camera roll can be overwhelming, and editing each photo individually would be extremely time consuming. Luckily, Lightroom makes it easy to edit even hundreds of photos quickly. Once you have completely edited a photo, all you have to do is select that photo first, then all of the photos that you want to look like that first one, and click “Sync.”
6. EXPORT AS JPEG
Once you have the entire group of photos looking how you want them, you can convert them to JPEGs. Click File, then “Export…” or Command + Shift + E. This opens up a dialog box, where you can select the location to save the photos, what you want to name them, etc. Just make sure you scroll down to the section called “File Settings” and choose JPEG.


7. TAKE INTO PHOTOSHOP (PATCH TOOL)

Now that you have your JPEGS, you can decide if they need further retouching. Most of the edits you need to do, you are able to do in Lightroom. I usually only use Photoshop for spot healing, like retouching skin, which is not as necessary for drone photos without close ups on people. But this function can be applied to landscapes as well, for taking out drone propellers that might have snuck in there, or smoothing out clouds, or taking out anything that you don’t want in your photo. The patch tool is by far my favorite. All you have to do is draw around whatever object you want to take out, then click and drag to a part of the photo that you would like to replace it with. Photoshop blends the two together, and fills in the gaps so that the new area blends smoothly.
For example, in this photo, there are two boats that I think unbalance the composition of the photo. Also, there are a few ripples in the water, and other distractions that I feel take away from the overall image. So, after doing all of my Lightroom editing, I brought this photo into Photoshop.


But, in Photoshop, edits have to be done one at a time, so I usually only take my final selects into Photoshop and really spend some time there perfecting them.


As you can see, there is a lot of freedom when it comes to editing great drone photos, so experiment with new things, and have fun with it!
IV. Combining / Merging HDR Images
There are many different ways to process these photos into an HDR photo, but the most common programs used are Photoshop and Lightroom. Other programs include Photomatix, EasyHDR, Aurora, or many others, but each of these require a subscription and can get pretty expensive. Some programs that claim to “create stunning HDR imagery” just throw a filter on a regular photo and call it an HDR. I’ve found that the most reliable programs to merge HDR photos are Photoshop and Lightroom.
IN LIGHTROOM:
Import the photos into Lightroom. Select all 3 (or 5) and right click. Select “Photo Merge,” then “HDR…” and a dialog box pops up.
There isn’t a huge amount of options in this box, but there are a couple worth noting. The “Auto-Align” option can correct any small movement of the camera between the photos. Toggle the “Auto-Tone” option on and off to see which one you like better. If you don’t love what Lightroom comes up with, you can always edit the photo further after processing it.


Next, there are a couple options for deghosting. This can correct any movement of the subject of the photo. For example, in this photo, cars were driving across a famous Massachusetts bridge and shifted slightly between photos. The first photo has no deghosting, while the second photo has the highest amount. As you can see, the top photo has some blurriness in the cars, while in the bottom photo, they are much more clear. The deghosting amount you choose depends on the amount of movement in the photo.


Once you have decided on your settings, click Merge in the bottom right corner. Lightroom then adds your new HDR image to the end of the camera roll.


IN PHOTOSHOP:
The process for merging HDR photos in Photoshop is very similar to Lightroom. To start, open all of your photos in Camera Raw. Select the ones you would like to merge, and right click. Select “Merge to HDR.” A similar dialog box opens up with options to deghost and align the photos. Once you choose your alignment and deghosting settings, click Merge, and select where to save this new image.

And that’s it! Now you have a brand new photo, separate from the ones you took, that you can edit however you like.


What if I have a large quantity of photos to process?
While Photoshop is valuable for producing precise HDR photos and fine-tuning them, it can be time-consuming to process each photo one at a time. One advantage to using Lightroom, as opposed to other software, is that Lightroom can treat groups of photos as “stacks” rather than individual photos. Once you have processed one, the settings can then be copied and pasted onto the rest of the stacks.

To do this, import all of your photos into Lightroom. Select all of the photos, and right-click on one. Select “Stacking,” then “Auto-stack by Capture Time.” The dialog box that pops up asks you how much time you would like between your stacks. Move the slider until you see the number of stacks you are expecting, or how many photos you took. If you shot in AEB mode, this should be pretty accurate because the bracketed photos were taken very quickly one after another.


Once you have your stacks, right click and select “Stacking” then “Collapse All Stacks” to make it easier to see the groups. A small white square with the number of photos will appear in the upper left corner of each stack.
Now make your first HDR like usual. Then select the second stack and press CTRL + Shift + H. This will paste the settings of the last HDR you merged onto the next stack. Repeat this on all of your stacks, and Lightroom will process them all at once, rather than one at a time, and add them to the end of your camera strip, where you can edit them as normal.

13. Tripod Mode
What is Tripod Mode?
Tripod Mode is an extremely versatile intelligent flight mode available on the DJI Spark, Mavic Pro, Mavic Air, Phantom 4, Phantom 4 Pro, and Phantom 4 Advanced. It enables fine control of your drone by limiting the maximum speed and reducing the braking distance. By giving you more control of your drone, Tripod Mode makes it easy to record smooth footage and cinematic shots for a variety of projects and applications. Watch the video below to learn how to enable Tripod Mode and how to use it for filming residential real estate projects, commercial properties, time-lapses and hyperlapses, and even for flying indoors!
What does Tripod Mode do?
Tripod Mode gives you enhanced control of your drone by throttling the maximum flight speed and reducing the braking distance. On the DJI Spark, Mavic Air, and Mavic Pro, the maximum flight speed is limited to 2.2 mph, while on the DJI Phantom 4, Phantom 4 Pro, and Phantom 4 Advanced, the maximum flight speed is limited to 5.6 mph. Tripod Mode also engages the 3D Visioning System on the Phantom 4 Pro to assist in obstacle avoidance.
The 5 Best Uses for Tripod Mode
Limiting the maximum flight speed of your drone doesn’t sound fun at all, but Tripod Mode proves to be extremely useful in a wide variety of applications because of its enhanced control and smooth motion. Here are the five best uses for Tripod Mode that we recommend you try:
I. Avoiding Obstacles
The limited flight speeds and reduced sensitivity of the controls in Tripod Mode gives you more control of your drone for avoiding obstacles in tricky situations. Using Tripod Mode can be particularly beneficial while filming residential real estate projects with trees, bushes, or other obstacles on the property.


II. Filming Close to the Ground
Tripod mode is excellent for getting smooth, cinematic footage while close to the ground. This is ideal for showcasing a property from lower angles, something not every drone pilot considers. The 3-axis gimbal stabilization combined with the slower motion produces some really nice shots, and it can be great mixing this footage in with some higher altitude clips. This is definitely something fun to play around with. And again, with the added control you can more easily avoid trees, telephone poles, and other obstacles.

III. Flying Indoors for Commercial Projects
Not only is tripod mode great for capturing storefront locations and the exterior buildings, but it is perfect for flying indoors. Many companies like to showcase the operation of their equipment and machinery, their assembly line process, or just the interior of a large space, and tripod mode is ideal for this kind of application. The slower movements and added control make it easy to capture smooth footage while keeping the drone a safe distance away from the machinery.


IV. Filming Aerial Time-Lapses and Hyperlapses
Tripod mode is actually so stable and smooth, you can hit record and fly your drone in a single direction to for creating beautiful time-lapses or hyperlapses. Drone time-lapses and hyperlapses are visually stunning, and it can be awesome to explore creating these kinds of videos using Tripod Mode.

V. Anything Else
The flexibility and versatility of Tripod Mode makes it ideal for a wide variety of projects and applications. It is easy to use because the controls for the drone stay the same, it just moves slower and in a more controlled fashion. Using Tripod Mode is a great way to explore creative new shots and for making your drone footage slow, smooth, and cinematic.

Drone Photography: Summary
In this article, you’ve discovered the first steps necessary for getting into drone photography. Sure, it’s an expensive, technical aspect of photography which requires great skill, but it rewards the effort you put in ten-fold.
Hopefully, this article has given you a realistic sense of the costs and obstacles involved in drone photography, but also whet your appetite for creating stunning aerial photographs which will amaze your family and friends, and that you can be proud of for years to come.
Resources
Canva.com, “The Complete Beginner’s Guide to Drone photography. “; dronegenuity.com, “The dronegenuity mega guide to Drone photography. ” by Adam Shore; photographypro.com, ” 8 tips for getting started with drone photography. ” BY Rob Dunsford;