


There are countless items that have been made to make the live’s easier of photographers, from tripods, clamps, bean bags, rifle stocks, carrying cases, bags and backpacks. The list just goes on. Countless companies have been created just to cater to the photographer’s every need. Manfroot and Gitzo are companies that just make tripods and other support devices. Many companies just make studio lights. Companies like Tamrac, LowePro, Tenba, Mindshift, Think Tank and Kata only make protective cases for cameras and photographic equipment.
How to Choose and Buy a Tripod
Choosing a tripod can be an overwhelming experience, given how many different types and choices we are presented with. On one hand, a tripod is a very simple tool to keep our cameras steady when we use them in challenging light conditions. On the other hand, there are so many different variables that come into play when choosing a tripod: How tall should it be? How light should it be? How stable should it be? What kind of weight can it support? How much should I spend on a tripod? These are just some of the questions that might come up as you look into buying a new tripod.

Before getting into the intricate details about tripods, I would like to go over the advantages and disadvantages of tripods and why you might need one for your DSLR or mirrorless camera.
Why Do You Need a Tripod?
So, what is the purpose of a tripod? You might need a tripod for some or all of the following reasons:
- To increase sharpness and depth of field in your images by keeping the camera still in low-light environments when using slow shutter speeds.
- To rest heavy camera gear such as long telephoto lenses on the tripod.
- To increase the quality of the images by keeping the camera ISO low.
- To allow more careful composition, while framing the shot exactly how you want it.
- To shoot HDR and panoramic shots that require exactly the same framing and precision.
- To photograph nighttime objects such as the Moon, planets, stars, etc. as well as painting with light or using available light for landscape and architectural photography.
- To do self-portraits with a camera timer.
- To shoot extreme close-ups/macro (flowers, insects, etc).
- To hold various objects such as flashes, reflectors, etc.
- To shoot at difficult or impossible (hand-held) angles.
- To shoot vibration-free videos.
- To defend yourself 🙂
I personally use a tripod for one main reason – landscape photography. Shooting sunrises and sunsets can be quite challenging, especially when the light conditions are far from ideal. Thanks to image-stabilized lenses and now cameras with excellent built-in image stabilization, the use of a tripod for most types of photography is not necessary when shooting in daylight conditions.
However, some photographers still prefer to use a tripod, as it allows them to keep the camera ISO as low as possible, which not only keeps the amount of noise in images to a minimum but also provides the highest dynamic range the camera sensor can capture. In addition, a tripod can help in proper framing of a subject and allow to capture panoramic and HDR images.
Lastly, there are situations where one must use a tripod in order to slow down and blur action, such as when photographing streams and waterfalls as shown in the image below. Therefore, if you are into landscape photography, a good tripod is a must-have tool in the field.

Occasionally, I might use a tripod for wildlife photography (specifically for bird photography), but not during long hikes, due to inconvenience and weight factors.
Tripod Components – What is a Tripod System?
A tripod system is generally comprised of the following parts:
- Legs – the obvious. Tripod legs are typically made of aluminum, basalt, steel or carbon fiber.
- Head – the part that holds a digital camera or a lens. There are many different types of heads, but the most popular types are ball-heads and pan-tilt heads.
- Centerpost/Center Column – a separate leg that runs through the middle, allowing to further raise the tripod head.
- Feet – good tripods allow changing tripod feet at the end of the legs for indoor and outdoor use.
The cheapest tripods have legs with an integrated non-replaceable head and feet and sometimes have a centerpost, while the top-of-the-line tripods have a modular tripod system that have replaceable feet and allow attaching a separate tripod head (the head is typically not included).
Disadvantages of Using a Tripod
Tripods are nice and can give you many options to get the highest quality image. However, there are also some disadvantages of using tripods, specifically:
-They are potentially heavy. Although there are lightweight carbon-fiber tripods out there, once you add a tripod head, the setup can become heavy.
-They are inconvenient. No matter how small and collapsible a tripod is, it still occupies space and is often inconvenient to carry around or travel with.
-They are difficult to use in crowded environments.
-They can be expensive. Good tripod systems can cost over $1,000.
-They can take time to set up, making you miss the best moment.
You can easily damage your camera and lens if you do not know how to properly operate a tripod, or if the tripod system is cheap and unstable.

Factors to Consider When Choosing a Tripod
You started your tripod shopping spree and have no idea where to start. What factors do you need to consider when purchasing a tripod? As I have pointed out above, purchasing a tripod can be an overwhelming experience, given how many different choices we are presented with from small and compact, to large and heavy. Let’s go through each factor and identify your needs:
Weight Rating
The first thing I would look at is how much weight a tripod can support. Many photographers make the mistake of buying a tripod that can only support a few pounds and is not made for heavy camera equipment. What ends up happening is obvious – at one point or another, the whole thing collapses, destroying the camera and the lens. Always make sure that the tripod you want to buy can support at least 1.5 times more than the total weight of your camera and your heaviest lens. I say “at least” because I prefer to keep it at around 2x more. Do not forget that you will at times apply pressure on your camera and sometimes even rest your hands on the setup if you are shooting with long lenses, which adds to the weight. You might also add a flash or a battery grip to your camera in the future, or potentially shoot with something heavier, so you have to keep all of that in mind.
Tripod Height
I always recommend buying a tripod that matches your height, so that you do not have to bend to look into the viewfinder. Once you put your camera on a tripod, the viewfinder should be at your eye level. It is OK if it goes higher than your eye level because you can always adjust the legs to be shorter. However, if it is much below your eye level, you will find yourself bending all the time, which can be a tiring experience, especially when you are waiting for some kind of action and need to constantly look through the viewfinder.
If you are buying a tripod with an attached head, you want the tip of the head to be on your jaw level. If you are buying a modular tripod with a separate head, make sure that the legs end approximately on your shoulder level.
Another factor to consider is tripod height when it is folded for easier travel. Do you need it to fit in your carry-on luggage? Mine barely does diagonally, with feet removed, and I take it with me everywhere I go.

Tripod Weight and Construction
Weight is a significant factor when choosing a tripod. You do not want your tripod to be too heavy, because you will find yourself leaving it at home, rather than taking it with you on the road. The lightest tripods are made of carbon-fiber material, which is extremely durable, stable and does not rust. While carbon-fiber is the best material for a tripod, it, unfortunately, comes with a high price tag.
The next best construction material is aluminum, which is heavier than carbon fiber. Most cheaper tripods are made of aluminum today. You can also find tripods made of stainless steel, but those are generally used for video equipment and are too heavy for regular use.
In terms of total weight, try to keep the tripod legs without the head under 5 pounds. Generally, carbon fiber legs are between 3 and 4 pounds (but can be lighter or heavier depending on what they are made for), while aluminum legs can be between 5 and 6 pounds and heavier, depending on the size and how much weight they can support. Basalt lava legs are somewhere in-between both in terms of weight and cost.

Tripod Legs
Tripod legs generally come in two forms – tubular and non-tubular. All carbon-fiber legs come in tubular form and have a threaded twist-lock system to secure the legs, while aluminum, basalt, and steel tripods might come in different shapes with a flip-lock. Depending on the maximum height of the tripod, there might be between 3 and 5 sections on tripod legs. The more sections, the higher the tripod and generally a little less stable.
Tripod Feet
Some advanced tripods will allow you to replace tripod feet for different conditions and situations – they just unscrew on the bottom of the tripod legs. There are different types of tripod feet for indoors (rubber or plastic) and outdoor use (metal spikes). Unless you are planning to shoot in icy, rainy/slippery conditions, the standard rubber feet that come with your tripod should work just fine.

Centerpost
Some tripods come with a centerpost – a single leg in the middle of the tripod that allows you to increase or decrease the height of the camera by simply moving the centerpost in upward or downward direction. Although some photographers find it convenient and nice to have, I strongly advise against having a centerpost on a tripod. A centerpost defeats the whole purpose of a tripod – it is essentially the same thing as having a monopod on top of a tripod. It might not be as pronounced if you are only shooting with a wide-angle lens, but once you set up a long telephoto lens, you will quickly understand that using a centerpost will cause too much vibration. If you still want to get a centerpost for whatever reason, make sure that it can fully decline to the same level as where the tripod legs meet. The centerpost should never wobble at its lowest level.

Tripod Head
A tripod head is the most essential part of the tripod system. It is responsible for securely holding camera equipment and controlling camera movement. A modular tripod system does not come with a head and you have to buy it separately. When choosing a tripod head, always make sure that it can support at least the same amount of weight your tripod legs can.

There are generally three types of heads commonly available:
- Pan-Tilt Head – either with a single handle for horizontal movement or dual handles for both horizontal and vertical movement. This is the most common type of head that is typically built into cheaper tripods.
- Ball-Head – compared to pan-tilt heads, ball-heads only have one control that loosens or tightens the grip. They are very flexible and allow very smooth operation while keeping the camera/lens securely tightened.
- Gimbal Head – a specialized head for long and heavy 300mm+ lenses. Compared to pan-tilt heads and ball-heads, gimbal heads perfectly balance the camera and heavy lens and are best suited for fast-action photography. They are extremely easy to use in any direction and do not require tightening the head every time the camera/lens moves.
I started out with a pan-tilt head and eventually switched over to a ball-head with a quick-release system (see next), due to flexibility and easiness of use.

Quick-Release System
Every modern camera comes with a thread on its bottom that allows you to attach it to a tripod or a monopod (heavy lenses also come with a similar thread on the tripod collar). This threaded system makes it extremely inconvenient to attach cameras and lenses on tripods because you have to either rotate the camera or the tripod to attach them together. To make it easier and more convenient for photographers, manufacturers came up with a great solution – to attach a small removable plate on the camera or lens, which then can be tightly secured on the tripod head.
Cheaper tripods come with a simple plastic plate that can be attached to any camera or lens, while some of the more expensive tripod heads come with a more durable plate. The best quick-release system, however, is the Arca-Swiss Quick Release System. It has more or less become a standard among manufacturers and it has proven to be a very effective solution for quick and easy operation. Compared to plastic plates, the Arca-Swiss Quick Release System is made of very strong aluminum and allows attaching the camera/lens on a tripod without the need to rotate anything. A quick-release plate is permanently attached to a camera or lens, which then easily slides into a quick-release clamp (pictured below). The locking mechanism is simple, yet super tight for vibration-free operation.

The beauty of this system is that some manufacturers like Really Right Stuff and Kirk Enterprises offer not only plates for almost any camera and lens but also replacement lens tripod collars, flash brackets, L-brackets, and other accessories for the Arca-Swiss Quick Release System. The only downside of the Arca-Swiss Quick Release System is that it is not cheap – you also have to purchase separate plates for each camera and lens.
Stability
A heavy tripod does not always mean that it is stable. There are plenty of tripod systems out there that are heavy and durable, yet lack the much-needed stability when used in various weather conditions. When a tripod is fully set up, it has to withstand not only wind but also occasional bumps and knocks that might happen in the field. You always need to make sure that your camera and lens balance on a tripod rather than lean towards one direction, because you might end up damaging your equipment if the head is not fully tightened or if the front outweighs the back and everything falls on the ground.

Which Tripod Should you Buy?
Now that you are familiar with all the criteria for selecting the right tripod, you are probably wondering which tripod you should buy for your photography needs. Since I have numerously gone through the experience of shopping for tripods and have seen others do the same, let me tell you what many photographers end up doing. They first look for the cheapest tripod available that will be good enough to hold their first camera, since they have no idea if they really need it or do not know how often they would be using it. The tripod would cost between $75 and $150 for the legs and the head, which is a good price for a simple tool.
Next, they purchase a longer and heavier lens and add more weight to the setup. All of a sudden, they find that the cheap tripod is not good enough and they need something more durable and stable. After making the first mistake, they suddenly realize that they need to do more research and they spend countless hours reading about tripods on different websites and forums. Despite all recommendations from the pros, they are not willing to invest on a top-of-the-line tripod with a good ball-head, so they end up getting a popular tripod system for $300-500 with a separate head. Seems like a great investment and the tripod seems to be much better than the previous one.
After a year or two, they realize that their last purchase was not that good, because the tripod is too heavy and hard to use, especially for traveling. They realize that they should have listened to the pros in the beginning and bought a solid tripod system. Does this sound familiar? It certainly does for me, because I went through a similar experience and wasted too much effort and money.
Other photographers might have a different story, where they purchased an inexpensive tripod they like in the beginning and they are still happily using it today. All it says about them is that they are not using their tripods as much and what they have is good enough for occasional use. Anybody who heavily relies on a tripod (especially landscape and architectural photographers) ends up buying two to three different tripods to eventually end up with the best.

It seems that it is hard to avoid purchasing multiple tripods because it is often impossible to justify the cost of a good system for someone who does not heavily use a tripod. If someone told me that I would eventually spend more than $500 on a tripod system when I just got into photography, I would have never believed them – that’s too much money to spend on a darn tripod! But it all turned out to be true, because I actually ended up spending a lot more than $500 overtime, and I wish I could go back in time and buy the right stuff from the very beginning.
If I recommend someone who has just bought their first DSLR or a mirrorless camera to get the best tripod system that costs between $800 and $1,200, I will almost certainly get a “you are crazy” look, no matter how well I explain my story. Therefore, here is what I would recommend:
If you currently do not have a tripod and you want to buy one, get the cheapest aluminum tripod system with an integrated head for less than $150 total. Why do I recommend the cheapest tripod? Because you first need to understand how much you will be using it. Six months down the road you might end up doing other types of photography that do not require a tripod or you might find yourself on a path of becoming a good landscape or macro photographer. A cheap tripod will give you enough information to understand the real role of a tripod in your photography.
If you already have a cheap tripod and you want to get something better, save yourself a lot of money and frustration and get the best tripod with an Arca-swiss quick release system – skip the middle. Some people buy cheaper legs and heads and either find them too heavy or unstable. One common problem with other quick-release systems is the fact that cheaper plates do not grip well on cameras and start wiggling and rotating relative to the base, making it a nightmare for things like panoramic photography.
Best Tripods to Purchase
My tripod recommendations, based on the above, are divided into two categories: “low-budget” (under $150) and “top of the line” (over $500).
Low-budget Tripods (under $150)
Here are the best low-budget tripods under $150 that I recommend:
Sunpak Ultra 7000 – $69.99. Very cheap, weighs 4.1 pounds (1.9 kg) and can support up to 12.3 pounds (5.6 kg) of total weight. This is very similar to the first tripod I bought for myself from a local camera store.
Slik Pro AL-324DX Tripod with 3-Way Pan/Tilt Head – $119.55. Although maximum height is too short at only 57.5″ (146 cm), it is reasonably lightweight at 3.8 pounds (1.72 kg) and can support up to 8 lbs (3.63 kg) of total weight. This would be a great tripod to take on long hikes.
Slik Pro 700DX Tripod with 3-Way Pan/Tilt Head – $139.95. Although it is a little heavy at 7 pounds (3.18 kg), it can support up to 15 pounds (6.8 kg) of total weight and can be extended all the way to 74.8″ (190 cm).
Top-of-the-line Tripods (over $500)
Top-of-the-line tripod systems have separate legs and replaceable heads. Let’s start with the tripod legs. The best legs are made of carbon fiber and manufactured by such brands as Gitzo (top choice) and Really Right Stuff. I cannot really recommend a particular model, because you should choose one that fits your height and weight requirements. If you buy Gitzo, their best and the most stable line is the “Systematic” 6x Carbon Fiber series without a center column. I personally have an older version of the Gitzo Systematic legs that I have been happily using for years and they have never failed me once.
In terms of tripod heads, if you are not shooting with very long lenses, you should definitely go for a ball-head. Here are the best ball-heads available in the market today:
Arca-Swiss Z1 – $379.95. I have used this ball-head in the past and I really like it.
Kirk BH1 – $385.00. An excellent alternative to the Arca-Swiss Z1.
Really Right Stuff BH-55 Pro – $415.00. Another great ball-head that is better in quality than the Arca-Swiss Z1 and Kirk BH1.
FLM CB-58 – $474.00. Another superb ball-head with great features (see my FLM Ballhead review)
These are all relatively big ball-heads with huge load capacities, which might be overkill for your particular needs. I recommend exploring other smaller ball-heads by the above brands to see if there is a better fit. For example, I personally stay away from full-size ball-heads, because they are huge and heavy. My preference is to use smaller and lighter ball-heads that carry enough load to fit most of my needs, especially when traveling. My personal favorites are the RRS BH-30 and FLM CB-32 – these are the ball-heads I use most often for my work.
If you are shooting with long and heavy lenses, your best choice is going to be the Wimberley Gimbal (top choice) or the much smaller Sidekick (requires a solid ball-head to work).
There are many other cheaper and more expensive brands out there that manufacture very solid ball-heads, but I’m not going to list through them all in this article.
One more thing worth noting is that some of the higher-end tripods sometimes come with a hook under the platform. Those can be useful to hang a backpack or a sandbag for additional stability, but you have to be careful when shooting in windy conditions, as it can move the weight and potentially cause even more camera shake.
A Good Tripod is a Life-Long Investment
Unlike cameras and even lenses that come and go, a good tripod is a life-long investment. If you buy a good tripod that is easy to disassemble and reassemble, chances are, you will be able to easily clean and even repair it yourself without having to send it anywhere. Well-known tripod manufacturers will provide long-term service and repair options in case any part of the tripod malfunctions or breaks. This way, you do not have to worry about replacing your tripod in the future…
Remember, with tripods, you often get what you pay for!
Tripod Heads
Pan-Tilt Heads
When most people think about tripod functionality, they envision the movements and handle-operated style of the 2- or 3-Way Pan-Tilt head, which features from one to three independent handles and/or knobs to control vertical-tilt, horizontal-tilt, and 360-degree pan. This classic design has remained popular, especially among beginners, because of its straightforward operation and relatively precise movement, giving the user control over each plane of movement without having an impact on the other planes. To alter the position of each plane, simply loosen the handle controlling the desired movement, move the camera into position, and tighten the handle firmly to secure the camera in place. Three-way heads are commonly utilized for landscape, portraiture, still life, and macro or product photography, but they can be used for nearly every photographic application.

Pan Head Perks
+Precise and individual control of each plane of adjustment
+Smooth operation for video
+More affordable price
Pan Head Drawbacks
–Slower and more complicated to operate
–Heavier weight, added bulk can lead to snags
–Harder to store/transport
–Potential for jerky movement or drifting
Ball Heads
A more recent innovation than the pan head, the Ball Head has become extremely popular, due in part to its more compact size and versatility. Ball heads trade out extraneous handles and knobs to put the camera in the driver’s seat, which can be moved into any position by loosening one or more tiny tension control knobs. This style head typically features one or more drop notches in the friction collar for added flexibility of camera movement, allowing for extreme up or down angles and vertical camera orientation.

The most basic ball heads control camera movement by tightening or loosening the ball joint using a single knob. Higher-end models may offer additional adjustments, such as a secondary drag control to hold the camera in place when the tension control is disengaged, while still allowing specific movements. Still other models incorporate an independent panning control, allowing the entire mechanism to be rotated horizontally 360° while maintaining the orientation of the ball joint. Although the simpler mechanism of a ball head may have fewer parts, the components must be precisely machined to provide smooth movement, increasing the average price.
Due to its smaller size and ease of use, this style head is popular among sports, action, outdoor adventure, wildlife, and travel photographers—although, like the pan-tilt head, it can be used for almost any photographic application.
Ball Head Perks
+Lighter weight, more portable
+Easy to use and adjust
+More intuitive control, quicker to operate
+Good for tracking moving objects
Ball Head Drawbacks
–Less precise, harder to achieve exact level
–Not as sturdy, could be prone to camera slippage
–Higher price point
Pistol Grip Heads
Basically a variation on the ball head, a pistol grip head (also known as a grip action or joystick head) allows you to reposition your camera by squeezing the grip with a one-handed movement. This releases the ball, freeing you to position the head at the desired angle, then you simply release the trigger to lock everything in place. Using a pistol grip head tends to be an acquired taste—some people love them, while others find them to be a nuisance. Pistol grips are generally heavier, bulkier, and more expensive than a standard ball head, and some models can be prone to slippage. But their fast, intuitive handling can be a plus for action subjects like sports, outdoor adventure, wildlife, and travel photography. Pistol grips are less effective for genres like studio, macro, and still life photography, when more precise camera adjustments are needed.

Pistol Grip Head Perks
+Fast, intuitive to operate, great for action shooting
+Ergonomic design facilitates single-handed adjustments
+No fumbling with multiple handles or knobs
Pistol Grip Head Drawbacks
–Higher price point
–Heavier and bulkier than a regular ball head
–Some models can be prone to slippage
–Squeeze grip mechanism requires hand strength, which can be challenging for those with arthritis or other hand ailments
Gimbal Heads
Advanced sports and wildlife photographers often gravitate to Gimbal Heads to help track a moving subject while supporting and balancing a large lens and camera body. Typically the largest and heaviest style tripod head, when properly balanced, a gimbal head will maintain its position even after your hand leaves the camera.

It’s important to note that gimbal heads for still photography are distinct from a video gimbal. The former is designed to be placed on a tripod or monopod and does not contain electronic parts, while a gimbal for motion footage uses motors, rotating gyros, and electronics to resist the camera’s inertia and keep it level while in motion. Video gimbals are used handheld or attached to a moving object rather than a tripod. These gimbals generally have less weight capacity than a tripod-mounted gimbal head.

Gimbal heads for photography come in two different styles: cradle-mounted (the more traditional type) and a side-mounted version. With a cradle-mounted gimbal, the lens foot attaches to an L-shaped arm that extends down from the gimbal’s pivot point to cradle your gear. This style gimbal head is heavier, bulkier, and generally more expensive than the side-mounted version. With a side-mounted head, the lens foot attaches directly to the gimbal’s pivot point, resulting in the camera rig being positioned at 90 degrees from its placement in the cradle mount.
Most importantly, keep in mind that a lens-mounting plate is not included with a gimbal head; one must be specially selected for the lens being used. Before investing in a gimbal system, always make sure to purchase an appropriate lens-mounting plate with enough length to balance your rig sufficiently.
Gimbal Head Perks
+Steady support for large lenses
+Mobility for capturing and tracking fast action
+Video gimbals are smaller and more portable than other types of stabilization for motion footage
Gimbal Head Drawbacks
–Photo and videography gimbals are two distinct items
–Largest and heaviest style tripod head
–Requires proper balancing for optimal use
–Mounting plate must be purchased separately
Geared Heads
A geared tripod head enables you to position your camera incrementally along geared tracks on vertical, horizontal, and rotational planes by using three knobs that control pan, tilt, and yaw. This allows for precise adjustments with no drifting or camera slippage. For added precision, most geared heads feature two or more built-in spirit levels, so you know when everything is level. The exacting nature of this style head is ideal for genres such as architectural, industrial, still life, and large format photography, although its substantial heft and complex operation makes it a serious investment.

For everything you’ve ever wanted to learn about geared tripod heads but didn’t know to ask, check out our Geared Tripod Head Roundup, by Allan Weitz.
Geared Head Perks
+Ultimate precision
+Solid support for large cameras, high load capacity
Geared Head Drawbacks
–Slower to work with
–Very bulky and heavy
–More expensive price point
Fluid Heads
With nearly every stills camera able to perform advanced video functions, many photographers now incorporate video components into their tripod kits, with one important consideration being the fluid tripod head. An improvement on the more basic “friction” head, fluid heads are designed to decrease resistance when recording video. The hydraulic damping system of a fluid head controls drag while panning and tilting, and its integrated “fluid” cartridge helps reduce the unwanted jitters, vibrations, and shakes of sudden camera movements. While each tripod head features a maximum load capacity, a fluid head’s declared maximum is a firm guideline that should not be crossed. Proper weight balance is essential for a fluid head to perform well, and resistance from an unbalanced load can negate the head’s video-smoothing properties—especially in the hands of entry-level users. Although a fluid head may be overkill for basic still photography needs, it is extremely helpful for ensuring smooth motion footage, and its damping properties can help avoid camera shake when shooting with long lenses.

Fluid Head Perks
+Sturdier build than friction heads
+Complex design helps the dampen sudden movement
+Provides very smooth pan and tilt movement, overcomes earthquake effect
Fluid Head Drawbacks
–Expensive price point
–Very bulky and heavier than other head styles
Panoramic and Time-Lapse and Sliders
Tripods are specifically designed to stabilize your gear, making the inclusion of Panoramic & Time Lapse Heads and Pro Video Camera Sliders seem counterintuitive here. Yet, one good reason they deserve a spot is due to the precise control they exert over your camera’s movement when capturing multiple images for an ultrawide still photo or immersive motion clip. A dedicated tripod head is certainly not a requirement for creating successful scenes, but the accuracy of such tools to eliminate parallax, control shooting angles, and standardize the degree of image overlap can save a significant amount of time in post-processing. Panoramic heads are particularly useful to architectural and landscape photographers seeking to capture expansive vistas, while time-lapse heads and sliders are increasingly popular and widely accessible as tools that allow almost anyone to harness dramatic cinematic effects.

For much more on panoramic and time lapse heads and sliders, dive into Todd Vorenkamp’s Explora article Tools of the Trade for Panoramic Photographers and Shawn Steiner’s Time-Lapse Tips and Tools.
Panoramic / Time Lapse Head / Slider Perks
+High precision capture without the worry of parallax
+Allows you to generate large files with lots of detail
Panoramic / Time Lapse Head / Slider Drawbacks
–Learning curve to master use fully
–Challenging to use in windy conditions or changing light
–Large files require robust image processing and storage capabilities
Camera Mounts: Quick releases, Arca-Swiss-Compatible Plates, and L Brackets
An inventory of various style tripod heads means nothing without a word (or more) about how your camera mounts on different types of support systems. Most cameras have a female thread on their bottom surface sized at either 1/4-20 UNC (for consumer cameras) or 3/8-16 UNC (for larger, professional cameras and lenses). This thread allows for the introduction of a flat metal plate generally known as a quick release which, as the name implies, makes it quick and easy to remove and resecure your camera to a corresponding plate on the tripod head. Angled or grooved metal jaws on each plate keep the camera clamped into position under a locknut or clamp.

While Arca-Swiss-compatible plates have become the most popular, and hence most desirable, type of quick release, it’s important to realize this is not a universal standard. Many tripod makers still use their own quick-release plate designs, so this is a detail worth checking before purchasing a tripod system or individual head. Additionally, if you’ll be using multiple cameras with the same tripod, consider attaching a quick-release plate to the bottom of each camera to save time when preparing for your next shot.
")
Another handy accessory that will allow for maximum efficiency in the field is an L-Bracket, available either in camera-specific or universal models. Like its name, this L-shaped plate serves a similar purpose as the quick release, while keeping your camera centered on the head to minimize slippage and for maximum efficiency when switching between portrait and landscape orientation.
Low-Clearance Pods: Beanbags, Groundpods, Chest Supports, Tabletop, and Mini Tripods
If you need to stabilize your camera for a sharp image but a tripod is either not permitted or sufficient set-up space cannot be found—fear not—there is a wide variety of Counter, Chest, and Strap Pods that can provide support on almost any surface, including your own body.

The ever-malleable beanbag is arguably more stable than a tripod or monopod because of its low center of gravity and very wide base. Often filled with rice or beans (as the name implies), you can basically fill an empty beanbag with any granular substance to stabilize and cushion your gear. One benefit to using a beanbag on the road is the option to save space and weight by carrying an empty bag, which you can fill after arrival at your destination. What’s more, a beanbag can serve double duty in weighing down your full-sized tripod when conditions permit.
Another good option for getting really low is the ground pod. Attach your camera directly to the pod for a frog’s eye view or add your choice of tripod head for a greater range of low-angle shots. Certain ground pods can be mounted to a solid surface to keep your camera steady wherever you want it.

Yet, perhaps the most popular solution for stability on the go is the tabletop or mini tripod. Often sold as a single unit with head and legs pre-attached and a maximum height of a foot or less, these diminutive stabilizers are ideal for travelers, hikers, or those shooting in areas where full-size camera supports may be prohibited. Bendable variations, such as the Joby Gorillapod line, can be wrapped around a variety of objects (such as tree branches, pipes, and handlebars) to keep your camera steady on uneven terrain or to achieve unique photographic perspectives.
")
For even more shopping suggestions in the realm of action adventure motion capture, check out M. Brett Smith’s story, 10 Awesome Mounts for Your Action Cam.
Low Clearance Pod Perks
+More economical than a full-sized tripod
+Light weight and compact size make them easy to pack and carry
+Provides camera support in conditions where full-sized tripods cannot be used
Low Clearance Pod Drawbacks
–Limited load capacity
–Smaller size may compromise stability and/or full range of motion
Monopods, Extension Poles, and Selfie Sticks
Finally, while some might discount it as the tripod’s unhinged cousin, the humble monopod deserves mention for its ability to steady the weight of your camera setup in conditions where a larger rig is ill adapted for use. Monopods are quicker to set up/take down and easier to transport than conventional tripods, making them particularly useful in taming fast action such as sports or wildlife situations when there is sufficient light.
These handy devices come in many sizes and form factors to serve photographers and videographers of all types, from those making casual grab shots or vlogging on the go to professionals seeking to stabilize a monster lens. They can also be employed in a similar manner as their big brother, the Extension Camera Pole, to reach a remote scene that is otherwise inaccessible from view.

And here’s a fun fact: Select tripod models can be conveniently converted to a monopod by means of a removable leg that attaches to the tripod’s center column.
Another take on the monopod is the selfie stick or camera pole, which exploded as a fad along with the rise of high-end cell phone cameras. Although the aptly nicknamed “Wand of Narcissus” isn’t as ubiquitous today as a few years back, it has not lost its usefulness as a portable tool for maximizing creativity when capturing life on the go, especially if you want to include yourself and your friends in on the fun.
Care to learn more about the full range of selfie sticks? Jump to Explora’s Selfie Sticks: A B&H Buying Guide, by John Harris.
Monopod/Selfie Stick Perks
+Lightweight, quick and easy to set up
+Less expensive than purchasing a tripod
+Useful in locations that do not allow for a larger setup
+Potential for capturing otherwise inaccessible scenes
+Can also serve as a hiking pole on outdoor adventures
Monopod/Selfie Stick Drawbacks
–Not as stable as a three-legged camera support
Assembling Your Own Kit
We hope that the above information will make it somewhat easier to select a tripod that’s fully suited to your needs or to assemble your own custom support kit. While there are many brands to choose from and multiple designs and functions to review, always remember that your tripod setup is, first and foremost, designed to support your gear safely, and that special consideration should always be given to the recommended load capacities of any tripod component you purchase.
Miscellaneous Items
Binoculars or a Monocular

Wildlife photography is often a waiting game and you might spend hours scanning the horizon for your intended subject. It’s simply not practical or comfortable to do this with your camera and lens – a pair of binoculars or a monocular is an absolutely essential accessory for a wildlife photographer. A monocular can be a great choice when you have to hike to your location because they are smaller, lighter and fit easily onto your belt. If you are shooting from your car or a safari vehicle, then a pair of binoculars will likely be a better choice. In fact, for many people, there’s good reason to have access to both options in your gear closet but I’ll leave that decision up to you.
The most popular magnifications are 8X and 10X. 10X devices are physically larger but in most cases, I don’t find them to be prohibitive. There is probably some math that you could do to work out the 35mm equivalent of a 10X pair of binoculars but all you really need to know is that it’s a lot! A 10X set of binoculars is going to show you a far closer view than your super-telephoto lens does, and that’s the important thing.
When you’re looking at specifications you’ll see binoculars are always represented by two numbers. For example; 10X42 or 8X32. The first number is of course the magnification, while the second number is the size of the objective lens in millimetres. A larger lens lets more light in and offers a brighter view through the eyepieces, at the expense of added weight of course. Juggling these two numbers gives rise to a huge variety of different size options. Another thing that you’ll likely want to take notice of is the waterproofing. Since we can’t really guarantee what the weather will be like, I would always opt for a fully waterproof setup. In most cases, this actually adds very little cost to the equation.

When you start looking at the options that are out there you’ll also see a huge variation in pricing, even when comparing binoculars with seemingly similar specifications. Price is somewhat determined by the quality of the optics, and also the size of the device. It’s possible to get very small 10X devices, but the smaller you make a 10X device, the more expensive it becomes to maintain good optical quality in a miniature form factor. It’s a definite balancing act so you need to decide what’s most important to you between price, magnification, physical size and optical quality.
A Headlamp

The majority of good wildlife photography opportunities will be early in the morning or late in the evening when the light is less harsh. This almost certainly means that you’ll spend some time in the darkness, whether it be before or after your photography session. I personally like to carry both a headlamp and a flashlight with me. The headlamp is perfect when you need two hands to rummage in a camera bag, and they also do a great job of illuminating your immediate surroundings when you are walking in the dark.
A small, powerful LED torch can be great as well though, as this allows you to light up distant objects and it can also be a handy light painting tool! I use the Petzl Swift RL. You can recharge it via USB and it also has a red LED mode which is great for illuminating closer objects, like your camera, but without affecting your night vision. For photographers, I would consider that to be a must-have feature, and you’ll also find it in the cheaper Petzl Bindi rechargeable headlamp, which is like the baby brother to the Swift RL. I try to keep as many of my accessories as possible chargeable via USB so that I can top them up with my Goal Zero Venture 30 battery pack.
For LED flashlights I rely on a couple of slightly different models from Fenix. These kinds of accessories don’t have to break the bank, but they can make a huge difference to the success of your photo mission!

Bean bags are an excellent way to support your camera and lens combination where a tripod just isn’t practical. They are often used in safari vehicles, but of course, they work just as well in your own vehicle! LensCoat LensSacks are the perfect answer and they come in a couple of different sizes. Their design means they rest easily over a car door, or provide a perfect lens cradle when being used on the ground for low angle shooting. The idea is that you empty the sacks for travel, then fill them up with whatever you can find when you get to your destination. Buckwheat hulls work well, or you can simply use rice! I keep one of these in the back of my car at all times – you just never know when you’ll come across something interesting to shoot. As with many of the items on this list, they are inexpensive and don’t take up a lot of room, yet have the ability to really enhance your wildlife photography experiences.

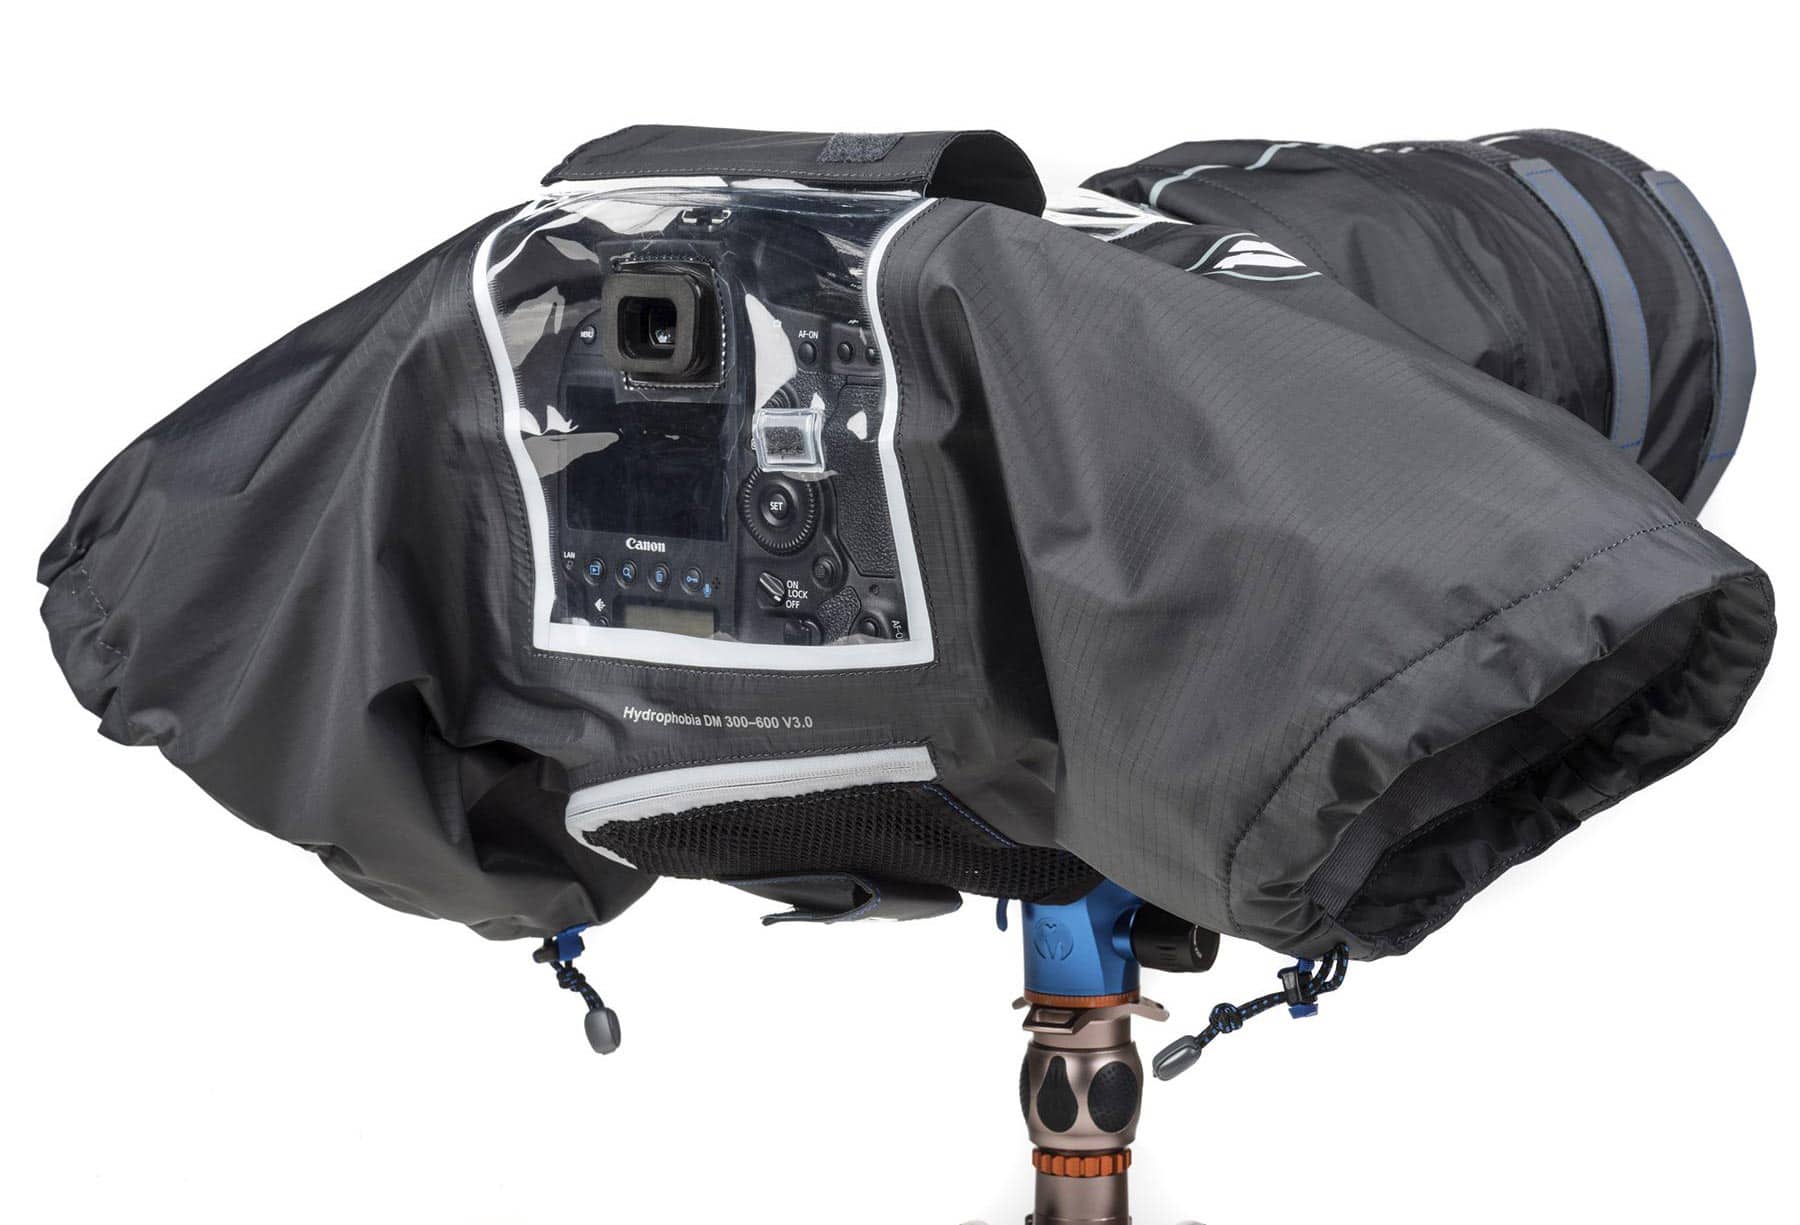
When you consider the cost of your lens, a waterproof cover for it should be a no-brainer. Since it is impossible to make any guarantees on the weather, it’s an inevitability that at some point you’ll be caught in the rain while trying to find, or waiting for your chosen subject. There actually aren’t a whole lot of options out there for quality long lens covers, but the Think Tank Hydrophobia 300-600 V3 is the best-known one for super-telephoto lenses, and the Hydrophobia 70-200 V3 is the best one for telephoto zooms such as a 70-200mm, 100-400mm or 80-400mm. As the name of the 300-600 suggests, it’s good for lenses sized from 300mm f/2.8 up to 600mm f/4, but it’ll also work with an 800mm f/5.6 or longer tele-zooms such as a Tamron 150-600mm, Nikon 200-500mm or Sigma 60-600mm.
Some of My Gear


Camera bags and cases for photographers: choose your type!
The best camera bags will protect your camera kit from knocks and bumps, and very often the weather too. They let you keep all your camera kit close to hand and accessible when you need it. But camera bags come in six main types, so which do you need? Our guide below goes through all the pros and cons, picks a some of our favorite camera bags and has links to more detailed guides on each type.

Camera bags, just like cameras and the photographers who use them, are not created equal. That means there’s no one-size-fits-all solution when it comes to finding the perfect bag. Most photographers will find that the type of bag they need varies from one shoot to the next—and may even depend upon where they’re going and what they’re shooting.

With so many bags out there to choose from, finding the one that’s perfect for your needs is daunting, to say the least. But rest easy—there are ways to find the bag that meets all your needs…
Knowing how your bag will be used, what you’ll be shooting with, and even how you’ll be transporting the bag are all factors that are important to consider before making the purchase. The right bag will make your job easier and make shooting more efficient, while the wrong bag can quickly become a frustrating hindrance. Let’s look at some of the things to consider when buying a bag.
General Considerations
1. Size
Consider what equipment you need to fit inside your camera bag. If you want your bag to take two camera bodies then you’ll obviously have to ignore the smaller products. That goes double if you have DSLR cameras, which tend to be bigger than mirrorless cameras. Camera bag capacities are usually measured in liters. Smaller bags (big enough for one camera) are around 15L, while larger ones (good for at least two cameras, plus lenses and more) can be around 40L or larger. But in general, most standard bags will be in the 20-30L range. This is usually enough for your camera gear, plus a laptop or tablet and other accessories, like ND filters.

Either way, it’s worth considering lenses. It goes without saying that if you want to take a large zoom lens and a couple of camera bodies then you are going to be looking for one of the bigger camera bags, like one from the Vanguard Alta Sky range. However, if you have a mirrorless camera and a single zoom lens then you can probably fit them into a reasonably small product. While a 30-liter bag is tempting, that does also means a heavy load to lug around.
2. Flight considerations
If you do a lot of flying with your photography gear then you need to buy a camera bag that doubles as a carry on. That means thinking about dimensions.
Annoyingly, the restrictions keep changing and the allowances are shrinking, so purchasing something that just about fits into the overhead locker one year might not work next year.

As examples, for British Airways it’s 56x45x25cm (as well as a 40x30x15cm laptop/handbag, with the combined weight not to exceed 23kg) while for American Airlines it’s 56x36x23cm.
Keep an eye on a regularly-updated guide to cabin bag sizes and weight restrictions(opens in new tab)for the latest guidance. And if you fly a lot, consider getting a roller bag like the Manfrotto Pro Light Reloader Switch-55 (below).
3. Extra features
Camera bags are not just for storing cameras. Some camera bags have straps on the outside to accommodate a tripod. Others have straps all over them, so can host multiple tripods.
It makes sense to choose a camera bag with lots of small pockets, which can be useful not only for storing accessories like shutter release cables, filters, SD cards and batteries, but also snacks.

If you’re a landscape photographer going off into the wilds then you’re going to need room for things like food, water and an extra layer. Some have a pop-out rain cover.
A lot of mid-size and large bags have built-in laptop and/or tablet sections by default, but the sleeves themselves can add to the bulk of the bag, which is worth bearing in mind if space is likely to be a premium.
4. Access
Do you need to access your camera quickly? If so, then find a camera back that boasts side access as a minimum, so you can slide it round and take your camera out without removing the bag from your shoulders or back.

However, it may be that you would rather have more security while you’re on the go. If that’s the case then consider choosing a camera bag with top access only. Even more secure are camera backpacks that open from the back, so when you wear them it’s impossible for opportunist thieves to open.
5. Build quality and weight
It goes without saying that you want your camera bag to be of the best quality if you want it to protect your camera gear. Look for ballistic nylon on the outside, which is tough and adds water resistance, and good quality Velcro dividers on the inside that can be moved and reshaped around your specific camera and lenses.

Camera bags have to put up with a lot of wear and tear, so look for good quality zips, excellent stitching, solid grab handles and well-padded shoulder straps. And if you’re not quite sure where to start, check out our guide to the best camera bags you can buy.
6.Styles of Camera Bags and their Uses
A) You’re going to shoot events/action, but won’t need to change out a lens.
• Holsters:
Holsters and pouches are designed to carry a single camera with lens attached. Depending on the size, these could be designed for compact cameras, mirrorless cameras or DSLRs. They’re great if you’re not planning on taking or changing lenses.The smallest bag types, these are made for very light setups. Some can even be worn on a belt, like a real holster! They’re ideal for a single camera and lens, and smaller sizes are also called camera pouches.
Maybe it’s a soccer game, maybe it’s an afternoon safari at the zoo with your kids. All you need is a single zoom lens to get you through the shoot—that’s when a digital holster can do the job. A good holster, like the Think Tank Photo Digital Holster 10 V2.0, offers more features and uses than the name implies. When you think “holster,” you’re probably thinking about something strapped around your waist during the days of the wild, Wild West. But the only similarity here is that it lets you draw, aim, and shoot with ease—particularly when used with Think Tank’s Pro Speed Belt, Thin Skin Belt, or Steroid Speed Belt.

The holster is really a form-fitting case that will hug your camera and lens. (Always check for compatibility of both the camera and lens before purchasing any bag). One of the great features of this particular model is that it lets you keep the tripod plate attached to the camera, so if you need to set up a shoot for a long exposure, you won’t have to take the camera out of the case and add the tripod plate—and risk losing the shot.

Although it’s designed for people who are traveling light, it still has room for essentials—like the lens cap, batteries, etc.—and it even has a business-card holder under the top grab handle, in case you want to drum up a little business during your shoot. Of course, anyone who shoots outdoor events knows that Mother Nature can be fickle and unpredictable, so having a rain cover with you at all times is essential. That’s another great feature this bag offers—a built-in rain cover.
B) You’re more of a point-and-shoot photographer… but you take it very seriously.
Sling bags:
Sling bags aim to offer the comfort of a backpack with the access of a shoulder bag. They can swing round to the front to be opened like a shoulder bag and swing round to your back like a backpack. They are kind of halfway-house between a shoulder bag and a backpack.Kind of a marriage between backpacks and shoulder bags, sling bags are single-strap bags worn across one shoulder but on the back. The sling design means that they can be slung around the body quickly to allow access to gear. A sling-style bag is a good choice if you like your camera gear out of the way but still quickly reachable. The sling packs in the photo below are ant-theft packs.

Today’s photographer doesn’t necessarily need a DSLR to get great shots, but if you’ve surpassed using your smartphone as a camera, chances are you need a bag that carries your gear better than your back pocket or purse.
The great news about some of these bags is that they not only provide the perfect space for carrying your camera(s), but they also allow you to bring along some accessories and personal items—something that buyers sometimes forget about when they’re looking at bags. You also have choices in style. Do you want something sleek or are you going for the rugged look? Backpack or messenger bag style?
Peak Design’s Everyday Sling Bag is a stylish way to carry a mirrorless camera and lens, and even has designated space for an extra lens. Peak Design’s velcro dividers let you configure the contents of your bag according to the specific content. There’s also room for a 11-inch tablet and items like your car keys and smartphone. One of the great features you’ll enjoy on this bag is that it also has a storage compartment for a jacket or sweater, which is great for those all-day events in changeable weather. There’s even a place to stash a water bottle, and it’s all tucked away inside a good-looking bag that looks like a messenger bag.

An even smaller approach to a camera storage is the MTW Fanny Sling by Moment, which packs a lot of cool features into a rather small space. This one’s designed specifically more as an everyday carry but is spacious enough to fit a point-and-shoot camera and accessories. Inside, the padded dividers can be arranged to fit your needs, and the front pocket will hold a credit card, memory card, and other small items.

C) You need to take a load off.
Backpacks:
Backpacks are a firm favourite for photographers who have to travel long distances with their camera gear. If you’re a walker, traveller or landscape photographer, you’ll be looking for something comfortable, ergonomic and that will protect your gear from any accidental falls or scrapes. However, one downside is that you’ll have to take the backpack off in order to access your kit, even if you’ve got one of the best camera backpacks. With two straps, one for each shoulder, backpacks are better balanced for carrying heavier kit over longer distances, or when traveling. They can be better weatherproofed than other types of camera bag, and often have extra space for other items like water bottles, or even an external hook for a tripod. The downside is that it can take longer to get at your camera gear.

Let’s face it; sometimes shooting can be a pain in the neck—literally. Carrying heavy equipment, wearing a camera and lens on a strap around your neck all day, toting a backpack with extra bodies or lenses… these things can all add up to a chiropractor’s visit just waiting to happen. A beltpack can be a welcome solution, taking a load off your neck and shoulders while still keeping your camera and equipment close at hand.
For example, the Lowepro m-Trekker HP120 Bag lets you carry your equipment around your waist instead of cross-body if you prefer. A padded swivel shoulder strap allows for greater evenness in weight distribution. One of the things that makes a good beltpack like this one so handy is the quick access top, so you can get to your equipment without putting the bag down and unzipping the entire bag. Adjustable dividers allow you to choose a configuration that works for your gear—and can be changed depending on the needs of the shoot.

D) You’re a frequent flier who takes your equipment with you.
Roller bags:
Roller bags are designed specifically for travel, with wheels in the base, an extending handle for pulling them along like suitcases and often with dimensions chosen to fit international cabin baggage requirements. Ideal for frequent travelers and airports in particular, roller bags have wheels that let you drag them around on the ground, and some can also convert to backpacks. They’re designed for camera transport, not easy access, so they are not for hill-walking or big hikes.

Airlines keep coming up with more restrictions, so getting your gear onboard with you isn’t as simple as it used to be. What you need is a rolling bag that will fit in the carry-on compartment—but still has enough room for all your gear. That’s when you need to look for bags specifically designed for this task, such as the Airport Roller Derby Rolling Carry-On Camera Bag from Think Tank Photo. The interior can be configured for each use and will hold two DSLRs with attached lens, additional lenses, flashes and accessories. Two padded pockets are designed to hold a tablet and laptop. Side-rolling wheels are perfect for maneuvering down airplane aisles, there’s also room to strap on a tripod, and there are compartments to stow batteries, memory cards, a wallet, and phone.

Of course, some trips calls for more equipment, and that’s when your friends at TSA will make you put the bag on the conveyor belt and trust it to arrive on the other side. In that case, you definitely want a well-padded, hard-sided solution that can take a beating. A rolling hard case, such as the 1510TP Carry-On Case with TrekPak Divider System from Pelican, is sturdy but amazingly lightweight. It’s crushproof, waterproof, and unbreakable, and has a cubed foam interior that will accommodate whatever gear you need, cradling each piece of equipment in its own compartment. It also has double-hinged latches to ensure proper closure and can also accept a TSA-approved lock, if preferred.

E) You need something that’s rugged and ready for the great outdoors.
Hard cases:
Hard cases for cameras offer the ultimate in protection against impact, rough handling and harsh environments. They’re not really designed for carrying any great distance, but they can keep your camera gear protected in environments where no other bag can.The toughest type of camera bag, these can take a real pounding and keep your kit safe. They’re not comfortable to carry, but if you need to transport a lot of expensive kit safely (as checked luggage on a plane, for example) then this is your best bet.
Maybe the first thing that comes to mind when you say “rugged” and “outdoorsy” is “Bear Grylls,” but remember, we’re talking about camera bags here. When you are prone to climbing rocks, blazing trails, and hiking through areas that may include streams, mud, and other elements that put your camera’s well-being at risk, you need a bag that is up to the task. Look for something that’s not just waterproof, but also is crush proof and designed to go wherever you do.

The PRVKE 31L Backpack v2 from WANDRD is a great example of what to look for; it’s a backpack that can be carried either by a handle or worn as a backpack. The padded, removable dividers let you configure it to fit the needs of your shoot and can handle a DLSR with attached lens, a second lens, flash, and accessories. It also has a removable chest clip and removable waist belt, which provide greater stability, comfort, and weight distribution when wearing it as a backpack.

F) You shoot both video and still photography.
In today’s world, shooting video and still images at the same time is becoming more common. Whether it’s for work or personal use, the combination of video, audio, and images places new demands on what you need to carry with you. That’s when no ordinary bag will do—you need something designed with all your equipment needs in mind.
The Lowepro Fastpack BP 250 AW III offers an all-in-one solution, with a functional way to pack all of your photo, video, and audio gear into one relatively compact package. It can handle a DSLR with attached lens, 3 extra lenses, and a 13″ laptop. There’s even a side pocket for a tripod, which gives you an easy, hands-free way to carry your tripod—and deploy it just as easily.

Since it’s designed to hold so much equipment, Lowepro also built in lots of comfort features like adjustable shoulder straps and a snap-closure chest strap to ensure balance. The waist belt adds additional comfort and stability—but also can be hidden away when not in use. There are numerous compartments for cables and audio gear, and the bag even has a hidden all-weather cover to protect your gear when weather conditions are working against you. Two of these cases are anti-theft bags.

G) You’re all about function—with form.
Shoulder bags:
If you want to keep it simple, shoulder bags are great. There’s not too much fuss, with only a single strap, and it’s generally very easy to access your kit when it’s in a shoulder bag. The disadvantage, of course, is that you’re carrying everything on one shoulder, so you don’t want to overload or carry it for too long.

You’ll also see shoulder bags referred to as messenger bags(opens in new tab). These are similar to shoulder bags, but with additional space for laptops and other work tools such as paperwork, pens and tablets. If you’re often taking your camera on a commute for quick snaps before and after work, then this is an ideal choice of bag.
With a single strap that runs over one shoulder, these are quick and simple bags with easy access and different capacities. Ideal for cities and travel, they can be a strain if they are too heavy. ‘Messenger bags’ tend to be slimmer, with a pocket for a laptop and a design that lets you push them round to your back for cycling, for example.
Sometimes you don’t necessarily want to show up with a camera bag that looks like a basic bulky black bag. Fortunately, there are solutions out there that add style to your shoot.
The Bowery Camera Bag from ONA is made from Italian-tanned leather and comes in colors like Antique Cognac and Dark Truffle to suit your personal style. Don’t let the stylish exterior fool you; inside, you’ll find padded, touch-fastened dividers that let you arrange space for a DSLR and up to two lenses, as well as accessories. The soft leather grip handles make it easy to carry, while the elegant styling means your bag won’t announce that you’re carrying camera equipment inside.

Make sure you give your personal needs and uses some serious consideration before making your next bag purchase. Do your research and check out the reviews before making a final decision; you want to ensure it’s something you’ll be happy with for years to come.
In this list, our general-purpose guide to camera bags, we want to explain the different types and when you might use them.
No matter whether you’re using a point-and-shoot camera(opens in new tab), a mirrorless(opens in new tab) model with a couple of lenses, or a DSLR(opens in new tab) camera with flashguns(opens in new tab), filters and various camera accessories(opens in new tab) included, there will be something on this page to suit you. So let’s get to it!
H. Custom Luggage and cases
Anything make for a specialized purpose is by its ver nature inherently expensive. No matter how specialized the item is that you buy, chances are it will not meet all of your needs, unless you are a world famous photgrapher like Peter Lik. He had a custom made pack /vest made with a hydration pouch. It was really cool, and at last look it had still not been mass produced . I am not sure what the problem is? I have been a photgrapher for a long time, so I know what my needs are, so in many cases I have had to come with up my own gear. I like to go hiking and take photos wherever I go. I even do multi-day/night back packing trips. I came across this idea when I had a custom brake made for my my dive camera and strobes. I was able to connect my camer rack to my bouyancy compensator D-rings. the supplied straps were made with stainless steel hardware, and heavy duty straps. The straps allowed me just enough leeway to bring the camera up to my eye level. it also did not hang down too farfrom my chest, so it was perfect.
So found out who made the straps and I bought a score of them. As any long time photographer will I have lots of camera bags and cases. I also had several back packs from week long to weekened backpack trips and day hikes. I set up all these bags with the straps I also chose six camera bags that gave me some flexibility in the amount of gear I would carry as well as the type of environment I would be dealing with. I even had a water proof case. All these bags hung from my backpacks with two sets of straps attached. This configuration ensured that my gear would be protected and also would not sway no matter how energetic my hiking became.

To date there is only one company that has anything comparable and they went put of business. I also like to do astro-photography, so I took an old suitcase that is simply too large and heavy for todays travel and customized it so it would hold all of my gear and filters. If I had this custom made it would have set me back hundreds of dollars.
Resources
photographylife.com, “How to Choose and Buy a Tripod.”; bhphotovideo.com, “The Best Tripod is the One You’re Willing to Carry.” By Jill Waterman; digialcameraworld.com, “The best camera bags and cases for photographers in 2022: choose your type!” By Rod Lawton; bhphoovideo.com, “In the Bag: Things to Consider When Buying Your Next Camera Bag.” By Mos Khan; TECHRADAR.COM, “6 key things to consider when buying a camera bag.” By Jamie Carter;