


Tower Bridge, London. Exposure: shutter speed 2.6 seconds, aperture f/5.6, ISO 100.
Night photography is a great way to get really interesting and unusual pictures. It is also a great time to go shoot since it is not during business hours (you’ll be off work) and others will be asleep (notably spouses and children). Night photography immediately solves a huge problem that you confront constantly in photography. That problem is being faced with ordinary scenes that just aren’t very interesting. If you take a picture of a building or a standard street scene during the day, it can be sort of dull. We are all used to seeing shots taken in the middle of the day. That same scene – shot at night – can be a really interesting photograph though. While any image taken after sunset could fit the concept of night photography, I particularly associate night photos with a few specific categories of subjects. For me, the classic night photo is a shot of the Milky Way galaxy stretching over a unique foreground – this photo typifies many of the challenges that make night photography exciting.
Shooting at night means low light. Whether you’re capturing the stars or the lights of the city, you’ll need to make sure there’s enough light on the subject for your camera to register that something’s there.
The actual taking of pictures at night might seem a little bit like magic if you are just getting started. Even those who have been shooting a while may wonder how to get a proper exposure and focus in the dark. Although photographing in the dark certainly has its challenges, in some ways, it is actually easier than photography during the day.
Pulling off a shot like that is made easier by having the right gear, understanding how to set up your camera and exposure for the best results, and making a few smart decisions when editing. Fortunately, these same skills transfer to just about any subject you want to photograph at night, whether it’s a streetlight-lit portrait, an architectural photo, or something entirely different.
These skills all transfer because the biggest challenge in night photography is the lack of light. Light is essential to photography, and not having enough light can make a lot of the automated systems in your camera less consistent. You might find that your autofocus has a tougher time locking on, your camera’s meter doesn’t deliver the appropriate exposure for the scene, or your final photo looks grainy and speckled, thanks to noise from using a high ISO setting. All of these challenges are solvable, however. In the next section, we’ll take a look at the few pieces of gear essential to a successful night shoot, followed by building an understanding of how the shutter speed, aperture, and ISO can be best set for any night scene.
So let’s take a quick look at the essentials of night photography. In particular, we’ll cover the gear you need, how to expose your photos, how to focus at night, great subject matter, and some post-processing tips. Hopefully, this will help open up the world of night photography to you.
Find your light.
Alex Tan, a photographer and art director, says that night photography is the best environment to work in because unlike with daytime shoots the light’s “not changing — it’s very much the same throughout the night. And so you have a lot of room to experiment; you can keep trying things until you feel like you got it right without worrying about the light changing. During the day, when you’re outside, the sun is constantly changing.”
“You can keep trying things until you feel like you got it right without worrying about the light changing.”
That consistency gives you time to play — even though you’ll need slow shutter speeds and a wide aperture — you have an evenly lit backdrop to experiment in.
Pidgeon recommends a few different ways to explore light in nighttime street photography. He notes that, “a lot of times you want to use light to define the shape of things or the scale of things. So if you’ve got light on one part of the building, and it just bleeds off so you can’t tell where the building ends and the night sky begins, that doesn’t look so great.
“Find a way to pop in a little something on the corner of that building, so that you’re defining the edge,” Pidgeon continues. “That can be enough to create interest. Sometimes it can be as simple as waiting for a car to go by and shine its headlights for a second; that just gives you that little edge. It’s a different frame of mind because you really have to think about the composition. You have to add things in, because you have less to work with.”

You may also want to bring a light source and play with light painting — there are many options that are small and easy to pack. As Pidgeon explains, “Put on a five-second exposure and shine a flashlight over something. You could use your phones, and be like, ‘When I count to three, we’re going to paint this little corner of the building.’” If you’re shooting digitally, you can immediately check your results. “If it didn’t work,” Pidgeon says, “you can just try it again; it can be really fun.“
What to Bring for Night Photography

Breckenridge, Colorado – Exposure: shutter speed 15 seconds, aperture f/2.8, ISO 3200.
You can create amazing night photos with any camera. Thanks to recent advancements in features like Night Mode on iPhone and similar features on Android phones, camera phones are also capable of taking great night images. Whatever your choice of camera, however, you’ll probably want some way of steadying your shot. While it is possible to shoot night images handheld, and for many subjects at night, this’ll work fine, a tripod can unlock an even wider range of subjects and possibilities.
-Tripod: First, let’s talk about what you will need in terms of equipment for doing night photography. The good news is that you will not need much in the way of extra gear. Besides your standard camera and lens, the only thing you will absolutely need is a tripod. The darkness means that your camera needs to use a long shutter speed to gather enough light for a proper exposure (more about that in a second). So you need to be able to hold your camera steady and a tripod is the best choice for that.
Determining what tripod is best for you can depend greatly on both what your subject is and what type of camera and lens you’re using. We’ve got an entire, in-depth guide to selecting the best tripod for your camera that you should check out if you’re looking for more information. As a beginner, I went with an affordable tripod from Manfrotto. If I were in that position today, I’d consider the Manfrotto Element MII. This version features an Arca-Swiss-compatible ball head, a padded bag, and convenient twist leg locks, all at a reasonable, sub-$150 price point.
If you’ve got a larger budget or heavier gear, you can consider stepping up to carbon fiber tripod legs and a fancier tripod head. This can increase the stability and effective load capacity of your tripod, but can get expensive fast.
On the other end of the spectrum, if you’re shooting with a compact camera, phone, or small interchangeable lens camera, you can use an even smaller tripod, like the Joby Gorillapod. This unique concept functions like both a regular tripod and a flexible mount, capable of wrapping around a railing or tree branch for unique angles.
-Remote Trigger: Another helpful item for keeping the camera steady is a remote shutter release. I highly recommend that you get one – and the corded ones are very cheap (under $10). You can spend a lot on an intervalometer if the extra features will benefit you, but you don’t need that for standard shooting at night.
Avoiding shaking the camera is key to getting sharp photos during long exposures, which are often the exposures you’ll need for night photography. A tripod can eliminate a lot of vibration, but finding an alternate way to trigger your camera is key to getting every last detail sharp. Fortunately, there’s a lot of options for triggering your shutter without shaking your camera, and many of them are free!
The first option is just to use the delay built into your camera. On many models, you can set a self-timer or shutter delay. This means that when you press the shutter, a short timer starts, ending with the camera’s shutter triggering. In that intervening time, the vibrations of you pressing the button have time to settle out. An interval like 2 seconds should be plenty for most situations. For information on how to set this, just check your camera’s manual for the phrase “self timer”.
For some cameras, particularly newer models, there’s often an app that you can use. Canon’s is called Camera Connect, Nikon’s is called SnapBridge, and Sony’s is called PlayMemories. Each of these offers the ability to remotely control many of their recent cameras, along with a host of other features.

If you’ve got an older model, or just prefer a hardware solution, consider buying a remote for your camera. Remotes from third party manufacturers are often very inexpensive, and they work great for just triggering the shutter. B&H offers a wide range of remote shutter releases. Just make sure to check that it’s compatible with your particular camera model, as each brand often has a variety of remote standards.
On smartphones, you can choose between an app that allows self-timing, triggering with an alternate device like a smartwatch, or even using the volume clicker on headphones as a shutter release.

Miami, Florida – Exposure: shutter speed 0.3 seconds, aperture f/2.8, ISO 200.
Although not necessary, here are some additional items to consider having on hand for your night photography:
–A flashlight: This will come in handy in a myriad of ways. It will help you with finding your camera controls if you don’t know them cold. It will help you set up your tripod and deal with straps and other attachments. Finally, a flashlight will also help you find things in your camera bag. Just keep a small one (or a headlamp) handy.
Knowing your camera controls pays off at night. You can make changes to the settings without being able to see everything. Nevertheless, a small flashlight is tremendously useful. Keep one handy to make sure you can see everything on your camera and tripod.
(It occasionally comes in handy for lighting areas of your picture, as well!)
–Lens hood: At night you will have bright lights coming at you from different directions – such as street lights and neon lights. Using a lens hood will help keep flares to a minimum.
–Extra batteries: The long exposures you take at night will drain your camera battery at an alarming rate. You may also be using Live View, which drains them even faster. So does cold weather. Therefore, night photography always calls for spare batteries. Don’t take any chances here – a dead battery means your night is over.
If you are going to capture the night sky, you’ll need to be on top of weather conditions. In addition to your standard weather apps, be sure to add an app to your phone that will help you see where the moon, constellations, and Milky Way (if visible) will be. If you don’t already have apps you are using (there are several), I recommend PhotoPills and Star Walk 2.
Exposures for Night Photography

Pigeon Point Lighthouse, California. Exposure: shutter speed of 6 seconds, aperture f/5.6, ISO 1600.
The biggest difference between daytime and night photography is the exposure values you will need to use. The darkness changes everything. Don’t worry though, once you have your camera on a tripod, it is actually not that difficult to get the proper exposure in most cases.
Let’s back up and cover things that you might already know. Your camera’s exposure is a result of three controls (the exposure triangle) – shutter speed, aperture, and ISO. Because of the darkness, you need to let more light into the camera, and you can only do so by affecting one of these three controls. We’ll cover how to do that for each of them now.

Toledo, Spain – Exposure: shutter speed 8 seconds, aperture f/8, ISO 200.
Shutter Speed
During the day, you will typically use shutter speeds that are a small fraction of a second. At night, however, the camera will use shutter speeds that are longer than one second – sometimes significantly longer. Think of it this way: because it is dark, the camera needs a longer period of time to gather light for a proper exposure.
The shutter will now be open for a longer period of time, so the camera needs to be held steady or the picture will move during the exposure process, causing your image to be blurry. That is why a tripod is required equipment at night. You can leave the shutter open as long as you want, as long as the camera is steady and does not move at all.

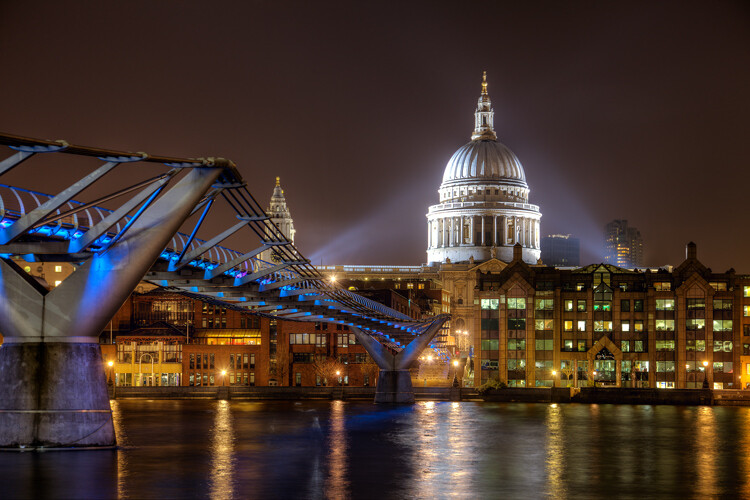
Millennium Bridge and St. Paul’s Cathedral, London – Exposure: shutter speed 4 seconds, aperture f/5.6, ISO 400.
Depending on the subject and how you’ve stabilized your camera (handheld or tripod-mounted, for instance), you’ll want to set different shutter speeds. A longer shutter speed will need better stabilization, like a tripod.

To understand what counts as a longer shutter speed, it’s helpful to know this rule of thumb: a shutter speed slower than 1 over the focal length of your lens, like 1/20th of a second with a 20mm lens, increases the risk of blur. Of course, this can change with steadier hands or image stabilization/ vibration reduction systems, but the rule can provide a good reference point. Once you start to get into multi-second long exposures, you’ll definitely need to mount your camera to a tripod, or rest it securely on a surface like a table.
These multi-second long exposures aren’t without their benefits, however. Along with capturing much more light (great in nighttime situations), they also open up a wide range of artistic possibilities. With longer exposures, you can get interesting effects like light trails from passing cars, moving water can smooth into puffy clouds, or you can even “paint” light into the scene using a flashlight. As your exposure gets longer, you can also decrease your ISO or stop down your aperture because you have more light to work with, decreasing the noise in the shot or increasing the depth of field .

If you have stars in your scene, there is one final consideration for shutter speed, and it’s caused by the apparent movement of the stars themselves. Put simply, the stars move across the sky at night, and with longer exposures, you can get streaks behind the stars from that movement. We’ve got a guide on how to deliberately create that star trail effect here, but if you’re instead looking to keep your stars pin-point sharp, there’s another little rule of thumb that can help. The “500/focal length” rule, where you divide 500 by your focal length in millimeters, yields the longest exposure you should use to retain sharp stars. While this shutter speed might be a bit too long for high resolution cameras or large prints, it’s another good starting point for understanding your possible shutter speeds. (There is also a more complex alternate rule called the NPF Rule; we compared the 500 Rule vs the NPF Rule here.)
If you want to set a shutter speed longer than 30 seconds, you might bump into a limit on your camera. Many cameras cap the longest shutter speed that can be set at 30 seconds. Fortunately, most of these cameras also offer Bulb mode, where the shutter remains open as long as the shutter is held down. If you’re planning on using bulb mode, make sure to pick up a trigger – many advanced triggers offer the ability to set far longer exposures, or trigger repeatedly, acting as an intervalometer. If you’re interested in an advanced trigger, the Vello Shutterboss II is available in versions for many popular cameras, and includes all those features and more.
To recap, if you’re shooting handheld, you’ll need a short enough shutter speed to prevent blur. Once you get on a tripod or stable surface, you’re only limited by subject movement, like star trails, or your ability to set the shutter speed. You’ll want to keep those factors in mind when you’re choosing your ISO and aperture, which we’ll discuss in the following sections.
Aperture
The aperture is the opening in the lens that lets light into the camera. The size of the aperture determines the amount of light being let into the camera for a given shutter speed, and it also affects the depth of field.
The aperture of your lens, typically denoted by the f-stop, like f/3.5, determines how much light comes through your lens. An f-stop that lets more light in is counterintuitively indicated by a smaller number. A lens set at f/2.8 lets through more light than when the lens is set to f/9.

For night photography, there are two key considerations when choosing your aperture: the amount of light let through, and the depth of field. Stopping down your lens (AKA choosing a narrower aperture like f/8) lets through less light, but it increases the depth of field in your image. You can stop down to ensure that your entire landscape is sharp from front to back, or to deliberately capture less light to allow for a long exposure to capture things like star trails or light trails. On the other hand, you can open up your aperture to f/2.8 or f/1.8, if your lens supports it, to make it easier to shoot in very dark environments, like when photographing the Milky Way.
One last thing to know about your choice of aperture is how it impacts image quality. Most lenses perform better when stopped down some amount. A lens that can shoot at f/2.8 will often be sharper at a moderately narrow aperture like f/5.6. This is another situation like ISO, where you have to balance image quality against the other considerations of your composition. Especially for night photography, you may need to lose a bit of sharpness or depth of field in exchange for capturing as much light as possible with a wide aperture.
For the most part, there is no difference between how you will use the aperture at night versus how you use it during the day. The only difference is that the camera will struggle to get enough light for a proper exposure, so a small aperture will often require ridiculously long shutter speeds. In addition, the background is usually black, so you don’t need to worry as much about achieving a wide depth of field.
Both of these factors (needing more light, and not needing a wide depth of field) tend to mitigate toward using larger apertures at night.

When you are shooting a scene like this where everything is far away, you don’t need a wide depth of field. Hence you can get away with a larger aperture. New York, New York – Exposure: shutter speed 0.3 seconds, aperture f/4.0, ISO 400.
ISO
The third exposure control, ISO, is a measurement of the sensitivity to light of your digital sensor. Higher ISO values make your digital sensor more sensitive to light and thereby allow you to use a shorter shutter speed or a smaller aperture.
But, there is no free lunch here, and using higher ISOs will result in more digital noise in your pictures. Since dark areas of your picture tend to show more digital noise than lighter areas, it is often a problem with night photos. Therefore, resist the temptation to crank up the ISO at night if you can help it.
While shorter or longer shutter speeds can offer both creative options and real-world considerations, ISO choices are a bit simpler. Broadly speaking, a higher ISO will result in more noise in your image, but it can let you use a shorter shutter speed for the same level of brightness in your image. Some cameras, particularly those with larger sensors and newer designs, can offer “cleaner” results with less noise at higher ISOs, but even so, using the lowest native ISO setting (and getting a bright enough image by manipulating shutter speed, aperture, and the ambient light instead) yields the best image quality.

With that in mind, you’ll want to set the lowest ISO that will enable a proper exposure based on your choice of shutter speed and aperture. If you want to take a portrait in low light, and need a 1/30th of a second exposure, don’t be afraid to set an ISO like 3200 or 6400. On the other hand, if you’re shooting a moonlit landscape and can choose between 5 seconds at ISO 6400, or 20 seconds at ISO 1600, the lower ISO exposure will have less noise.
One more thing to remember about ISO is that it’s easy to change. If you’re trying to compose in low light, or are using Live View and need a brighter image, you can quickly increase your ISO to 6400 or higher, and use that brighter preview, while still being able to decrease your ISO for the final shot.
The concepts around ISO, digital noise, and sensors can get very complex. We’ve got articles that dig into the technical details of noise and ISO invariance, if you’d like to learn more.

Since you will be using a tripod, you can usually avoid the need to use a high ISO. In other words, the tripod allows you to use a longer shutter speed, and that long exposure allows more light into the camera such that you don’t need to use a high ISO. However, in those cases where you cannot use a tripod or you have a moving subject, you will need to increase the ISO.

I needed the foreground sharp in this image, so these exposure settings are brighter than the typical night sky shot, which you will learn more about shortly. Shutter speed 30 seconds, aperture f/2.8, ISO 3200.
That is certainly bad news, but the silver lining is that cameras are getting better and better at handling higher ISOs without showing much digital noise. In addition, post-processing software continues to improve at noise reduction, so you should be able to remove the digital noise later.
A Starting Point for Proper Exposure
Let’s say you are in Aperture Priority mode, which is what I find a lot of people use. If you are still using an automatic mode, give Aperture Priority a try, as it is still semi-automatic (meaning the camera will set the shutter speed for you to create a correct exposure), but you get to set the Aperture and ISO.

So, let’s talk about the aperture setting first. Start by setting your aperture to f/5.6, which is a fairly moderate choice that lets in a healthy amount of light. It won’t give you as much depth of field as you might like, but remember that you typically don’t need an extremely deep depth of field since the background will be black.
Next, set your ISO. Start at about 400, which is high enough that you won’t have to use an extremely long shutter speed. At the same time, most cameras can shoot at ISO 400 without digital noise becoming a problem.
After that, just see where the shutter speed ends up when you line up your shot. I’m assuming you are using a tripod for this example, by the way. You know the shutter speed is going to be long – probably a few seconds. I have tried to keep the other settings such that you won’t be standing in one spot for a minute or more while the camera creates the exposure.

Chicago River – Exposure: shutter speed 30 seconds, aperture f/13, ISO 200.
That’s not to say you should never do that. Depending on the scene and subject, you might want your shutter speed to be measured in minutes – but it is not the norm.
One answer to this problem is to use spot metering and expose for the highlights. So meter off the highlights, then set your exposure between +1 and +2. The +1/+2 setting will keep your highlights looking bright but will also keep the highlights within the dynamic range of your camera.
However, you generally don’t want to sit around for 30 seconds, a minute, or even longer, just waiting to see if the test shot is going to work out.
If you don’t have a tripod, your options are limited. In fact, there is only one option, and that is to open up the aperture all the way, crank up the ISO to at least 1600 (probably 3200 or 6400), and then use whatever shutter speed the camera sets.
Even with a wide aperture and high ISO, the shutter speed is likely to be long enough that camera shake will still be an issue.
Exposing the Night Sky Photo

There is one specific exposure setting I can tell you right now because it is often the same. It is the exposure settings for photographing the night sky. Your exposure settings will be:
Shutter speed: 15 seconds.
Aperture: f/2.8
ISO: 6400
This is not set in stone, and you’ll notice that my night sky photos add a little exposure to these settings, but it is a good starting point. But what if your lens doesn’t open up to f/2.8? Then you have to just increase the ISO or the shutter speed by the corresponding amount.
For example, if your lens’s maximum aperture is f/3.5 – which is the case with many kit lenses – you’ll need to find another 2/3 of a stop of light. Either add that to the ISO, the shutter speed or just increase both by one click (remember one click of your dials is 1/3 of a stop).

Big Bend National Park, Texas. Okay, the exposure settings don’t have to be exactly the same. I wanted this brighter to accentuate the Milky Way. Shutter speed was 13 seconds, aperture f/2.8, ISO 6400.
You might be tempted to lengthen your shutter speed a lot on the premise that you are using a tripod. After all, that would seem like a good way to reduce your ISO to control digital noise and also to use a smaller aperture so you don’t have such a narrow depth of field. Don’t do it!
The stars in the sky are moving (okay, it is really the earth’s rotation, but they appear to be moving across the sky). If you lengthen your shutter speed too much, the stars will have little trails which appear as a blur in your shot. You may not see it until you get the pictures home and look at them on the computer screen, but it will be there and will ruin the shot.

Big Bend National Park, Texas. Look closely at this picture and you will see little star trails. This was the result of using a longer shutter speed than I mentioned above. Shutter speed 165 seconds, aperture: f/4.0, ISO 1600.

Choose proper settings
Proper settings will always depend on the situation. Nevertheless, there are some helpful guidelines for choosing settings at night:
Aperture: Open up your aperture more at night than you would during the day (i.e., use a lower f-number). Most night photographs tend to require less depth of field than shots during the day. Plus, the background and sky will be black. The larger aperture also has the benefit of letting more light into your camera.
ISO: Keep your ISO setting as low as you can. Night photography always has dark areas, and these dark areas inevitably lead to digital noise. Raising the ISO will compound the problem.
Shutter speed: Whereas shutter speed might be the first exposure setting you worry about during the day, it should generally be the last one you think about at night. Since you will be shooting from a tripod, you can let the shutter stay open as long as you need. If you have traffic (streaking lights), a fountain, or running water in your picture, the longer shutter speed will create a very cool effect. (Note, however, that if you’re shooting in high winds or if the ground is unstable, you’ll need to boost your shutter speed to prevent blur.)
One other setting to check is Long Exposure Noise Reduction, which will be in your camera’s menu. If you enable this option, the camera will take two exposures, one normal and one with the shutter closed. Your camera will then use the second image to filter out noise from the normal picture.
Of course, photos shot with this option enabled will take twice as long to expose, but they’ll also be less noisy.
Meter for the highlights
Determining the proper exposure level can be tricky at night, and each metering mode presents its own challenges.
If you use evaluative metering, the camera is likely to be confused. If you use spot or partial metering, the meter will jump around, depending on whether you’ve aimed at a bright light or a dark background.
Do not worry as much about the dark portions of your picture. If the dark areas happen to turn black, it is nighttime, so there is supposed to be some black. But you can always take test shots and adjust as necessary.

5s | f/16 | ISO 400
Take a test shot at a high ISO
You should make liberal use of test shots when shooting at night.
So the best way to create a test file without wasting a lot of time is to take a shot at a much higher ISO than you would ordinarily use.
Let’s say you think the proper exposure settings for a given shot are 30 seconds at f/5.6 with an ISO of 400. Rather than taking that shot and waiting around 30 seconds for the exposure, just crank up the ISO, then boost the shutter speed by the same number of stops. The exposure will stay the same, but it will take much less time to capture the test picture.
For the above example, I would raise the ISO to 6400. Why? Well, raising the ISO by one stop takes it to ISO 800, two stops increases it to ISO 1600, three stops to ISO 3200, and four stops gets you to ISO 6400.
Once you’ve set your ISO to 6400, you can reduce your shutter speed by four stops to 2 seconds. After all, reducing the shutter speed by one stop shortens it to 15 seconds, two stops shortens it to 8 seconds, three stops to 4 seconds, and four stops takes the shutter speed down to 2 seconds.
Then, when you are satisfied with your exposure, just decrease the ISO and lengthen the shutter speed by a comparable amount to get back to the final settings.
Bracket your photos
Night photography is one area where you will want to bracket your photos. Blending and HDR can work wonders at night, but even if you don’t like to use those processes, bracket your photos anyway. Think of it as exposure insurance.
After all, if you overexpose or underexpose your file, having a bracket on hand will be the difference between a failed and a successful photoshoot.

30s | f/11 | ISO 200
Verify the exposure with the histogram
After you have taken your exposures, you should always check them on your camera’s rear LCD.
However, while the picture on the LCD will show you if the exposure is close to correct, you should also check the histogram.
Why?
Because a histogram is more accurate than your camera’s LCD. You can use it to carefully determine whether the exposure is within your camera’s dynamic range.
Specifically, make sure to keep the highlights on the right side of the histogram, but avoid a spike on the far right. If the dark areas spike on the left side of the histogram, that’s okay; parts of your picture are supposed to be black.
In general, however, keep as much of the image as possible within the range of the histogram, though err on the side of keeping the highlights from blowing out.

4s | f/11 | ISO 400
Picking a Subject for Night Photography
Now that you have the right gear and know how to expose your photos at night, you have to pick a good subject for night photography. For the most part, that is no different than what you do during the day. A good subject is a good subject. Still, things will look different at night.
Let me introduce you to some of the things I like to photograph at night. Hopefully, these will give you some ideas, which you can take in your own directions.
The Night Sky
If you are out in the countryside, you need nothing more than a clear night to get a great photo. Moonless, clear nights are the best. If you can happen to catch the Milky Way (usually possible from March through October, and best from May to September), all the better.
Check out an app called Star Walk 2 to help you get a handle on the timing of these things. If you can add an interesting foreground to the shot, even better.
Museums and Public Buildings

The Louvre, Paris. I was forced to hand-hold this shot (it was taken from inside the Louvre), so I really had to crank the ISO and open up the aperture. Shutter speed 1/8th of a second, aperture f/4.0, ISO 3200.
Well-lit buildings are an obvious choice for a nighttime subject. You almost can’t go wrong here. Although the concept is obvious, when executed well the result can still be great. You can also use this as a starting point for your night photography. You will have additional ideas as you stand there waiting for your pictures to expose.
Fountains

Buckingham Fountain, Chicago – Exposure: shutter speed 10 seconds, aperture f/18, ISO 100.
Perhaps my favorite nighttime subjects are fountains. Many times they are lit with different colors as well, adding additional interest. The long shutter speeds you use at night make the fountain appear to be flowing.
Bridges

Brooklyn Bridge, New York – Exposure: shutter speed 15 seconds, aperture f/11, ISO 200.
It seems like every city or town has a bridge. It may not be the Golden Gate Bridge, but there will likely be a bridge and it will be well lit at night, which makes it an interesting subject. Plus the long exposure time you use for night photography will cause the water under the bridge to blur, and the traffic to appear as streaking lights.
Streetlights
Pay close attention to streetlights when you are doing night photography. They can be useful in a lot of different contexts. They can add a point of interest to it otherwise blank area of the picture. If there are multiple lights, they can create a nice leading line into your picture.

Washington, D.C. For this shot, I wanted the twinkle or starburst effect from the streetlights, so I used a smaller aperture. Exposure: shutter speed 8 seconds, aperture f/16, ISO 800.
Car Light Trails

Dallas, Texas – Exposure: shutter speed 20 seconds, aperture f/16, ISO 100.
A really fun thing to include in your night photos is streaking light trails from moving cars. These are created when a car or other vehicle drives through the frame while you have the shutter open. The camera picks up the lights, but since the car has gone all the way through the frame while you had the shutter open, it shows up in your picture as streaks of lights.
Try to time your pictures so that vehicles move all the way across the frame while you have the shutter open. Read: How to Create Dynamic Photos of Car Light Trails for more tips on this technique.
Reflections

Reflections in London, U.K. – Exposure: shutter speed 1.3 seconds, aperture f/8, ISO 200.
A benefit of the longer shutter speeds you will be using at night is that reflections show up better on the surfaces of water. This is obviously true on ponds and lakes. But it is also true for puddles. After a rain can be a great time for night photography.
Overlooks and Vistas
Photographing landscapes and cityscapes at night can be a great way to find new material in a scene you’re already familiar with. Fortunately, it’s easy to get started with these subjects, as you can take your time and experiment with settings.

When composing an image at night, consider the impact of movement and light. Roads can offer the opportunity for light trails, while the general bustle of a city can make for a great contrast with the static buildings. The direction of the moonlight can also make a big difference, as well as the phase of the moon – a full moon that’s low on the horizon can light the scene quite dramatically, while a new moon provides the best opportunity to photograph stars or meteor showers.

Time of night can also have a huge effect on the look of the image. You may have heard of the “blue hour” before. This 30-ish minute period after sunset can still leave enough light in the sky to create a really pleasant blue color. As more time passes, this color will fade from the sky, and that opens up the opportunity to photograph the stars and focus on artificial light sources in the scene.
Let’s end with overlooks and vistas. Some of the best night photography I have ever seen are nighttime views of cities. You can often get great skyline shots. Be careful though – a great view often does not translate into a great picture. Make sure you have an interesting foreground and/or a strong center of interest in the picture.

New York City from the Manhattan Bridge – Exposure: shutter speed 10 seconds, aperture f/8, ISO 200.
When picking subjects for night photography, it is important to note that things will not look the same to the camera as they do to you. Take some test shots whenever possible. If the idea of a long exposure test shot seems tedious due to the wait time, crank up the ISO for purposes of your tests which will allow you to use a short shutter speed. When you go to take the final picture you can reduce the ISO and increase the shutter speed by a corresponding amount.

Nashville via drone – Exposure: shutter speed ½ a second, aperture f/5.6, ISO 310.
Astrophotography
While deep-sky astrophotography can become very complex (just check out some of the setups in our deep-sky astrophotography guide), photographing the Milky Way can be a great way to get started with this niche. The Milky Way, the galaxy that our solar system is located in, is a classic astrophotography subject and appears as a bright band of stars and interstellar dust. Since astrophotography is so specialized I will devote an entire chapter (23) to the subject. Even this extra coverage is still far less than is needed to do justice to this unique subject matter. I have entire books devoted to it. It can also take years to master this skill. Besides underwater photography it in my humble opinion is the most difficult genre to master. It can e quite equipment and even software intensive.
Focusing
One final difficulty you will face in night photography is that it is often tricky to focus your camera. That is because most cameras focus by detecting contrast. If the scene is too dark, there is no contrast for the camera to pick up. There are a few things you can do to get your camera to focus though.
The first is to focus on a bright light in the picture. A streetlight works well for this. Try focusing on the edge of the light (between the bright part and the black background), which will give you the necessary contrast. Be sure you are focusing the same distance away as where want your final picture to be focused. Once you have the focus set, recompose your picture and press the shutter button to take the picture.

U.S. Capitol, Washington D.C. – Exposure: shutter speed 30 seconds, aperture f/16, ISO 400.
Another trick to allow you to use your autofocus is to break out the flashlight and shine it on the thing that you want your camera to focus on. If it is close enough, the flashlight should provide sufficient light for your camera to focus.
Finally, if none of that works, you will need to manually focus your lens. Just put the camera in Live View and look at the LCD as you compose the picture (zooming in if possible) to see if your picture is in focus.

Henry Street, New York – Exposure: shutter speed 1/13th second, aperture f/5.6, ISO 3200.
Processing Your Night Photos
You can make your night photos look a lot better with a minor amount of post-processing. Of course, given all the different types of night shots you may face, giving specific editing advice here is difficult. Still, there are a few general things you might want to consider.
Editing night photos doesn’t have to be significantly different from editing your other photos. All the sliders still work the same, and all the same principles apply. There are two sliders that are more important for night photography than daylight photography, however: the White Balance/Color Temperature setting and the noise reduction setting.
White balance can have a major impact on the feel of a night photo. A cooler color temperature will bring across the cold, blue feel of night, and is the classic choice. In mixed lighting environments, like a cityscape, there may not be a single “right” color temperature. Instead, you’ll have to prioritize by subject or feel. Lastly, for Milky Way photos, a slightly warmer color temperature might work better, as going too cool can drown out the delicate looking structures and contrast that really make the galaxy stand out.

Noise reduction is a matter of personal taste. I find that color noise is both more noticeable and more disruptive to the image than luminance noise, so I focus on reducing color noise when possible. Luminance noise is that grainy texture visible in high ISO shots, and reducing it basically involves applying a very slight blur to the image. With the luminance noise reduction slider, avoid using too much, as it’ll make your image look unpleasantly soft.
Color noise reduction is a little easier. Color noise is visible as specs of “wrong” color in areas, or even color in colorless areas, like red dots in the dark sky. It’s easier to remove than luminance noise without negatively impacting the image, although going too far can still remove some low-level color details and saturation. For color noise, I recommend that you just bump the color noise slider up until your image looks good at 100%.
Another source of unwanted artifacts in nighttime photos is the same hot pixel issue I mentioned a moment ago. These are bright dots that may be too large for the regular noise reduction algorithms to remove, and they are especially noticeable if you left Long Exposure Noise Reduction off in-camera. These dots are easy to remove, however. After making my edits, I like to open my image with hot pixels in Photoshop, then duplicate the background layer to work non-destructively. On this new layer, I apply the Dust & Scratches filter at a radius of 1 or 2 pixels. This filter will remove almost all the hot pixels, while having little impact on other parts of the image. If you notice that you are losing details, however, like stars in the sky, just apply a mask to this top layer, or increase the threshold on the filter itself.

Lincoln Memorial, Washington, D.C. Another benefit of night photography is that you get to take pictures of memorials without any people in your shot. Exposure: shutter speed 6 seconds, aperture f/11, ISO 200.
Highlights
The first thing to consider is how to handle the highlights. Given the nature of night photography, you are doing to be dealing with some really dark areas, and some really bright areas. Many times those highlights will be slightly blown out. Even if they aren’t completely blown out, they are still bright enough that they would look better toned down a bit.
It wasn’t too long ago that this might have required using HDR (high dynamic range) software, but not anymore. Most RAW editors can bring back the highlights a bit (assuming you’ve’ shot in RAW format).
If you use Lightroom or Photoshop (Adobe Camera Raw or ACR), all you need to do is find the Highlights slider and pull it to the left a bit. That will decrease those highlights. As an added benefit, it will often make those same highlights appear a bit more colorful.

Westminster Bridge, London. Here I used a 5-second exposure to capture the lights of the bus passing by. Shutter speed 5 seconds, aperture f/8, ISO 200.
Shadows and Blacks
Now you have to deal with the dark areas of your photo. There will be parts you want to brighten, but at the same time, you should allow the darkest parts of the photo to go pure black. There is no point in attempting to preserve detail in a black sky.
To accomplish both of these goals, I have another quick move for you. Pull up on the Shadows slider, and then pull down on the Blacks slider. Areas of detail you want brighter will benefit from the increase in the Shadows, but you will maintain contrast by pushing down the Blacks.

Salt Lake City, Utah. In this shot, I needed a wide depth of field to keep both the fountain in the foreground and the Tabernacle building in the background sharp. I used a long exposure, which also created a flowing effect to the water, but I still had to raise the ISO a bit. Shutter speed 6 seconds, aperture f/16, ISO 400.
Sharpening
Sharpen your night photos the same as you would any others, but you will likely need to deal with digital noise more than you are used to. If the whole picture is noisy, then give it a global noise reduction. In Lightroom and ACR, there is a Noise Reduction section in the Detail panel, and you just pull up on the Luminance slider to the right.
You might just need to reduce noise in specific sections of your photo though. Noise often manifests itself in the darkest areas of your image. In that case, apply a local adjustment. If you are using Lightroom or ACR, use the Adjustment Brush, paint where you want the noise decreased, and increase the Noise slider. That should take care of it.
You have to watch noise reduction though. Applying too much of it will reduce detail in your photo. That’s why you don’t want to apply a global adjustment if you don’t have to. If you have a serious noise problem and want to fix it without sacrificing detail, there are some plug-ins that are truly wonderful. I use Noiseware and I am often shocked at what a good job it does of reducing noise but preserving detail. Other good products are Noise Ninja and Dfine by Nik.

The Golden Gate Bridge from the Sausalito side – Exposure: shutter speed 30 seconds, aperture f/6.3, ISO 200.
Night Photography Tips for Nailing Your Exposure (Every Time)
Take a Chance and Explore the Unknown
What’s my exposure time? This is the number one question asked by a night photography novice setting up his or her camera for the first time. A basic understanding of the functions of aperture and shutter speed take on mind-expanding dimensions at night, when stopping down your aperture can turn street lights into starbursts and setting your shutter speed to bulb offers you the ability to capture the unseen. Contrary to the view of photography as an exact science, nocturnal image making provides an opportunity to experiment, explore, play, and have fun. So, instead of freezing up and following someone else’s exposure suggestions by rote, explore all the variables at your fingertips with your own camera. Then, make this into a veritable learning experience by noting down your exposure settings in writing (or audio) so you can study the results after downloading your files. To economize on power when taking notes, keep things simple and stow a small waterproof notepad and pen in your camera bag or coat pocket.

Devoting time to this effort will help you to determine what worked best so you can incorporate the same exposure strategies in future shoots. In the words of Lance Keimig, author of the book Night Photography and Light Painting: Finding Your Way in the Dark, “There are no bad exposures at night, only different ones!”
Work in Manual mode
Here’s your first night photography tip, and it’s a big one:
Make sure you’re shooting in Manual mode.
In Manual mode, you will set the shutter speed, aperture, and ISO. This gives you complete control over your camera.
When shooting at night, your camera will be on a tripod, and you will be working slowly. So there is no need to use any automatic mode; even if you’re not totally comfortable with camera settings, you can take your time, carefully dialing in your aperture and shutter speed and checking your exposure.
Further, there might be a little trial and error with the exposure settings (the camera can be fooled by the large differences in bright and dark areas of the picture), and you want to make sure you have plenty of control over this process.
Manual mode gives you that control.
4s | f/5.6 | ISO 400
Make sure you are comfortable with Bulb mode
Manual mode only works for exposures up to 30 seconds.
So if you need a shutter speed that is longer than 30 seconds, the only option is Bulb mode. Therefore, while you should generally shoot in Manual, you should also get comfortable with Bulb.
In Bulb mode, the shutter stays open as long as you hold down the shutter button. When you hit the button, the shutter opens. When you release the button, the shutter closes.
(Of course, to avoid introducing any shake or movement into the exposure, you must use a remote shutter release when working in Bulb mode.)
With Bulb mode, you can make your exposure several minutes long. If your remote shutter release doesn’t have a built-in timer, make sure you keep another timer handy (e.g., on your phone).
Also, if your remote does not have a timer, make sure it has a locking feature, so you don’t have to hold the shutter button during the entire exposure.

6s | f/5.6 | ISO 1600
Shoot in RAW
When shooting at night, it is particularly important to make sure you are shooting in RAW format.
RAW files coming out of most cameras are 14 bits, whereas JPEGS are only 8-bit files. The more bits, the higher the range of available colors and the smoother the transitions between them.
(In other words: RAW files look better.)
Plus, most of the colors a camera can capture are at the top (bright) end of the scale. The range of available colors at the low (dark) end of the scale is extremely limited. At night, your pictures will almost always include a large dark portion. A JPEG file, with its reduced color options, will likely display (very ugly) banding.
So always, always, always shoot in RAW.

10s | f/9 | ISO 200
Keep it sharp.
With longer exposure and a wider aperture, sharp focus on your subject can be tricky. To avoid blur, Tan notes , “You might have to be a little bit more steady if you’re opening up on your aperture or slowing your shutter speed. Shooting at night is a little bit slower of a game.”
He warns that “a lot of people miss focus at night; their subjects aren’t sharp. When they open up to a really wide depth of field, there’s not a lot of forgiveness on sharpness. If your subject moves an inch or two away from the camera, they all of a sudden go out of the range of focus.” Setting your shot up carefully and asking your human subjects to be still can help ensure that your image is clear.
Samuel Nute, a landscape photographer, has tips on night sky photography — sometimes called astrophotography— which requires very long exposures and especially careful attention to focus. His recommendation:
“You want to have the shutter open for anywhere from 10 seconds to a minute, depending on what you’re trying to get. But in that time, if the camera moves at all, the shot’s going to be blurry.”
Using a cable to control the shutter remotely — so you’re not having to touch the camera — is really, really important. Having a tripod is important, as well. Because, again, you need to limit movement.”
If it’s a windy night, or you’re trying to capture star trails, Nute suggests using what you have on hand to minimize camera shake: “You can set up your tripod and then hang your backpack so that the tripod won’t move in the wind, acting like a sandbag of sorts.”
Learn and Memorize Gear Functions Beforehand
Locating that pesky button or dial to change camera settings or pull up a menu is much more challenging at night, not to mention locating the accessories buried in your camera bag! Low light shooting makes it even more essential to study your camera manual to memorize how your gear functions and locate access points for essential dials and menu options before you go out into the darkness. When photographing at night, you should be shooting with your camera and lens in manual mode. If you’ll be breaking new ground with this, get comfortable with your gear’s manual functions under low pressure circumstances, so you can act with calm efficiency when conditions are less than ideal. One item I always rely on in low light is a basic magnifying light, which serves the double purpose of casting a concentrated beam of light where I need it and magnifying the text of tiny dials or digital readouts, so I don’t need to pull out my reading glasses.

Know Your Destination and Scout It in Advance
One challenging repercussion to low-light shooting is that everything in sight takes on an otherworldly appeal, which can complicate attempts to pinpoint one specific composition or picture subject. To avoid this dilemma, as well as to prepare yourself for unexpected surprises, you should familiarize yourself with your destination, ideally by scouting the site in advance. Plan to arrive at your location before sunset and take your time setting up, while also gaining the advantage of making pictures during magic hour lighting. This will add to your understanding of how changing light conditions can impact a scene.

In addition to scouting your location directly, you can also let your computer help out during a remote scouting session. Photo sharing websites such as Flickr are readily searchable by descriptive terms, or even specific GPS coordinates. Scrolling through the results from other photographers can provide innumerable tips about site conditions, camera angles and much more.
Lastly, consider bringing along a digital compass to log GPS data, as well as to determine your orientation in relation to the heavens. This can prove critical when shooting star trail images, especially if you want to make images of star trails encircling the North Star.

Adapt Your Image Capture to Address High Contrast Levels and Color Casts
Night photography often involves working in situations with extremely high contrast and widely ranging colorcasts. This makes it particularly important to shoot in RAW file format, for greater leeway in controlling contrast and white balance in post-production.
For optimum control of color, you can manually set your camera’s white balance to a specific Kelvin temperature. This can be particularly useful if you’re looking to achieve the cool blue tungsten hue (3200K) that many people associate with nocturnal images. Your camera also has white balance presets for various lighting conditions, as well as an auto white balance option. Auto white balance is quick and convenient, but this setting functions within a limited range and can be fooled by mixed lighting conditions or the predominance of one color in a scene.


Lance Keimig exposed this mixed-lighting scene for 10 seconds at ISO 400, using Nikon’s Fluorescent 1 (sodium vapor) white balance setting. He made two adjustments to the white balance in post: (left) balanced for the sodium vapor lights in the scene by clicking on a neutral area of the concrete at left of the smoke stack, and (right) balanced for the metal halide light source by clicking on a neutral area of the light emanating from the building at back right. He prefers the version on the left. Photograph © Lance Keimig
Mixed lighting situations—where artificial lights of different color temperatures are adjacent in a scene—are extremely common at night. These can be difficult to identify visually and nearly impossible to control 100 percent. Under these conditions, decisions must be made about which color cast to neutralize and how the neutralization of a dominant or distracting color cast will shift colors from competing lights. In recent years, many cities have made strides to replace traditional sodium-vapor streetlights (which exude a yellow-orange color cast) with more energy-efficient LED lighting. This produces a clearer, whiter light—thereby simplifying the issue of color casts, while simultaneously reducing opportunities for night photographers to explore creative compositions that highlight mixed light.
Condition Your Gear to the Outside Environment
A pesky external condition that’s likely to hamper every night photographer on occasion is the occurrence of lens fog. This can be caused by moving gear from dry cold to warm, humid conditions, or it can occur due to changes in temperature and humidity levels—such as when the temperature nears the dew point. Accumulating moisture can totally interfere with or block light passing through the lens, which can result in soft, blurry images or frames that register no exposure at all. This can be particularly frustrating when it occurs in the process of a long exposure.

In conditions that are prone to lens fog, adding a clear lens filter can protect the optical glass from direct exposure to moisture, however this may cause ghosting or flare in an image if lights are present in the scene. A lens hood can also help reduce moisture build-up. Other methods to prevent lens fog involve heating the lens to make it warmer than the dew point. Astronomy buffs use portable, electric heating devices to keep telescope optics free of moisture. Another possibility is to attach portable hand warmers to the lens barrel. In these situations, it’s advisable to attach the heating device before the lens fogs up, since it can be time consuming and difficult to eliminate moisture that has already condensed.
Without ignoring proper safety measures, you can also circumvent this issue by keeping your camera gear in an environment similar to where you will be working for several hours in advance of a shoot. This will allow gear to acclimate to existing temperature and humidity levels, and will keep your glass fog-free until the levels change.
Dress for Success in All Conditions—Winter-, Water-, and Bug-Proof Yourself and Your Gear
Proper wardrobe is a key concern when photographing at night. Plunging temperatures or sudden weather inversions can quickly turn an enjoyable evening into an endurance test for the unprepared, even in temperate climates. Dress in thin layers that you can add or subtract as outside conditions change, and bring along items to keep everything warm, dry and comfortable—from your core to your extremities to your gear.

Increasingly popular in recent years, gloves with pullback fingertips offer substantial protection while being a practical way to access camera controls in cold climates. A more moderate option for those who have a hard time working encumbered are lightweight glove liners, which protect hands from wind and weather and can be coupled with heavy gloves or mittens in extreme climates. Another handy cold-weather tool is the rechargeable hand warmer, which often doubles as a portable power supply and/or flashlight, in addition to providing warmth.

Cold or wet conditions are not the only concerns facing intrepid night photographers. Insects can be nearly invisible and are an extremely hard to predict nuisance with lasting after-effects. Bug spray can help, but if you’ll be venturing into buggy territory, consider arming yourself with a bug jacket.
Pack Extra Power and Plan for Calamity
Making long exposures for hours at a time can drain your battery quicker than you think, so make sure to bring plenty of back-up power for cameras and other electronic gear that require batteries to function. You can also conserve power by turning off your camera’s Live View function and LCD display. If you’re shooting on a tripod turn off the Image Stabilization, as well.

Extreme cold also has a tremendous impact on battery drain. If carrying multiple packs in cold weather, keep extra batteries warm by placing them in interior pockets or insulating them with hand warmers. If a battery becomes exhausted by the cold, warming it up may provide a temporary revival of power, allowing you to fire another few shots.
If you’re shooting in a remote location and have traveled there by car, you can recharge batteries using your car battery as a generator, or better yet, bring along a portable generator to ensure you don’t tax your car battery to the point of exhaustion. And, as an added safety precaution, inform friends or family about your shooting destination and overall plans, then follow up to let them know you’ve returned safely, especially if you’re working alone.
Prep, patience, and a sense of adventure.
Taking photos at night requires a little extra precision around camera settings and a bit more preparation than simple daytime snapshots. But the rewards can be great, and the nighttime scenes you discover through your lens may surprise you.
Pidgeon offers a last piece of advice for those setting off into the dark, suggesting that the real work is about “looking at it as an adventure — at what makes a compelling or interesting picture versus being more control oriented. You need a certain amount of control to come up with something that technically works, but with night photography, you embrace the random things that happen. You can come up with some cool shots if you’re in that mindset.”
Night photography exposure: final words
As the adage goes, you can’t be successful at something if you don’t first apply yourself. This is particularly applicable to night photography, when the motivation to gear up and go into the darkness after a full day of work or other pursuits can be easily foiled by inertia.

Veteran night photographers use a number of different strategies to kick-start their motivation—from making a commitment to shoot during particular astronomical conditions such as a full moon, high or low tide, to capturing weather events such as fog, mist, or snow. While the idea of going out with your camera during inclement weather seems less than appealing, the aesthetic results from these types of conditions can pay off in spades.
You can also consider planning a group expedition with one or more cohorts. This can yield benefits far exceeding the simple matter of accountability in getting you out the door. There is both safety and camaraderie in numbers, attributes that can be especially important in the still of the night. The practice of night photography is rich with community engagement. At the end of the day, connecting with—and learning from—like-minded colleagues, is what night photography is all about.
When you follow the night photography exposure tips I’ve given above, you are likely to get some great shots. Every city lights up its major attractions, bridges, and museums – often in colorful ways. So a scene that might be boring during the day can offer great photos at night.
Because of the effects of the lights, you’ll often be surprised by what you end up with (in a good way!). Taking your time and applying these tips to nail the exposure will help you maximize the experience.
Whatever your choice of subject, night photography can be a wonderful way to get more familiar with your camera, stretch your artistic and creative muscles, and refine your technical skills. It doesn’t require much equipment beyond a tripod, and you can find subjects just about anywhere.
Like any new skill, learning night photography can be an iterative process. When you get your first shots on your computer at home, don’t be afraid to look at them with a critical eye. Understanding the impact of exposure settings and technical elements can make for a better photo taking experience any time you use your camera.
I have included a few low light and night shots of mine below:


Resources
Photography-school.com, “The Ultimate Guide to Night Photography.” BY Jim Hamel; photography-school.com, “9 Night Photography Tips for Nailing Your Expisure (Every Time).” BY Jim Hamel; photographylife.com, “Night Photography Tutorial: A Beginner’s Guide.” By Alex Coleman; adobe.com, “Discover the best techniques and settings for shooting night photography.“; bhphotovideo.com, “10 Essential Tips for Night Photography.” By Jill Waterman;
photographylife.com, “500 Rule vs NPF Rule: Shutter Speed for Astrophotography: How to eliminate motion blur in your Milky Way photos and get sharp stars.” By Spencer Cox;