


We’ve all had the experience: Driving through a beautiful landscape, you stop at every scenic overlook to make photographs sure to capture the grandeur of what you see. The initial photos in this chapter are mine.
You get home, look at the pictures, and find them flat and boring. All the elements that enthralled you at the time are there, but not the feeling. Why?
When we look at a landscape, our eyes travel over it and selectively focus on the elements that we find appealing. Our field of vision encompasses a great deal of the scene, but our eyes and brains have the ability to ignore all except the most alluring details. Lenses and sensors or film cannot do this by themselves. They need help.
Time is the most important investment you can make in getting good landscape pictures. When you arrive in a place you’ve never visited before, spend time scouting—driving or hiking to different locations, finding different vantage points. Carry a compass to figure out where the sun will rise and set, and imagine how the place would look in different kinds of light. This can take some practice because you also have to look at where the light will not be falling. Photographing a canyon, for example, you might see that the west wall will be beautifully lit in the early morning, if the canyon is deep, however, the east wall will be in such complete shadow that your camera will be capable of rendering it only as a great black blob. Unless this is the effect you want, you’ll either have to modify your composition, shoot it later in the day, or plan to return on an overcast day when both sides will be photographable.
Most landscape photographers like to shoot using wide angle and ultra wide angle lenses, mainly because they give the photographer amazing depth if field as well as they cover wide swaths of the landscape. While I occasionally follow their lead in this, I also shoot with telephoto lenses. I like to isolate remarkable landmarks in the landscape. I also enjoy shooting panoramas, horizontal and vertical. I have shot vertical panoramas of the redwood trees and deep slit canyons. I find that if you follow the same rules that everyone else uses, your photos will look all the same. I also try to incorporate motion in my scapes, especially where clouds or moving water is involved. I also like to use hi-def where appropriate. Black and white also has its place in landscape photography.
In the chapter on filters I discussed neutral density filters or ND filters, as well as graduated ND filters. Landscape photography is where these filters excell, especially when you are using slow shutter speeds to show motion. Or in the case of extreme variances in light with graduated ND filters. Polarizing filters also play a big roll in this discipline.
In this chapter I will discuss all of the types of scenery that you might come across and to shoot each type. I will also cover the types of lenses that you can use in more detail and the accessory equipment that you will need.
To start with we will discuss the four pillars of landscape photography.

Making a Photograph – The Four Pillars
Explore the four things that make a great landscape photograph – Fantastic Light, Strong Composition, Appropriate Sharpness and Optimum Exposure.
A lot of thought has been given by leading landscape photographers on what goes into making a great landscape photograph. It turns out there are four things, four pillars if you will. Four, that’s a good number. There are the four legs of a table or the four wheels of a car. And not to forget the four sacred directions of the Native Americans.
In landscape photography the four pillars are evenly divided between the aesthetics and the technical. So what are they? The two aesthetic pillars are Fantastic Light and Strong Composition. No surprise there. The two technical pillars are Appropriate Sharpness and Optimum Exposure. No surprise there either. If just one of those pillars is missing, well, the table collapses, the image suffers.

Let’s look at them one by one….Joshua Tree Spring Sunrise.
Fantastic Light
We’re always looking for fantastic light and, unlike studio photographers, we have to work with what we’re given. But we know that there are certain times of the day when we’re more likely to find fantastic light. That’s why we get up hours before sunrise and don’t pack up our gear till an hour or so after sunset. We love the light found during the bookends of the day.
Learning to make the most of the light means becoming keenly aware of two of light’s most important properties – Color and Shadow.
Color
Color can be used to establish a strong emotional connection with the image and its subject. The color of outdoor light changes as the conditions change. The light we have at midday on a clear sunny day is daylight, our standard for white light. It has no color cast to it. Objects are seen in their ‘real’ color. But that’s generally not a color that creates an emotional connection. During sunrise of the same day the color is much different; it’s warmer. And sunset color is even warmer than sunrise.

Silent City, Bryce Canyon National Park, Utah.
But during twilight the light becomes very cool. It is also cool in open shade and on overcast days.

McWay Cove Twilight, Big Sur, California.
Shadows
Shadows are the other key property of light. On a bright sunny day the shadows are strong and deep.

Death Valley Dunes.
On overcast days, during twilight or in open shade the shadows are very soft and subtle.

Virgin River, Zion National Park, Utah.
Depending on what you want to convey, shadows can communicate strength and energy or softness and delicacy.
Because of harsh shadows and white light, landscape photographers generally shy away from photographing during midday. However, sometimes you can’t avoid it – like when you’re on vacation with the family. So the trick to getting good midday photographs is to work the shadows. Become aware of shadows and work them into your compositions.

Maus Castle, Rhein River, Germany.
Strong Composition
Speaking of compositions, the second pillar is strong compositions. Composition can be a complicated topic. There is a list of compositional principles as long as your arm. But it boils down to just a couple of things. However, before I get to them it’s worth mentioning two very common and useful principles – the Rule of Thirds and Border Patrol.
I think most everyone is aware of the Rule of Thirds – that tick-tack-toe grid you superimpose on the image and place significant elements on or near the lines or their intersections. Border patrol is scanning the edges of your image to make sure you don’t have any unwanted elements intruding into the image. It’s a simple idea but not as easy is it might sound.
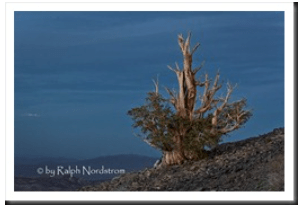
Bristlecone Dusk, Eastern Sierra, California.
Composition is the arrangement of elements within a rectangular frame. It’s about the most useful definition available. Elements are trees and rocks, streams and bushes, roads, fences, buildings, clouds, all the things that are enclosed within the borders of the image. Arranging them within the rectangular frame is why we move our tripods three feet to the left, two feet back, down six inches, etc.
The compositional principles are the most important in landscape photography are Unity, Balance and Visual Tension.
Unity
Unity is the inclusion of those elements that enhance and contribute to the image and the exclusion of those that do not. Every strong image has a subject, focal point or message. And all of the elements need to guide the eye through the image. Elements that distract from the focal point need to be removed or at least deemphasized. When you achieve this you have achieved Unity.

Arch, Alabama Hills, Eastern Sierra, California.
Balance
Balance relates to the arrangement of the elements. Each element caries a visual weight. Large can balance small, dark can balance light, blue can balance yellow. By balancing the elements you can create a visual center of gravity. Now, when I talk about balance I’m not referring to the symmetry of an English or French formal garden. These are beautiful but they are structured and rigid. I’m referring more to the harmony of a Japanese garden.
Salmon Creek, Big Sur, California.
Visual Tension
And this leads to the third point – visual tension. Images are interesting if they are both in and out of balance – a ying and yang thing. Placing key elements off center, for example, creates visual tension. Our minds want to move them to the center where they can be at rest. Visual tension creates energy.

Spring Storm, Alabama Hills, Eastern Sierra, California.
Most of the compositional principles that you can study are not universal; they do not apply in every situation. But unity, balance and visual tension are about as close as you can come to something that is always relevant.
These are the two aesthetic pillars and both are rich with possibilities for exploration, discovery and learning. They are truly life-long studies.
Appropriate Sharpness
Turning now to the technical, sharpness is a key feature of a successful landscape photograph. But the sharpness needs to be appropriate to the subject. Some subjects require tack sharpness throughout. Many landscape images cry for everything to be sharp from the foreground to the most distant objects.

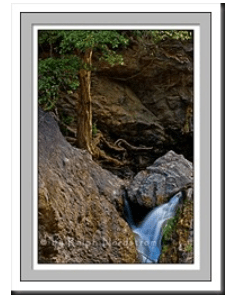
Tree, Cascade Falls, North Shore, Minnesota.
Other subjects require much of the image to be out of focus. Flowers and tiny insects are examples of this kind of selective focus.

Wild Irises, Eastern Sierra, California.
To master sharpness you need to understand Depth of Field and to master depth of field you need to understand the 3 F’s – Focal distance, Focal length and F/stop. These are the three things that come together to determine depth of field. For the grand landscape you need a short to moderate focal distance, a small focal length (wide angle) and a high f/stop to get the extreme depth of field needed by some of these compositions. For the flower shot you need a short focal distance balanced with a moderate focal length and a wide-open f/stop to get the shallow depth of field.
The other skill you need for the grand landscape shot is determining Hyper-focal Distance – the focal distance that holds both your nearest and most distant elements in focus. For those tricky near/far compositions, hyper-focal distance is twice the distance from the closest object to the front of the lens.
Optimum Exposure
In the days of film you really had to nail your exposure regardless of whether you were shooting color or black and white, negative or positive film. With digital we have a bit more leeway, especially when we shoot raw. We can often correct for exposure problems in the darkroom. Achieving the optimum exposure may sound like a basic skill but it is profoundly important.
Mastering exposure is a matter of mastering the Histogram – understanding what it is telling you and taking appropriate action. The histogram tells you if your exposure is right on or if it is over or under exposed. It tells you if you have highlight or shadow clipping . And it tells you if your camera’s sensor can handle the light conditions or not. With this knowledge you can take corrective action and get the optimum exposure.
The basic rule of the histogram is to keep it away from the edges by adjusting your exposure. Increasing your exposure will shift it to the right; decreasing it will shift it to the left. If you can’t avoid the edges then you can use other techniques like graduated neutral density filters or HDR. But it’s the histogram that provides this important feedback.

Sunrise, Thor’s Hammer, Bryce Canyon National Park, Utah.
That’s it. These are the four pillars – Fantastic Light, Strong Composition, Appropriate Sharpness and Optimum Exposure. But it’s important to note that this is the starting point of a great photograph. The work is not over when you press the shutter, it’s just beginning. The darkroom still lies ahead. It doesn’t matter what kind of a darkroom you work in – the kind that is actually dark and smells funny (good) or the kind that has a keyboard, mouse and casts a glow on your face. It’s all the same and that is where the magic is completed.
LANDSCAPE SUBJECTS
Flowing Water

If a river or stream flows through the landscape you are shooting, think about the character of it and how to convey that character in the image. A big, slow river looks and feels different from a fast-moving mountain stream. The water can be the center of interest in the image, or it can serve as an element in your composition—as a diagonal or other leading line, as a horizontal line, or as a shape that complements other elements in the frame.
Look carefully for reflections in the water. You can use some reflections to enhance the image—the colors of reflected autumn leaves, for instance—but others may just be distracting. You may have to move around a bit to include or eliminate them, or return when the sun is at a different angle. Use a polarizing filter to eliminate some of the reflection and increase contrast; rotate it until you have the effect you want.
Forests


Photographing forests presents a different set of challenges. First, think about the character of the forest you want to shoot and the feeling you want to convey in your image. Should it feel dark and brooding, or light and airy? Are there any special features that will help express how you feel about it?
As with any photograph, find a point of interest. It might be one slightly different tree trunk, a path winding through, or a splash of color on a flowering vine. Whatever it is, compose in such a way to lead the viewer to it. Look for shafts of light penetrating the canopy or one spot on the forest floor directly lit by the sun.
Whether you are shooting toward a forest or shooting from inside it, look for patterns, lines, and other compositional elements you can use. Try both wide and telephoto lenses. A wide lens looking up at the trees will make them soar; a telephoto will compress a row of trunks. Lie down and look straight up through the branches; climb a tree to look down the path.
Plains and Prairies


Wide-open spaces such as plains and prairies are among the hardest landscapes of all to photograph well because often they lack an obvious point of interest. In most cases, the huge scope of the scene is one of the things you’re trying to communicate. Even so, remember that viewers need something on which to focus. Look for an element peculiar to that place and use it as a point of interest that says something about the scene and imparts a sense of scale. You don’t want the viewer’s eyes to wander aimlessly around the frame, so use whatever might be available to lead him into the image—a winding road, a stream, or a fence line, for example.
Like every forest, every plain has its own personality, so hunt around until you have found an angle and composition that reflect it. What is the most important feature of this particular place? Think about the sky. Do you want a lot or a little of it? A clear blue sky might best reflect the character of one plain, a brewing storm another. Remember the rule of thirds. If the sky is important, place the horizon along the bottom third division of the frame. If it is not, put it along the upper third.
Deserts
I prefer sunrise because there are almost always fewer people around, and I still have the rest of the day ahead of me when I get done shooting. It’s a great way to kickstart a day.Some locations, such as Cadillac Mountain in Acadia National Park, are famous for their sunrises, so it’s a busy location, even at 4 am. However, at most places, being there at dawn will allow you to avoid crowds. At some of my favorite spots, I seldom see anyone else. However, those same spots could have dozens of visitors later that day.

Speaking of too much foreground, that’s not to say you shouldn’t include foreground in your landscape photos. Not every scene works best with a layered composition, but many do. A great way to create layers and depth in a scene is to utilize foreground elements. One of the first things I do when I get to a new place is to look around for anything I can use as an interesting foreground. It may be a rock, flowers, or a puddle. By incorporating something close to the lens, you create a sense of scale in your photo, and there’s more for the viewer to explore.The ice in the foreground achieves two tasks in this composition. It creates a sense of depth in the image, and the ice includes a striking pattern.

You can capture great landscape photos at any time, but many landscape photographers prefer the early morning or the late afternoon and early evening. I captured most of my favorite shots within an hour of sunrise or sunset.


Look for ways to show the rugged nature and the beauty of deserts. In the middle of the day, find waves caused by the heat. Using a long lens to compress them, you’ll get dramatic shots that really say “hot.” Deserts are also great places for pictures of stars. There is no humidity, and usually no terrestrial lights to interfere, so stars seem more numerous and are unusually brilliant. Watch the way the color of the sand changes throughout the day with the angle of the sun. Think about ways to capture the characteristics of the desert. A wide shot might best portray one desert, while a close-up of one plant struggling to survive on the side of a dune might best represent another.
Think about including the sun in your photograph—it’s one sure way to say hot and harsh. But shooting the sun is tricky. On a clear day, the sun is so bright that your camera’s meter will tend to underexpose everything else in the frame. Shoot in manual mode, or take a reading without the sun in frame, depressing the shutter button halfway to hold the exposure, then reframe before you shoot. If you’re shooting film, bracket a lot to make sure of getting the exposure you want. With a digital camera, check the images as you shoot. Wide-angle lenses tend to work best because the blown-out sun takes up less of the image, but they are susceptible to lens flare. The advantage of SLRs is that you can see the flare when you frame the image.
Seacoasts
But the golden hour isn’t the only time of day that’s great for landscape photography. Light during the blue hour – that is, the time just before sunrise and just after sunset – can look amazing, too: soft, ethereal, cool, and magical. (Plus, due to the limited light, the blue hour is a great time to do long-exposure landscape shots!)
You should also grab a few high-quality landscape lenses. When you’re just starting out, a 24-70mm f/4 model or even a kit lens will get the job done, though I’d eventually recommend grabbing a 70-200mm f/4 lens (for telephoto landscape photography) and an ultra-wide lens such as a 12-24mm f/4.


Consider these different scenes: a tranquil tropic isle with turquoise water lapping at a white, sandy beach; storm waves pounding a rocky New England shore; a densely packed vacation beach. What kind of shore are you photographing, and how can you best convey it? What time of day, what kind of weather, and what season is most appropriate for showing its character? These are the kinds of questions to ask yourself while scouting for the right vantage point and composition before shooting. Every shoreline is different in some way. Show the difference in your images.
Once you have thought about the character of the shore, look for elements you can use to reinforce the feeling you’re after. Palm trees make a good frame for a tropical beach; a spray of water shooting over rocks adds drama to a rugged coastal scene. As in the desert, be careful about sand. If it’s windy, be sure to protect your camera and lenses from blowing sand. Don’t open the camera back unless you are in an area that is well sheltered.
Mountains
I’ll be using the phone as an example in other portions of this article because it is a good tool for learning. However, to create photographs that can be printed large and maintain sharp details, you are better off using your “big camera”.


If you think back to art class in elementary school, complementary colors are the big ones to consider. Blue and orange complement each other, as do red and green. These aren’t unusual in nature, and these color combos play well off each other and contribute to a dynamic composition.There are a few reasons why this is such a peaceful scene, but a big part of it has to do with the complementary colors and soft tonal transitions.
Are the mountains you’re shooting rugged or worn, threatening or enchanting? What feeling do you get from them? Look for elements that will reinforce your feeling and convey it to the viewer. What composition, angle, light, and weather seem most appropriate? Look for the telling details that reflect the spirit of the mountains, too.


You can have the most expensive camera with the best image sensor, but if you don’t put high-quality glass in front of the sensor, you’re leaving a lot of potential performance on the table. Fortunately, good glass for landscape photography doesn’t require breaking the bank. While pro-level lenses can easily top $2,000, that’s nothing compared to the best super-telephoto lenses that many wildlife photographers rely on that frequently cost well over $10,000. Further, as we’ll see, you don’t always need pro-level lenses.


This is just a general outline of focus stacking, but it’s a vast topic. This step-by-step focus stacking guide is an excellent resource if you want to try out more advanced stacking techniques.

An eye-catching foreground, one that immediately captures the viewer’s attention and helps lead them into the scene. (A good foreground can also make the scene appear more three-dimensional, which is almost always a good thing!)


When most people think about landscapes, they think of calm, serene, and passive environments. However, landscapes are rarely completely still – and if you can convey this movement, you’ll add extra drama and moodiness to your images.


Landscape photography is one of the most popular photographic genres. It’s easy to get started with the genre, but it can take a lifetime to master landscape photography skills. You don’t need a sophisticated camera or expensive lens, and the skills you learn when doing landscape photography translate to other types of photography.
What is Landscape Photography?
Landscape photography doesn’t fit neatly into a single box. However, a unifying thread that connects all landscape photographs is that the image features the natural world, although it may include wildlife, artificial objects, or people in it as well.
Many celebrated landscape photos have subjects like mountains, forests, lakes, rivers, and the ocean. However, many influential landscape photos also include a human touch. In an ever-changing world, landscape photos showing our impact on the environment may become even more important.

The line between landscape, nature, and wildlife photography is often blurry. A landscape photo could be all three at once. Landscape photography has a rich artistic history, and its definition has become suitably broad. Whether a landscape is depicted with hyper-realism, abstraction, or any style in between, it’s a landscape image if the photographer or the viewer says so.
A Brief History of Landscape Photography
While famous 20th-century landscape photographers such as Ansel Adams may be the first to come to mind when considering the origins of landscape photography, its history is traced back to the very earliest days of photography itself.
Of course, the history of photography is a bit murky. A widely accepted version is that Nicéphore Niépce was the first to use a camera to capture a photograph in the mid-1820s. The early results were crude and required hours of exposure time, so the first portrait was still a way off. However, static objects, such as landscapes, lent themselves well to the burgeoning medium.View from the Window at Le Gras, by Nicéphore Niépce. This is believed to be the first image captured by a camera, and it was shot in either 1826 or 1827. The original plate is seen on the left. The image on the right is a digital retouching performed by Nguyen for educational purposes. This image is used with a CC BY-SA 4.0 license.
Niépce’s associate, Louis Daguerre, then developed the daguerreotype process. This process required only a few minutes and produced clearer results. In 1839, Daguerre released his method to the world at large.
Photography still wasn’t yet practical, but that same year, William Henry Fox Talbot demonstrated a different photographic process using a paper-based calotype negative and salt-printing. Improvements to materials and chemical processes eventually shortened exposure time to seconds and then fractions of a second, making photography more economical.
When you look at the earliest photographs, at least those that have stood the test of time, many of them are portraits. It’s not surprising, as portraiture remains ubiquitous to this day. However, cameras were nonetheless being pointed at beautiful landscapes. In the 1860s, photographer Carleton Watkins captured early photographs of Yosemite and its surrounding areas using 18 x 22-inch glass plate negatives and a stereoscopic camera. He returned from his 1861 expedition with 30 plates and dozens of negatives. His images helped influence the US Congress to protect the Yosemite Valley and ensured that generations to come would be able to enjoy its natural beauty.Bridal Veil Falls, by Carleton Watkins. This image was captured in Yosemite sometime between 1873 and 1883.
Fellow New York-born photographer William Henry Jackson is considered the first person to have photographed Yellowstone in 1871 as part of the Hayden Geological Survey. In addition to capturing stunning and influential landscape photos of Yellowstone, Jackson later photographed incredible landscapes in the American West. Jackson, who lived to the old age of 99, is fondly remembered for his contributions as a soldier, explorer, author, painter, historian, and photographer.
By the late 1800s, despite the beautiful photographs by the likes of Watkins and Jackson, landscape photography – and photography at large – hadn’t yet earned the respect of the artistic community. However, photographers like Alfred Stieglitz, Peter Henry Emerson, and Edward Steichen utilized more painterly approaches in the darkroom, and photography began to cement its place as a legitimate art form. Steichen’s 1904 landscape image The Pond – Moonlight had an important role to play in photography achieving the respect it deserved.The Pond—Moonlight by Edward Steichen, 1904.
It’s impossible to discuss the history of landscape photography without talking about Group f/64. The group, formed in the early 1930s by western US-based photographers, includes some of the most famous names in the history of landscape photography. The group’s first exhibition in 1932 included prints from Ansel Adams, Imogen Cunningham, John Paul Edwards, Sonya Noskowiak, Henry Swift, Willard Van Dyke, Edward Weston, Brett Weston, Preston Holder, Consuelo Kanaga, and Alma Lavenson. The show ran for six weeks, and its impact was significant. It’s worth noting that the group was somewhat informally organized, and not all the photographers who exhibited their work considered themselves part of the group.
The group, informal as it may have been, did have a generally unifying vision of landscape photography. The group’s work fought against the earlier trend of pictorialism, which had initially convinced the art world to accept photography as legitimate art. Group f/64 aimed to promote sharp, well-exposed, and carefully composed images.The Tetons – Snake River, Grand Teton National Park, Wyoming, by Ansel Adams. This image is in the public domain and is preserved by The National Archives.
While Ansel Adams is perhaps the group’s most famous member and best known for his beautiful black and white images, he also worked in color at the advent of color landscape photography. On the other side of the country, photographer, Eliot Porter, photographed wildlife and landscape scenes in the eastern US using Kodachrome color slide film. Nonetheless, color landscape photography remained something of an outlier for decades.
In the 1960s, wilderness photographer Galen Rowell showed people the beauty of many remote landscapes in brilliant color. Rowell was also instrumental in developing the graduated neutral density filter with the filter company Singh Ray. Rowell was a prolific and influential landscape photographer until his tragic death at 62 years old in 2002 in a plane crash. His legacy will forever be felt.
Contemporaneous to Rowell were other color landscape photographers like Ray Atkeson, Philip Hyde, David Muench, Luigi Ghirri, Neil Folberg, and countless others. Of course, black and white landscape photography has never disappeared, and influential photographers have continued to work in black and white long after the early pioneers. Photographers like Michael Kenna, Takeshi Mizukoshi, and Hiroshi Sugimoto continue to create significant monochromatic landscape work.
It’s impossible to list everyone who has played an essential role in the development of landscape photography, and we wouldn’t be where we are today without the contributions of the earliest pioneers. They paved the way for modern landscape and worked tirelessly to guarantee that landscape photography became a respected art form.
Landscape Photography in the Digital Age
Landscape photography has become increasingly accessible. The proliferation of smartphones has made it possible for just about anyone to capture landscape images. Long gone are the days when a photographer needed to schlep dozens of pounds of gear and glass slides out into the wilderness to capture a beautiful landscape photo.
Modern landscape photography maintains many of the same components as the earliest landscape images. While the gear has changed, landscape photography maintains a certain timeless quality.Although the resolution of the original digital file belies the modern camera used, there’s nothing about the image itself that would be out of place decades ago. Many landscape photos share this timeless quality.
Portraits often show the changing sensibilities of cultures over time, and documentary photographs, like street photography, photojournalism, and sports photography, capture moments in time that are usually easy to date. In contrast, any given landscape could have just as easily been captured decades ago or yesterday.
In an increasingly changing world, with our impact on the environment being felt more acutely than ever, the importance of landscape photography is even greater. Much like photographers such as Carleton Watkins and William Henry Jackson helped convince politicians and the public alike to protect the natural beauty of Yosemite and Yellowstone, and photographers like Ansel Adams enamored people with stunning natural vistas across the US, landscape photographers today have a vital role to play in convincing people in the 21st century to do more to protect our environment now.
Why You Should Try Landscape Photography
There are many compelling reasons to try your hand at landscape photography. It’s a great way to add another element of enjoyment to your outdoor adventures. Even better, it’s excellent motivation to start getting out into the natural world more often. Landscape photography helps you document your surroundings and can be a fantastic way to learn to enjoy the outdoors, whether it’s right in your backyard or halfway around the world, in a new and fulfilling way.
Landscape photography is an excellent way to strengthen your photographic muscles if you want to improve your overall photography skills. Landscape photography encourages technical skills, including proper exposure and tack-sharp focus. The genre also helps you work on your compositional skills. Photographing the entirety of a beautiful scene is tempting. Still, disciplined landscape photography will help you learn what to include in your composition and, perhaps more importantly, what to omit. That skill translates to every possible photo genre.Landscape photography provides me with plenty of opportunities to enjoy the outdoors, even during frigid nights in winter. Landscape photography has also motivated me to learn new technical skills, such as star trail photography.
Landscape photography is an exercise in timing and patience. Sure, your subject is often stationary, but the light is ever-changing, and the best light is often fleeting. You may need to spend a lot of time in one place or visit the same spot many times before capturing your perfect shot. You learn a lot about light when doing landscape photography. That knowledge pays dividends across all types of photography.
Landscape photography is easy in the sense that your subject doesn’t move, and anyone can do it. The gear requirements are minimal. You don’t need an expensive camera, massive lens, or lighting equipment.
While it’s easy to do landscape photography, it will take a lifetime to master the craft. Your landscape photography skills will undoubtedly improve with time and persistence, but there’ll always be room for further improvement. Being easy to start but challenging to master makes landscape photography irresistible.
What Kind of Camera Do You Need?
Despite the ease with which anyone can shoot landscape photos and the relatively low barrier to entry concerning equipment, that doesn’t mean that there aren’t qualities to a camera or lens that make it a better or worse choice for landscape photography. You don’t need fancy gear, but there are undoubtedly better and worse options.
Let’s consider the camera first. After all, it’s the bedrock of any photographic kit. Image quality at low ISO settings is paramount for landscape photography. Image quality comprises sharpness, color range, tonality, and dynamic range. You want a camera that captures sharp, vibrant images with excellent capability to accurately record tones in a scene with highly varied lighting. You don’t need a full-frame or medium-format camera, but all else equal, larger image sensors perform better when it comes to image quality.Mirrorless cameras are all the rage, but DSLR cameras also work great for landscape photography. Consider the Nikon D850 seen here. It has a 45.7-megapixel image sensor, tilting display and rugged design, making it a great all-around choice for landscape photography. There are many more excellent cameras for landscape photography, DSLR and mirrorless alike.
A good landscape camera doesn’t require the same features as a camera aimed at photojournalists and sports photographers. These photographers make their money photographing action, so they care a lot about autofocus, shooting speed, and high ISO performance, even at the expense of resolution.
Other considerations aside, photojournalists and landscape photographers will agree that a camera’s durability matters. When outside, weather changes fast, and your gear needs to withstand big shifts in temperature and survive a bit of rain.
There’s no such thing as a completely waterproof interchangeable lens camera, and you should always do your best to protect your gear. Still, some cameras are certainly better than others at handling adverse conditions. Typically, cameras aimed at enthusiasts and pros will stand up better over time than cameras designed for beginners.
For what it’s worth, I’ve never had a camera break due to weather. I carry plastic bags in my backpack and always dry my gear before opening changing lenses, opening memory card slots, or changing batteries.
You’ll spend a lot of time composing landscape images, so you’ll want a camera that’s pleasant to use. This includes an intelligent user interface, convenient controls, a large viewfinder, and a sharp rear display. An articulating display is handy, allowing you to comfortably work when your camera is set up very low or high.
While DSLR cameras are perfectly suitable for landscape photography, and many pros continue to use them, you may be wondering about DSLR vs. mirrorless cameras. As the name suggests, mirrorless cameras eschew the mirror found in DSLR cameras. This allows mirrorless cameras to be smaller and lighter, although this advantage isn’t always realized with mirrorless camera systems.
Lenses for mirrorless cameras are also generally smaller and lighter, but this is due not only to the difference in camera technology but also to recent advancements in optical technology. Mirrorless cameras typically include better autofocus area coverage, advanced features, and faster performance. They also offer a real-time live view through their electronic viewfinders, which is very useful.
All the major manufacturers have now shifted their focus to their mirrorless camera systems. However, with newness and advanced technology also comes a higher price tag. You can build a nice DSLR kit for less money and then adapt your DSLR lenses to a mirrorless camera later. If you’re in it for the long haul and have the budget, buying into a mirrorless camera system upfront is likely the better choice, but it’s not the only choice.The Sony a7R IV is a popular mirrorless camera for landscape photographers. It features a 61-megapixel full-frame image sensor with an excellent dynamic range. The camera uses Sony’s E-mount, which supports many lenses from various manufacturers. Sony’s lens selection is one reason, among many, why its Alpha mirrorless cameras are so popular with photographers of all types.
To summarize, the primary considerations when selecting a camera for landscape photography are image quality and, to a lesser extent, sensor size (bigger is better), durability, and usability. An excellent, fast autofocus system is a nice bonus but not a requirement. You should also survey the lenses available for cameras you’re interested in to ensure that you can purchase appropriate lenses at a price within your budget. If you’re looking to save money, look at the used market and consider older camera models that use the same image sensor as the most recent models.
Lenses Are a Critical Part of a Landscape Kit
When picking out a new landscape lens, the first significant decision is whether you want a zoom or a prime lens. Zoom lenses have a variable focal length, whereas prime lenses offer a fixed focal length. Zoom lenses have the advantage of flexibility, whereas prime lenses are often smaller, lighter, more affordable, and offer a faster maximum aperture, all else equal.
Fortunately, a fast aperture isn’t necessary for most landscape photography, so you can opt for a lighter and less expensive lens with a slower aperture. For example, a 24-70mm f/4 lens is cheaper and lighter than a 24-70mm f/2.8 lens.
While an APS-C or Micro Four Thirds camera is a viable option for landscape photography, I want to narrow the scope and discuss some of the most popular full-frame lenses. If you open a pro landscape photographer’s bag, you’re likely to find one or more of the following zoom lenses: 14-24mm f/2.8, 16-35mm f/2.8, 24-70mm f/2.8, 24-105mm f/4, 24-120mm f/4, 70-200mm f/2.8 and 100-400mm f/4.5-6.3.
In terms of prime lenses, 14mm, 18mm, 20mm, 24mm, 35mm, 50mm, 70mm, 85mm, 105mm, 150mm, and 200mm lenses all have their place.
Many of the f/2.8 zoom lenses above are available in f/4 versions, or at least there are f/4 lenses that offer similar focal lengths. Avoiding the pro-level f/2.8 lenses is a great way to save money without necessarily giving up much image quality, especially when you stop down to f/8 or slower.
If you’re interested in night sky or astrophotography, the criteria change. You no longer require autofocus since you’ll be manually focusing anyway, allowing for affordable third-party options from companies like Samyang and Rokinon. You instead care a lot about the maximum aperture. Lenses ranging from f/1.4 to f/2.8 are good choices for night sky photography. The faster, the better. When considering lenses, make sure you look up reviews specific to night sky photography because different lens aberrations, such as comatic aberration, can dramatically impact how stars are rendered.
Speaking of third-party lenses, should you consider them in general? Absolutely. Companies including Sigma, Tamron, and Tokina make high-quality lenses that are often more affordable. Sometimes they’re also entirely different from what your camera manufacturer offers. You should always research any lenses you’re interested in and read about other photographers’ experiences, but it’s well worth considering third-party options.
Not all of us have the luxury of purchasing multiple high-quality lenses for our landscape photography. So, if I could only pick just one lens or type of lens to buy, what would it be? I’d start with a 24-105mm.
Sure, it won’t be suitable for night photography, but it will work well for most landscape situations. This type of lens typically costs between $1,000 and $1,500. It’d be a 16-80mm zoom on an APS-C camera, and on Micro Four Thirds, a suitable standard zoom would be something like a 12-40mm, 14-42mm, or 12-60mm.
After adding a standard zoom to my kit, the next lens on my wish list would be a telephoto zoom lens. I’ll discuss the value of longer lenses a bit more later.
A Good Tripod is Well Worth the Investment
Don’t skimp on support. It’d be a shame to put thousands of dollars’ worth of gear onto a cheap, flimsy tripod. Or worse yet, not have a tripod at all. While plenty of landscape photographers have captured beautiful images without camera support, you’ll want to use a tripod most of the time. It’s a critical part of a complete landscape photography kit.
A good tripod is a stable tripod. Better yet, a sturdy tripod that’s lightweight and durable. If you can spend the money to purchase a high-quality tripod from a reputable brand, do it. A good tripod will outlast many cameras and lenses. It may even last a lifetime. If you can’t afford a top-of-the-line tripod, that’s okay. There are plenty of options under $250 that will keep your camera steady.
When choosing a tripod, you must first decide what material you want. Carbon fiber tripods are more robust and lighter than aluminum but often cost more money. You need to determine what weight rating you require for your equipment or equipment you might realistically purchase within the next few years. You never want to put heavier gear on your tripod than it’s designed to support. You don’t even want to cut it close, so make sure your tripod is rated for at least twice as much weight as you intend to put on it. I’ve seen people’s tripods fail; it’s not a pretty sight.When choosing a tripod, research is essential, and it’s worth investing in a good tripod. You don’t need something as good as this Really Right Stuff Versa tripod, which starts at over $1,000, but a high-quality tripod will last you a very long time. A neat aspect of the Versa tripod is that you can replace its feet with different options, like spikes for sand or metal claws or ice and rocks.
When it comes to tripod height, ideally, your tripod should be able to hold your camera at your eye level. Not every scene will work best from that height, but when it does, it’ll be comfortable to shoot if you don’t need to bend over. I prefer tripods that can go even higher, so they’ll work well on steep inclines and offer additional composition options. Likewise, it’s good if your tripod can get low, providing an exciting and dynamic perspective.
You’ll notice that some tripods include a center support column. This seems convenient but has a couple of distinct disadvantages. The setup is less stable when you extend the center column. Further, the center column prevents you from setting up low to the ground. Some tripods have designs to overcome this latter issue, but it’s still generally a good idea to avoid having a center column altogether.
You’ll need tripod legs and a tripod head. Many tripods come with a head already attached. There are a few varieties of tripod heads.
A pan-tilt head uses adjustable handles or knobs to control side-to-side and up-and-down movement. It’s a common type of tripod head, and it can work well for landscape photography. Ball-heads are often found on more expensive tripods. They have a single control that loosens or tightens the ball, which allows you to make exact adjustments in one motion.
Photographers may use a third type of tripod head called a gimbal head. It balances your camera and lens and is designed for large, heavy lenses. It’s also easy to use, but gimbal heads are large, expensive, and specialized. There are also tripod heads designed for creating panoramic photography. This is a ballhead. You can adjust your camera by rotating a single knob, making it an excellent choice for landscape photography. It’s swift and convenient. Pan-tilt heads are also good choices and are often found on less expensive tripods.
When using a tripod, keep it as level as possible. If your tripod isn’t level, it’s more likely to tip over, and that’s bad news for your camera. If you’re working near water, try to keep your tripod leg adjustments out of the water, whether they’re latches or rotating locks. This is especially important if you’re working in saltwater. Water, salt, and mud will do a number on your tripod if you’re not careful.
Wear and tear are inevitable, but cleaning your tripod, especially after being in adverse conditions, will help keep your tripod in good working order for many years. Tripods are underappreciated enough, so make sure you take good care of yours.
Essential Lens Filters for Landscape Photos
Like the trusty tripod, filters are an essential part of a landscape photography kit. While you can accomplish a lot when editing photos, some filter effects cannot be replicated. And even those that can are often better realized at the time of capture using a real-life filter in front of your lens.
We have graduated neutral density filters thanks to landscape photography pioneer Galen Rowell. These filters are dark on one part and clear on the other. Typically, you place the darker portion over a bright sky and the clear part over a darker foreground element, which helps balance an otherwise high-contrast scene. Modern cameras have tremendous dynamic range, but even still, some scenes are too much to handle in a single exposure without a filter, especially at sunrise and sunset.
Graduated neutral density filters come in a few varieties, including hard-edged and soft-edged flavors. I opt for the latter, as they work better in any scene that doesn’t exclusively feature a straight horizon. The soft-edged filter is more practical when you introduce mountains or trees.As you can see, graduated neutral density filters come in many strengths and designs. I prefer a softer edge, but some photographers have found plenty of use for hard-edged graduated ND filters. This graphic is courtesy of LEE Filters, a well-known and reputable filter company, but many manufacturers make high-quality glass and resin filters.
There are also solid neutral density filters. These are dark filters that reduce the amount of light that reaches your image sensor. If you’ve seen photos of smooth waterfalls, the photographer likely used a neutral density filter. Sometimes the ambient light is dark enough that you can achieve a slow shutter speed without an ND filter, but often, an ND filter is required.
ND filters come in many strengths. A 3, 4, 6, or 8-stop filter is a good starting place that will work across most situations. You can read more about ND filter strength here.This image was shot using a LEE Big Stopper filter. It increases the shutter speed by 10 stops, allowing for smooth water on a breezy day. You can also see the effect of the filter in the sky.
Perhaps no filter better illustrates what photo editing software can’t do as well as a circular polarizing filter. While the physics of a polarizing filter is beyond the scope of this article, the filter’s utility is that it reduces reflections. Whether it’s a reflection in the sky, on water, or on vegetation, a polarizing filter will help bring out a subject’s most vibrant color. They’re also instrumental for photographing waterfalls and streams, which will otherwise reflect the ambient light and look flat.
However, you must be careful when using a CPL filter on a very wide-angle lens, as they can asymmetrically affect a blue sky, causing unsightly dark spots in your image. In some cases, it’s helpful to capture two photos of a scene, one with the CPL and one without, and then blend them to get the best of both worlds.Without a polarizing filter, this image would practically be impossible. By cutting down the reflected light that reaches the sensor, you can see the rocks in the stream and the color in the foliage. No amount of Photoshop will ever recreate the effect of a polarizing filter. It’s an absolute must-have for landscape photographers.
Camera Settings and Technique
Once you have a camera, lens, tripod, and filters, it’s finally time to capture landscape photos. While making a great landscape photograph is not easy, dialing in appropriate camera settings is relatively straightforward.
Exposure Triangle
Before getting to camera settings, let’s quickly cover the exposure triangle, as it’ll inform the rest of the discussion. There are three primary components that influence your photo’s exposure. Changing any of the three settings will make an image brighter (more exposed) or darker (less exposed). The three parameters are shutter speed (the duration your shutter is open, allowing light that goes through your lens to reach your sensor), aperture (the width of the opening that lets light through the lens), and ISO (how sensitive your image sensor is to the light it receives).Exposure triangle.
For landscape photography, especially when working on a tripod, the best ISO is almost always your camera’s base native ISO. Depending on your camera, it’ll likely be ISO 64, 100, 160, or 200. At base ISO, your camera produces the best image quality with the most detail and widest dynamic range. Whenever possible, shoot at base ISO.
Aperture and Depth of Field
The primary decision you must make is what shooting mode to use. Aperture priority is good if you’re shooting a scene without much movement. This means that you will manually select an aperture, and your camera, given the ISO setting, will select the appropriate shutter speed. Aperture is crucial for landscape photography because it determines how much of a scene is in focus. The higher the f-stop, and thus the smaller the aperture opening, the more of the scene that will appear sharp. For example, at f/11, the depth of field is greater and more objects from close to far will look sharp than at f/5.6.
To make a short digression, this is as good a time as any to discuss depth of field and hyperfocal distance. In many landscape scenes, you want to get as much of the scene in focus as possible so that your image is sharp from ‘front to back.’ However, you also don’t want to stop your lens down to its minimum aperture because your image will suffer from diffraction and be soft.
We don’t need to get into the physics of optics, but the primary takeaway is that while stopping down from maximum aperture will improve quality, there comes a point when stopping down will degrade performance. There’s a balancing act between having more field depth and an acceptably sharp image. Each lens is different, so it’s wise to do some makeshift test shots with your lenses before taking real-world photos.
You can capture multiple images with different focus points and then combine them on your computer. This is commonly referred to as focus stacking. You can also use what’s called hyperfocal distance. There are plenty of calculators to determine hyperfocal distance given your camera, focal length, and desired aperture.This image has areas I want to be sharp from the foreground through to the background. In this case, I achieved acceptable sharpness throughout the frame using a single exposure at f/11 by focusing about halfway in between the nearest object (small rock) and further object (distant island). It’s not tack-sharp, but it’s visibly sharp enough. Ultimately, “sharp enough” is the goal most of the time. There’s often a balancing act between depth of field and maximum sharpness. When that balance becomes impossible, focus stacking is a good alternative.
You can also simplify things by determining the closest object in your frame that you want to appear sharp. Then, adjust your focus until the background of the image and your selected “close” object appear similarly sharp. They may not be as sharp as possible – but they’ll appear sharp. Ultimately, how your image appears is what matters. But again, sometimes an object is so close to your camera that you simply can’t have everything appear crisp and detailed in the image. This outcome is more likely the longer your lens or, the closer an object is to the lens.
Manual Mode and Shutter Speed
Back to camera modes. Another good option is shooting in full manual mode, especially if using a mirrorless camera or a DSLR with live view capabilities. In manual mode, you choose both shutter speed and aperture.
If you’re photographing a scene with moving water, you may want to first choose a shutter speed, such as 1″ or slower, and then see how your exposure looks at different ISO and aperture settings. This is also a situation where a neutral density filter may be needed. In bright light, your camera’s ISO may not be able to get low enough for a good exposure at the desired shutter speed and aperture.When shooting moving water, such as a stream, a shutter speed from 1″ to 5″ is typically a good starting point. In most situations, you want the shutter speed slow enough to smooth out the fine detail but not so slow that you lose all the detail in the water entirely.
Histogram
Evaluating your exposure relies upon what’s called a histogram. Many cameras allow you to see a live histogram and select camera settings as you compose a scene. A histogram is a graph that represents the tones, or levels of brightness, across your image. The leftmost edge is pure black (shadows with no detail), and the rightmost edge is pure white (highlights with no detail). Everything in between the extreme edges are pixels with information.In this image with the histogram overlaid, you can see pure white pixels (shown in red along the mountain ridge and in other snowy areas) and black pixels (shown as blue in the shadow of the three large trees).
Your image is likely well-exposed if your histogram has the most prominent spike near the middle, with gentle slopes toward each extreme. Any big spikes at either edge indicate that you’re losing detail to shadows (left edge) or highlights (right edge). With that said, your camera shows you a histogram for a JPEG image, not raw. Raw image files allow for additional flexibility when editing photos. When processing a raw file, you can often recover some shadow or highlight detail that appears lost in a JPEG image.
Therefore, many photographers use a technique called “exposing to the right.” ETTR means that your JPEG histogram is skewed to the right, ensuring that you capture as much shadow detail as possible while having minor highlights that are easily recoverable during raw image editing. If you need to increase exposure later to bring back shadow detail, you’ll introduce noise in these areas of your image, like if you shot at a higher ISO than you did.
Every camera is slightly different regarding the flexibility of its raw files, so you’ll need to test your camera. Further, sometimes there’ll just be a highlight or shadow in your image with no detail, and that’s perfectly acceptable.
Exposure Compensation and Bracketing
Sometimes a scene is so bright in some areas and dark in others that even a graduated neutral density filter won’t do enough work. Perhaps a scene has brighter and darker elements throughout the frame, and your filter darkens or brightens areas you don’t want to be affected. In situations like this, you can use exposure bracketing. This setting allows your camera to successively capture images that are slightly brighter or darker than the rest using what’s called exposure compensation.
Your camera lets you use exposure compensation at any time, even if you aren’t using bracketing. I like to use +0.3-1.0 exposure compensation in most situations because your camera is designed to try to expose an image to what’s called ‘middle gray.’ This will make white areas appear gray rather than white. That’s typically not what we want, so don’t be afraid to use exposure compensation for times you’re not using a full manual shooting mode and your camera is making exposure decisions automatically.
nullThis is an exposure blended image. I combined multiple images shot at different exposure compensation values to ensure that the final image would include the full range of shadow and highlight detail. A graduated neutral density filter wouldn’t have worked well here because of the shape of the mountain and trees.
Once you have bracketed images captured at different exposure settings, you can combine the images into a high dynamic range (HDR) image using software or take a more hands-on approach and do exposure blending. This will come up again in the photo editing section, but the gist is that you can achieve a wider dynamic range using multiple photos shot with different exposure settings than a single image.
What is a Raw Image?
If you’re a beginner, you might be wondering, “what is a raw image?” Nearly every camera, and even most smartphones, lets you capture a raw image file. A raw image file includes minimally processed data from your camera’s image sensor that must then be processed by a raw converter, such as Adobe Lightroom, to display in a usable color space. Raw image files have much more flexibility than JPEGs, allowing you to extract more detail, color, and tonality than would otherwise be possible.
You should always shoot landscape images in raw. If you want to shoot raw + JPEG, that’s fine, but make sure you’re shooting raw images at the highest quality and largest size your camera allows. There’s a lot of debate about uncompressed versus compressed raw file quality. We don’t need to solve that debate, but you should at least choose a lossless compressed option.

Other Camera Settings to Understand
Other camera settings to consider include white balance, long exposure noise reduction, high ISO noise reduction, lens corrections, and autofocus mode. For white balance, it is recommended that you use using the automatic mode. You can easily adjust the white balance when processing your raw image files later, but automatic will often be a great starting point.
As for noise reduction settings leave in-camera noise reduction disabled. It is preferable to perform noise reduction when editing images. Lens corrections are okay to leave on, but again, it’s often better to perform these yourself. Most cameras and lenses have available correction profiles in many photo editors, and these are typically better than corrections performed in-camera.

Focus Modes
Autofocus is a big question for many photographers. Your subject will almost always be stationary when doing landscape photography, so you want to use AF-S or Single-Shot AF. The terminology varies by camera brand.
For the autofocus area, it is better to use a single-point setting that you can move around the frame as needed. Don’t let your camera determine your photo’s subject. While autofocus systems are incredible, you have the time to exercise control. Often, you shoot landscape images in low light and with at least a polarizing filter, which can push even excellent modern autofocus systems past their limits, so it is better manually focus. Even if the light was bright in a scene like this, a fully automatic autofocus mode might struggle to focus on the right part of the scene. It is best to use a single autofocus point area mode when doing landscape photography to avoid the camera selecting the wrong tree or another object as its focal point.
Speaking of time, take the time to zoom in on your image to ensure that it’s in focus. If the light is low, such as when shooting in the early morning or after sunset, don’t be afraid to switch to manual focus. Again, zoom in and check the focus. Manually focus when zoomed in using live view.
Using Your Camera’s Self-Timer or Remote
It is recommended to use a wireless or wired remote to control your shutter for landscape photography, your camera’s self-timer will do in a pinch. Using the self-timer ensures that you aren’t touching your camera when the shutter opens, eliminating the risk of camera shake. This is especially important when doing long exposures. Most cameras default to 5 or 10 seconds of delay when using the self-timer, which is too long for our purposes, so switch it to 1 to 3 seconds so that you’ll be able to shoot more images. 10-second delays add up.When doing long exposure photography, it is best to use a remote because you can open the camera’s shutter without touching the camera, thereby reducing the risk of camera shake. You can also use your camera’s self-timer to a similar effect. However, a remote is better if you’re trying to time waves when doing coastal photography.
Composition in Landscape Photography
You can capture an image with perfect exposure and tack-sharp focus, but it won’t be a good photo if it’s not well-composed. It’ll be competent on a technical level, but not an artistic one.
A beautiful scene may appear to be a worthwhile image all by itself, but that’s rarely true. Good composition requires identifying a subject. Everything flows from that crucial first decision.
Rule of Thirds
Most of the time, putting your subject dead center in the frame is a bad idea. It rarely works in landscape photography. Placing your subject off-center often makes an image more interesting. If you’re unsure where to put your subject, the classic “rule of thirds” is a good option. What’s great about this rule is that it works well in many situations and an available viewfinder overlay in most cameras and the default cropping frame in most photo editing applications.
Curves
Curves are a helpful way to lead the viewer’s eyes through the frame. Rural roads, winding streams, or even how light hits objects in your photo can create visual curves. Ultimately, the goal is to keep your viewer engaged, and there are few compositional elements better at this than curves.In this case, the curve is prominent (it isn’t always). The curved stream leads the viewer through the frame and between the trees.
Straight Lines
Straight lines are also great, especially when you create compositions with parallel or perpendicular lines. Parallel lines create nice symmetry in your scene, whereas perpendicular lines show more dynamism and power. Like curves, these don’t need to be prominent lines that knock the viewer over the head. They can be subtle, like slight differences in color or brightness. Using curves or straight lines as leading lines into your frame and toward your subject is ideal. Diagonal lines are also excellent compositional elements.This composition includes curves and lines. Not just straight lines, but diagonal, parallel and perpendicular lines. These elements help lead the viewer through the scene and keep their gaze within the frame.
Balance
Compositional balance is vital. Balance can be achieved in many ways, including through symmetry–like reflections, by balancing light and dark areas of your frame and balancing color. To put it simply, you don’t want your image to be weighted heavily toward one side. Removing the detail helps me see how the image looks only in terms of tonal values and color.
Watch Your Edges
This is important because you don’t want your subject cut off by the edge of the frame. If there’s a single element or small group, like a tree or a patch of flowers, try to keep them in the frame and away from the edge. When setting up a scene, you may become too focused on composing your subject that you lose track of the rest of the image. It is important to scan the edges of your viewfinder or monitor to check if there’s anything that I’ve cut off or something distracting. Give your subject room to breathe and exist within your composition.
Don’t Be Afraid to Get Closer
If there are unnecessary or distracting elements near the edge of your shot, consider moving closer or zooming in. Most of the time, a first composition includes too much rather than not enough – too much sky, too much water, too much foreground, etc.
Foreground and Depth
There is No Such Thing as Going Too Wide
If you’re using foreground elements in your composition, you may be tempted to use an ultra-wide-angle lens. Ultra-wide lenses are great for capturing more of a scene and delivering exciting perspectives. However, they can also make a big, impressive background look smaller relative to objects closer to the lens. Perspective is important to keep in mind. You don’t want an imposing mountain to look like a small bump on the horizon.
Portrait Orientation for Landscape Photos
“Landscape orientation” doesn’t mean you can’t photograph landscapes vertically. The default orientation of your camera is horizontal, which is sometimes called “landscape” orientation. Don’t let that fool you; shooting vertically is always an option. Not every scene works best vertically, but it’s a great idea to consider “portrait” orientation compositions.

Keeping It Simple
The design principle to “keep it simple, stupid” is well-applied to photography. Some of your favorite landscape photographs may seem complex, but they’re almost always simple when boiled down. Your image doesn’t need to do a lot to be effective. It needs to be interesting, and ultimately, being interesting rarely requires complexity. If something in your frame isn’t doing the all-important work of assisting your subject, consider eliminating it from the frame altogether. Or, at the very least, make sure that it’s not a distraction. A strong composition is a simple one.

Colors
You could write a book about colors. Many have. When composing landscape photos, the bare minimum to consider about color is to think about how tones interact with one another and how different colors have more “weight” in a composition.
It’s also important to think about how color affects the emotion of an image. Blue can be calming, red is louder and demands more attention, orange creates a sense of warmth, and yellow is bright and energetic, just to name a few. Adjustments to the color temperature of a scene, making it cooler or warmer, can dramatically affect the emotion of your image.
Keep Things Level
Do your best to keep your camera level when capturing landscape photos. Many cameras include a built-in level. You can also buy a small level to put in your camera’s hot shoe. No matter how you level your camera, just make sure you do it. A crooked horizon is distracting, and fixing it when editing will require you to cut off part of your image.

A Summary of Composition
There’s so much more to say about composition, and it’s a skill you’ll spend the rest of your life working to improve. However, suppose you’re just getting started, and you feel overwhelmed. In that case, the three most significant compositional ideas always to remember are understanding your subject, arranging the frame to emphasize the subject while cutting out anything distracting, and keeping your image simple. The rest will sort of fall into place as you go.
Basic Photo Editing for Landscapes
Sometimes it can feel like learning how to edit photos is even more complicated than learning to take good pictures in the first place. There’s also no need to get bogged down by which editing application you use. Many photo editors will do the trick. But, if you have no idea where to start, the Adobe Photography Plan is $10 a month and includes Adobe Lightroom and Photoshop, two of the most popular photo editing applications. There are a lot of great educational resources for Adobe software.
It’s also a good idea to ensure that your monitor is calibrated. It’s probably unnecessary to purchase a new monitor, but if you’re interested in upgrading your monitor, check out our Best Monitors for Photography and Photo Editing roundup. A good, calibrated monitor will improve your photo editing workflow and is especially helpful when you start printing images.
Cropping
When you open your landscape image in an editing application, you should first ensure that available camera and lens profile corrections are applied. This is especially important with wide-angle shots, as these lenses are more likely to exhibit distortion.Just because your camera’s image sensor is a specific aspect ratio doesn’t mean you need to stick to it when editing your photos. You should plan a different crop when capturing an image, including a wider aspect ratio.
Next, consider cropping. Ideally, you spent time in the field and captured the perfect composition. However, sometimes you need to adjust the composition after the fact. There’s nothing wrong with cropping to improve composition. There’s also no reason against using a different aspect ratio than your image sensor. Just because your camera shoots 3:2 or 4:3 images doesn’t mean that you must stick with that aspect ratio, especially if you intend to print your photos. The 5:4 aspect ratio works well for 8×10 and 16×20 prints.
Global Adjustments
Assuming you have been shooting in raw, which you absolutely should be doing, you have a lot of flexibility for the rest of your post-processing workflow, especially with white balance. Automatic white balance does a great job, but you may want to change it slightly to better reflect what the scene looked like at the time, color cast and all, or you may want to change the emotion of your shot by making it cooler or warmer. When you shoot raw, the world is your oyster when it comes to white balance, so experiment.
After cropping and adjusting the white balance, now is an excellent time to check in on your histogram. Your raw image’s histogram may look slightly different than the one you saw on the back of your camera. Remember, you typically want your histogram when editing to be balanced, meaning your photo has a full range of tones.
You can adjust your image using sliders, like exposure, brightness, contrast, shadows, highlights, blacks, and whites. You can also use curves adjustments. While using curves is the preferred method, sliders are more straightforward and often deliver good results. With each adjustment you make, check on your histogram and pay close attention to the image quality of the shadow and highlight regions of your image. As with any adjustments, a light touch is often best.

You can also adjust individual colors and the overall saturation of your image. Perhaps you want to emphasize a particular color harmony in your photo or draw attention to specific colors. It is a good idea to focus on a few colors in a scene, often green, blue, and orange. These are common colors in most landscape photos and will provide a slight increase in the saturation or brightness of these colors providing more “punch” to your landscape photo. Like with adjustments to brightness, it’s easy to overdo it, so making minor adjustments is the best practice.
Local Adjustments
So far, we’ve discussed what are called “global” adjustments. These adjustments apply to your entire image. There are also “local” adjustments. These are powerful ways to put the finishing touches on your image because they are specifically applied to only certain parts, colors, or tonal values in your photo.
While there’s no limit to what you can do to your photos, common local adjustments include using adjustment brushes and virtual graduated filters. Like the latest version of Adobe Lightroom Classic, some apps have AI technology to select and mask the sky in photos automatically. This allows you to adjust the exposure, color, and much more of your sky without affecting the rest of your image.Adobe Lightroom even includes artificial intelligence to automatically mask the sky in your images, making editing landscape images much easier. You can see the auto-generated mask here, shown in red.
There are different ways to make local adjustments beyond filters, brushes, and automatic masks. Most photo editors also allow you to select a specific color or luminance range. This means that you can choose an area of the image that’s a particular color or brightness and edit only those pixels. These pixel-level masks are precise in a way that manual masking selections never will be.
Sharpening
There’s no perfect recipe for success when sharpening, as images from different cameras will look best with varying sharpening strengths. View your image at 100% in your photo editor when sharpening photos. You want your image to look sharp and detailed, but you’ll introduce artifacts and noise if you overdo sharpening. There’s a fine line between an image looking detailed and appearing artificial.
You can also utilize local adjustment techniques and masks to sharpen only areas in your image with detail, like mountains and trees, rather than the entire photo, including the sky, which likely doesn’t have any detail you want to sharpen. It is best a light touch with the sharpening to

Special Technique: Focus Stacking
Earlier, I mentioned that it’s not always possible to get enough depth of field with a single frame, especially when you’re photographing with a longer lens or including close foreground elements. This is where focus stacking comes in handy. To focus stack images, you must first capture multiple images with different focus distances. Ideally, the files have identical, or at least very similar, exposures. A manual shooting mode can be helpful here.
Once you have your images, you can load them into software like Photoshop or Helicon Focus. When in Photoshop you load your focus stacking images as layers. Then go to Edit > Auto-Align Layers > Auto. At this point, you have two choices. You can go to Edit > Auto-Blend Layers > Stack Images. This should work well in many situations. You can create layer masks and manually stack your photos if it doesn’t. Helicon Focus is also an excellent automated solution. Focus stacking is a worthwhile skill to learn, as it will help you when using longer lenses or when utilizing foreground elements.
A Summary of Editing
Ultimately, what matters most isn’t the histogram or any sliders or settings, it’s how you feel about your photo. If you like the way it looks, you did an excellent job with the editing. However, a few final words on photo editing. You want to use non-destructive editing techniques. Many photo editing apps operate like this by default, but it’s important to preserve your original raw image files. Like your photo editing skills, your editing skills will improve with practice, too, and you may want to revisit old images years later. To that end, back up all your original image files.
Planning Your Landscape Shots
The Best Time of Day for Landscape Photography
Scouting Locations
Sunset shooting has a distinct advantage, though. You can show up at a location in the afternoon and scout it in full light before sunset. Scouting locations is important because it lets you plan potential images ahead of time, and you can test out different compositions while the light isn’t that good, ensuring that you’re ready when – or if – the conditions work out well.
Some locations work best at sunrise and not sunset, or vice versa, because of how the light hits the scene. Scouting helps you get a sense of this, but you can also use apps like PhotoPills to plan your shots and see how the sun will interact with a given location. PhotoPills is also great for other information like sunrise/sunset and moonrise/moonset times, calculating exposure with different filters, calculating depth of field, and much more.
Seasons
As for seasons, this depends heavily upon the location. Some beautiful areas aren’t accessible year-round, so that’s something to consider. Seasonal weather patterns can significantly impact how a place looks, too. Summers in Nevada are quite hot, so I usually shoot in the Mt Charleston where the temperatures tend to be cooler.
The Importance of Preparation
All these unknown factors demonstrate the necessity of scouting and researching locations. There’s no substitute for being at a location, but the value of researching from home is not to be understated, either. If you’re planning a specific trip for landscape photography, especially if it’s an expensive one, dedicate as much time as possible to planning out different areas you want to visit and deciding when you think those areas will be best concerning time of day and weather.
Landscape photography may seem like a slow-paced endeavor, but there are times when good light fades extremely fast, and the more prepared you are ahead of time, the better your chances of success.
Handling Failure as a Landscape Photographer
You can do everything right – make all the best plans, do extensive research, and compose the perfect shot in the field – and the good light never arrives. You go home empty-handed. It’s frustrating and, unfortunately, inevitable. If you spend a lot of time doing landscape photography, you’ll quickly find that the mediocre and bad days vastly outnumber the great ones.
It’s easier said than done, but you must try to find the silver lining. Even if good photo conditions don’t materialize, you should still be able to do valuable scouting and grab some fresh intel about a location. I bring a note pad woth me so I can take notes especially when visiting a new spot. Even if I don’t get any good photos, I at least learn something and give myself a better chance of making a good image the next time.
It’s also an opportunity to try a different style of photography. Maybe the conditions aren’t good for the shot you envisioned and hoped to capture, but they may be okay for other types of images. You can try switching lenses, heading to a nearby spot, or trying different techniques like long exposure photography. Sometimes flat light can work quite well for long-exposure photos or even for black and white landscapes, depending upon the scene.

13 Surefire Tips
Capturing stunning landscape photography might seem difficult – but with the right tips, tricks, and techniques, you can create consistently incredible images.
1. Shoot in Manual mode

If you want to create landscape photos that are both artistic and full of detail, then I highly recommend you learn to use your camera’s Manual mode setting.
You see, Manual mode lets you work independently with the three exposure variables, each of which affects your images differently:
-The aperture lets you brighten or darken the image, and it also lets you increase or decrease the depth of field (i.e., the amount of the image that’s in focus).
-The shutter speed lets you brighten or darken the image, and it also lets you increase or decrease the amount of motion blur present in the image
-The ISO lets you brighten or darken the image, but the higher the ISO, the more noise (detail-destroying specks of light and color) that’ll appear in your file it’s important to realize that, by taking complete control of your camera, you can adjust the image exposure, boost the depth of field, prevent noise, and include artistic motion blur effects at will.
And while you can always use semi-automatic modes like Aperture Priority to shoot landscapes, in my experience, it’s best just to take charge and handle your settings directly!
2. Adjust your settings for maximum depth of field
In landscape photography, a deep depth of field is almost always the way to go. In other words, you should try to keep as much of your scene in focus as possible.
Why? A landscape that’s sharp from front to back offers all sorts of beautiful details for the eye to explore – and it also feels more real, like the viewer could step forward and fall right into the scene.
Now, the simplest way to maximize depth of field is to choose a small aperture setting (i.e., a large f-number, such as f/11 or f/16). The smaller your aperture, the greater the depth of field, and the more the landscape will be in focus.
An image like this, which features tack-sharp detail from foreground to background, requires an aperture of at least f/11:

Keep in mind that smaller apertures cause less light to hit your image sensor. You’ll need to compensate for the narrow aperture either by increasing your ISO or lengthening your shutter speed (or both). In general, it’s better to keep your ISO at its lowest setting while lengthening your shutter speed, especially if you’re using a tripod (see my next tip!).
One more thing: While landscape photographers do tend to like deep depth of field photos, it’s possible to get great results with a very shallow depth of field. The technique is tricky and requires a lot of finesse, but if you prefer the shallow-focus look, don’t be afraid to experiment!
3. Use a tripod whenever you can

To maximize your depth of field, you’ll need a small aperture. Then, once you’ve dialed in your aperture setting, you’ll be forced to lengthen the shutter speed (so you get a detailed exposure).
If you’re working in bright light, you can often shoot at f/11 and 1/250s (or greater), in which case you’ll be able to capture sharp handheld shots.
But the best landscape photography often takes place when the light is low; in such cases, you’ll need to drop your shutter speed to 1/30s and beyond.
If you’ve ever tried to handhold your camera at 1/30s, you’ll know that it’s really hard; unless your hands are incredibly steady and your technique is outstanding, you’ll end up with unusably blurry images. (Also, even the steadiest photographers regularly fail to handhold images at one-second shutter speeds and beyond!)
That’s where a good landscape tripod comes in handy. You can use it to stabilize your camera and keep your photos tack sharp for 1-second, 5-second, and even 30-second long exposures.
By the way: Even if the light is strong enough to give you a fast shutter speed, a tripod can still be beneficial. It’ll force you to slow down and consider your composition more carefully.
(Pro tip: To prevent camera shake when pressing the shutter button, consider purchasing a remote shutter release!)
4. Look for a focal point
Once you’ve mastered your settings, it’s time to start thinking about your landscape photography composition (i.e., the arrangement of elements in the scene).
And while composition can be a complex topic, I can offer a few basic guidelines that’ll make a huge difference to your photos.
First, pretty much every great landscape shot needs some sort of focal point – a main subject that draws the eye and captures the viewer’s attention.

A landscape photograph without a focal point ends up looking rather bland and empty. Plus, it leaves the viewer’s eye wandering through the image with nowhere to rest.
Note that focal points can take many forms, including:
-Buildings and structures (like in the photo above)
-Eye-catching trees
-Boulders or rock formations
-Silhouetted wildlife
-A person
Then, once you’ve determined your landscape photo’s focal point, think carefully about where to position it within the frame. Try to go beyond a conventional “centered” composition (with the main subject sitting statically in the middle of the shot). Instead, try using the rule of thirds, or go for a minimalist composition by placing the focal point off to the side.
5. Include a stunning foreground
Beginner landscape photographers tend to find a beautiful scene, point their camera, and then hit the shutter button.
And while the resulting shots look nice, they’re often missing something powerful:
Good foregrounds tend to feature beautiful details, such as flowers, patches of foliage, water moving through a stream, glistening rocks, or waves lapping up on the sand.

Note that you’ll generally need a wide-angle lens to pull this off. The wider the field of view, the easier it’ll be to include both a beautiful foreground and a stunning background. Make sense?
6. Don’t forget about the sky
In landscape photography, you should always, always, always think about the sky.
Clear skies, for instance, tend to look bland and lifeless, while a mix of clouds and sun offers all sorts of interest (and explosive colors at sunrise and sunset!).
You should check the weather forecast before planning any landscape photography outings; that way, you can head out on partly cloudy days and maximize my time spent with beautiful skies.
If you’re faced with a clear sky, consider waiting to see if you get a couple of clouds – or, if you don’t have the time, try to subordinate the sky to the rest of the scene by placing it in the upper third of the image and contrasting it with a stunning foreground.
On the other hand, if the sky is filled with drama, interesting cloud formations, or colors, then let it shine. Place the horizon in the bottom third of the frame to emphasize the heavens.

Pro tip: If your skies aren’t looking quite as intense as you’d like, consider enhancing them with filters. Neutral density filters will let you use long shutter speeds that stretch the clouds like cotton candy, while graduated neutral density filters will help you balance the sky and foreground exposure so you can capture plenty of detail.
If it is the middle of the day and the light is harsh you might want to consider shooting infrared.
7. Use leading lines to add dynamism
Leading lines are lines that encourage the eye through the image (generally toward the main subject; see above!).
And in landscape photography, a good leading line or two can be the difference between a mediocre snapshot and a great image.
(Why? Leading lines draw the viewer into the photo, plus they add lots of depth!)
Now, leading lines might seem hard to find, but they’re actually pretty common. You just have to know where to look! For instance, you can create leading lines using:
-Roads
-Sand patterns
-Receding waves
-Rivers
-Cracks in ice
-Leaves
-Fallen logs
Really, anything line-like can work. The trick is to position the lines in the foreground. Then use a wide-angle lens and get down low, so that the leading lines appear huge in the frame and immediately captivate the viewer:

8. Use the right gear
Here’s the thing:
It’s possible to capture great landscape photos using only your smartphone. But if you want to get the most consistent results, and you want to be able to create large, beautiful prints, it’s important to use specific equipment.
For instance, you’ll want to pick a good landscape photography camera, such as a full-frame DSLR or mirrorless model. A Canon EOS R5 or a Sony a7R IV, for instance, will offer plenty of megapixels (for making large prints) as well as solid low-light capabilities (for doing astrophotography). If your budget is tight, consider an older full-frame DSLR (such as a Canon 6D or a Nikon D800).
It’s important to bring a sturdy tripod with you. And it also pays to stock up on filters, including a circular polarizer (to reduce reflections when shooting water) and a few high-quality ND filters (so you can experiment with longer shutter speeds as required). Some landscape photographers also like to use graduated neutral density filters, though it’s possible to get a similar effect using HDR techniques.
9. Aim to capture movement
(Plus, you can use movement to create leading lines or to produce an eye-catching focal point.)
Here’s what you do:
First, look for motion, even if it’s subtle. Search for wind in the trees, waves on the beach, water flowing through a stream or over a waterfall, birds flying, or clouds moving overhead. Mount your camera on a tripod and compose your shot.
Second, lengthen your shutter speed to 1/30s and beyond, then set your exposure. Note that different shutter speeds will give you dramatically different results, so it’s a good idea to take several shots while making adjustments. If you’re working in bright conditions, consider using an ND filter or a polarizer to reduce the light hitting the sensor; that way, you can drop your shutter speed further without worrying about overexposure.
Note that landscape photographers achieve all kinds of different effects simply by experimenting with various shutter speeds. A 1/15s shot, for instance, will blur moving water but retain plenty of detail in the sky, like this:

Whereas a 30s shot will heavily blur the water and start to stretch the clouds.
At the end of the day, working with movement is a lot of fun. Just embrace the effect and see what you can create!
10. Photograph during the golden hour and blue hour
The golden hour is the time just before sunset and just after sunrise, when the sun is low in the sky and produces a beautiful, warm light.
And the golden hour is amazing for landscape photography. For one, the sun softly illuminates the scene, emphasizing all the little details.

The golden hour also offers lots of cotton-candy-colored skies, and the angle of the low sun creates interesting shadows while enhancing textures.
Now, you might be wondering:
Should I only photograph landscapes during the golden hour and the blue hour? Or is it okay to head out at other times, too?
That’s a good question. In my experience, it’s possible to get beautiful landscape photos on heavily overcast days, but you’ll want to find the right subjects – such as foliage, forests, and waterfalls – and I’d recommend including very little of the sky in your composition.
As for midday landscape photography in bright sun: Avoid it whenever possible. Midday sun will cast unflattering shadows, wash out colors, and produce lots of unpleasant contrast.
11. Don’t be afraid of bad weather

A landscape scene can change dramatically depending on the weather – so it’s essential that you plan ahead and carefully pick your time and location.
As I emphasized above, partial cloud cover at sunrise and sunset makes for a stunning sky (and partial cloud cover looks great during the blue hour, too!). But other types of weather are great for landscape photography, including:
-Fog
-Rain
-Dark, heavy clouds
-Snow
-Rainbows
Unfortunately, many of these weather events don’t last very long, so it’s important that you always keep one eye on the forecast. And if you do expect fog, snow, or storms, choose your location in advance. Fog and snow look great in forest scenes, while rain and stormy clouds can dramatically enhance beach and ocean shots.
Pro tip: Bad weather, while highly photogenic, can be dangerous! Always tell a friend or family member where you plan to go, always wear proper protective gear, and bring proper protective gear for your equipment, too. I recommend a waterproof camera cover, though you can always get away with a modified trash bag plus some rubber bands (to secure it around the lens).
12. Think about the horizon line

This landscape photography tip is quick and easy:
Always pay attention to the horizon line, and do whatever you can to keep it straight.
A crooked horizon line looks incredibly amateurish, and while you can fix this in post-processing, you’ll lose pixels along the edge of the frame – which will reduce your ability to print large and (even worse!) can cut off key compositional elements.
So make sure you get it right in-camera! Here, viewfinder gridlines can be helpful. Most cameras have these activated by default, but if you don’t see them, head into the settings menu and switch them on.
And if you use the gridlines but you still struggle to keep things straight, you might consider purchasing a bubble level. You can attach one of these to your camera’s hot shoe, and you can use it as a reference when setting up new compositions.
13. Change your point of view

Are you looking to capture strikingly unique landscape images?
Then you’ve got to move past those basic “lookout” shots, where you point your camera at a beautiful scene, then snap a photo.
Instead, take a little more time with each landscape scene. In particular, look for an interesting angle or point of view, where you approach the composition from an interesting direction. You should have fun with this; try getting down low, finding a high vantage point, walking off to the left or the right, or even shooting from directly above (using a drone, a lookout platform, or a helicopter!).
Often, these unconventional images are astonishingly powerful, in part because they show the landscape from a never-before-seen perspective.
It’s important to bear in mind, however, that you should still pay careful attention to your gear and lighting. A unique perspective can add a lot to an image, but the best landscape shots combine well-chosen gear, great lighting, and a great perspective for a beautiful result.
Panoramas
Before I get to the concluding words for this chapter I want to discuss one more technique that is near and dear to my heart and that is Panoramas. Luckily for me most of my Sony cameras have a panorama setting. I now Cannon does not have this setting, because much to my shagrin my spouse shoots with Cannon. Not that I have anything negative to say about about Cannon or for that matter Nikon, it is just the added cost of another camera system.
While tripods do help in shooting Panoramas they can also be a limiting factor. With the setting on my cameras all I have to do is keep the angle on the somewhat wide range to facilitate shooting. You also need to be able to pivot your body smoothly and hold the camera level when you are doing it. On second thought, since my wife is not the most graceful of people maybe she should use a tripod, LOL. Since panoramas are much more difficult to shoot with Canon cameras than Sony cameras she just doesn’t shoot them. I am sure this is the case with most Canon shooters. That is a shame, since they do add a great deal to your portfolio.
If you shoot the images by hand, you need to make sure that each image has at least 20% or more overlap. This gives the stitching software more to work with and compare. There are several third party software companies that make this software. For a while I was using three different programs, because one program alone is not capable of stiching all of your images.
I have included a few of my panoramas below.


Why make a panorama?
While hiking along a trail you come to an overlook that presents an amazing view. You are in awe of this vista, you have a tripod but didn’t bring your wide angle lens. With your setup, you can’t capture the entire scene with one frame.
Disheartened, you pull out your phone to take a quick panoramic shot.
You know you really would have preferred to print this scene for all your friends and family to see and the phone just isn’t going to do it justice. But is that all you can do? What if I told you there is still hope, there is a way?
What is a panoramic landscape photograph?
To begin, the word panorama has its roots in English and Greek, combining the terms creates the meaning “to see all”.
Panoramic photos are composed of a series of two or more photos merged together to capture a scene that is larger than is possible to capture in one single photo.

This can be done horizontally, vertically, or spherically.
Does that make sense? If not, think about using your phone’s pano mode to capture a scene much wider than a single picture would allow.
Gear
***Disclaimer: While you can take a panoramic photograph free hand, these recommended pieces of equipment will help you achieve more consistent results.

Getting started, a minimum list
A tripod with built-in level
Ball head
A camera with a mounting plate


Intermediate list
Everything above plus…
A 3-axis bubble level that fits onto your camera’s hot shoe (see Top 15 Photography Accessories under $25)
An L-bracket
Shutter release
A ball head with degrees of rotation marked


Dream list
Everything above plus…
A tripod with leveling base
A pan-tilt tripod head with discretized degrees for both panning and tilting rotation


Procedure
Step #1 – Determine your subject
The subject is the thing that caught your attention. It’s what made you want to pull out your camera to take a photo. Whether it’s a grand vista or a single flower blooming in a desert, it’s a moment you want to share.
For this article, I’ve chosen a panoramic photograph from my trip to New Zealand last year (see below). While walking along the shoreline of Lake Wanaka, the light falling on the green hills and gleaming white peaks stopped me in my tracks. That scene was what I wanted to share, and thus, my subject.
To me, taking the time to consider what caught your eye and the message you want to share about the moment is very important to furthering your skills as a photographer.
Step #2 – Scout the scene and determine the composition
Going back to the hypothetical scene of stepping into a marvelous outlook on a trail, it’s easy to get overwhelmed. There’s so much to see that you just start snapping photos. Often, this means you’ll miss out on a really unique composition though.
As an example, think of how many nearly identical landscape photographs you have seen on Instagram for certain famous locations. People tend to go to a place to take “the picture” without considering other perspectives.

Here’s my suggestion. Once something has captured your attention, take a moment to walk around the scene before you start shooting. Your willingness to explore will pay off in dividends for your final photograph.
Now is the time to start thinking about composition. How do you want to capture the subject? Start thinking about what you want to include or exclude from your final photo. Is there an object that might obstruct part of the scene that you need to work around, etc.
Begin to visualize what you want as your final result, because after this step you’ll be setting up your gear to achieve this goal.
When you find your desired shooting location, make sure you can safely set up your tripod. Then, place your camera in portrait orientation (shooting vertical images) atop the tripod to make sure you can capture the desired composition while panning.

Step #3 – Set up your gear
To this point, you have selected a subject, chosen your vantage point, and found solid footing for your tripod. Now it’s time to set up your gear to capture the moment.
During this step, it is important to be as methodical as you can because it will save you time when you begin to post process your photographs.
I take a somewhat ground-up approach to setting up my gear. This begins with leveling the tripod. Starting with a stable, level base is important because you will be panning your camera left to right, and up/down to capture the landscape.
The goal is to keep your individual images tracking horizontally so that when you begin merging you will not lose any of the cool portions of the scene you are photographing. A level tripod means that your ball head is level. This means that you should be able to smoothly and evenly pan (rotate) left/right, up/down across the scene.
As you see in this example below, the individual photos are not perfectly aligned. Depending on the composition I had in mind I might lose some details in the top or bottom of the final image.

This portion of the setup is no different than the horizontal line that your phone shows you to follow when you use it to take a panoramic photo. If you stray too far above or below that line your result will be gnarly. If you haven’t done this, give it a try to see the result.
***Note: Depending on your equipment this can be straightforward or take a bit of patience. However, the effort will pay dividends when you begin post-processing.
Set the exposure
With your foundation established, now it’s time to make sure you are properly exposing for the scene.
Since you are breaking the scene into a series of individual photos, having each one exposed differently will just not look right when you merge them. Also, it causes a lot more work when you start post-processing. The solution is to maintain a consistent exposure from one frame to the next by using Manual Mode.

Manual mode can be intimidating but don’t worry, we’re going to ease into things.
First, put your camera in Aperture Priority Mode. Next, set the ISO and aperture you plan to use to shoot the panoramic landscape. Then with your favorite metering mode, measure a few different spots in the scene to get an idea of the amount of light. Pick the shutter speed that yields the most detail in the highlights and shadows.
Then, switch to Manual Mode and enter that shutter speed, aperture, and ISO combination and voila! You’re ready to shoot with consistent exposures across the entire scene.
Attach the camera to the tripod
With the camera mounted in portrait orientation, level the camera with the horizon. Camera orientation is important for panorama photography because of the way we are accustomed to seeing widescreen. This is analogous to how you take panoramic photos with your phone. Aesthetically, portrait mode results in the most pleasing viewing ratio.

In this step, level the camera body with respect to the horizon. The lens can be tilted up or down to capture more or less above your horizon. Just as leveling your tripod provides the foundation for panning, leveling your camera will keep you from cropping important parts of the landscape. Leveling the camera prevents the individual frames from being tilted.
Dial in the focus
Just like you want a consistent exposure for your individual frames, you need to consider what part of your photo you want in focus. To do this I like to start using autofocus, then fine tune with manual focus before setting it for the scene.
NOTE: You need to either use back button focus or switch it to manual focus so that the camera doesn’t attempt to refocus from one frame to the next.
Double check your settings
Check your exposure, focus, and make sure everything is level before you start shooting. Use the histogram to make sure you have not clipped any highlights.
TIP: Consider using a scene identifier for indicating the start and stop points of your panoramic photo. I sometimes take an extra picture of one finger for the start of the panorama, and two fingers to indicate the last frame. Then, when scanning my photos in the Lightroom catalog it’s easy to pick out the right files to merge.
Step #4 – Shoot your scene

I’ve seen suggested ratios of up to 1/2, but I haven’t found this to be unnecessary and makes for extra frames.

TIP: Have your rule of thirds grid activated on your camera if you’re using a digital overlay. This will make things significantly easier for you.
Here is the set of 15 images I shot for making the panoramic photo above. You can see how each image overlaps the previous one, and the next one by about one-third of the image.

Step #5 – Shoot the scene again – data is cheap
Repeat the same steps and do it again exactly, or do something different. You’ve done all this work, why not experiment? Try a different composition. Wait for the light to change.
Step #6 – Post-processing magic via Lightroom
If you don’t have Lightroom, use whatever program you do your processing in normally. This discussion covers a quick and dirty creation of panorama landscape photographs in Lightroom.

My way is not the only way, but the method that I’ve used with success. If you are using Lightroom, I’m making the assumption that your images are imported and you are ready to make some big photos of your landscape.
Follow these steps:
- Select the images you want to use for your panorama.
- Ctrl+M on Mac and Windows brings up the panorama dialog box (or right-click and choose “Photo Merge > Panorama”).
- Choose your Projection mode, usually spherical works best.
- Boundary warp is your friend. Adjust that to suit your taste.
- Click “Auto Crop” if you want LR to crop the white parts off the edges for you (or you can do it later manually using the crop tool).
- Click “Merge”.
- Continue editing the panorama image like any other photograph until you’re happy with the final result.


Advanced techniques
After you become comfortable with the technique outlined above, I suggest trying the following advanced techniques to create even more original work.
Multi-row panoramas
The same technique is used as with single row except you overlap your frames both horizontally and vertically to create a panoramic photograph of two or more rows. I like to use this when I want to use my telephoto lens to capture the finest details in subjects that are farther away.
HDR panoramas

For scenes with challenging lighting, you can shoot a series of HDR frames that can be combined to create a panoramic photo.
One of Lightroom’s latest features has now streamlined the process so you don’t have to merge HDR frames prior to creating your larger panoramic image. There is a command in Lightroom called HDR Panorama (under Photo>Photo Merge…) which does both at once.
It’s a pretty neat feature that I have used with success.
A final tip for making panoramic landscape photos
For scenes with objects moving horizontally in the frame, shoot your frame opposite their motion to avoid multiple occurrences in your photograph.
For example, a person walking through your frame from right to left. If you don’t want to see that person in multiple locations in the same photo, pan opposite the direction they are walking so go left to right.
The techniques that I have included will ensure that you get sellar results. I also want you to know that on my flickr account I have posted 402 panoramas, and the vast majority of them were taken hand held. I also want to state that I have been taking photos for close to fourty years and I can hand hold a camera to a 10th of a second shutter speed.
13 Tips for Shooting Golden Hour Photography
The right light can make a single photo stop you in your tracks. Imagine a warm, natural glow that makes everyone and everything look their best. That’s the magic of golden hour photography.

When Is Golden Hour?
The golden hour starts roughly one hour after sunrise and one hour before sunset. If you want a more exact time for when the golden hour starts, you can use a golden hour calculator app like The Photographer’s Ephemeris. Or try other apps like Helios Golden Hour (for iOS) and Blue Hour Calculator (for Android).
You can also use an online golden hour calculator like this one to find out when the golden hours start at a specific location.
The golden hour’s soft, warm, directional light makes it easier to shoot than the harsh light of a midday sun. Both professional photographers and beginners prefer to shoot during the golden hours since it’s easier to work with.
Golden hour gets its characteristic look since the sun is in a lower position in the sky. Compared to other times of day, golden hour light is:
Soft: the transition from light to dark is gradual, creating soft light that’s universally flattering and particularly good for portraits.
Warm: the low angle of the sun creates an orange glow, associated with calm and happiness.
Directional: since the sun is low in the sky, it’s easy to create back-lighting, side lighting or front lighting with just the sun and an inexpensive reflector or a modified fill flash.
Together, those three characteristics form the magic of the golden hour. All you have to do to take advantage of the golden hours is adjust your shooting time. And perhaps wake up a little earlier!

Our Top Tips for Shooting During Golden Hour
13. Get the Timing Right
Golden hour is one of the easiest types of natural light to work with, but it can still go wrong. You can run out of time and have to shoot high ISOs as the light wanes, or take portraits where the subject is squinting.
To avoid rushing, plan on arriving at least an hour before sunset, depending on the weather conditions. If the weather is cloudy, give yourself even more time. Overcast days don’t provide quite the same magic, but the type of light is still soft and directional.
12. Position the Shot to Make the Most of Golden Hour
If you’re new to working with light, pay attention to the sun’s position for the best quality of light. For portrait photography, arrange your shot so that the sun is to the side. If you are not shooting a portrait, the sun should be in front of your subject. Don’t use front lighting from the sun for portraits, or you’ll get a squint.
One of the best uses for the golden hour is back-lighting. Placing the sun behind your subject gives you that magical glow.

11. Choose the Best Golden Hour Camera Settings
Shoot in manual mode to make the most of back-lighting and to adjust exposure. Or in a semi-manual mode such as aperture priority with spot metering.
Spot metering tells the camera to expose for wherever the focal point is, instead of considering the entire scene. Without spot metering, you’ll most likely end up with a dark subject or even a silhouette.
On most DSLRs, there’s a physical shortcut for the metering mode. On many models, you can also adjust metering mode inside the menu.
Another great way to shoot with golden hour backlight is to use a reflector. Bounce some of the light back on the subject, creating a more even exposure. A low-powered flash with a diffuser also does the trick.
If I can’t juggle the reflector in the right spot, I use a hot shoe flash on-camera, but on a low setting with a diffuser. An orange gel is also helpful – the color helps the flash blend in with the ambient, or existing, light.
Golden hour settings vary based on the exact light and the subject. For portraits, I shoot with a low aperture, around f/1.8 to f/2.8. If I’m shooting a couple or a group, I use a narrower aperture to keep all the faces in focus.
I often use aperture priority mode and increase the ISO as the sun goes down. For landscapes, particularly if you use a tripod, you can keep the ISO low and lengthen the shutter speed as the sunlight wanes.
Another potential pitfall to look out for are lens flares. Adjust your position, use a lens hood or find a way to incorporate them artistically into the shot.
Back-lighting can sometimes be tough for budget lenses, so check your focus to make sure you got it sharp before leaving the scene.
The light changes quickly during the golden hour. You’ll want to watch your settings and adjust as the light fades. You might have to increase your ISO, widen the aperture or lower the shutter speed as the amount of sunlight decreases.

10. Avoid Unwanted Shadows
When taking portraits, the light direction has an important effect on how they will look. You should avoid vertical lights coming from above your model because they create ugly shadows on the face.
An especially unflattering effect in portrait photography is “raccoon eyes”. This is where the eyebrows cast a shadow over the eyes, making them look like dark circles. This is not the case with golden hour photos. The light comes from a low angle, illuminating the model’s face from the side, not from above.
You might need to deal with other shadows, but you can save yourself so much pain in post-processing just for avoiding the raccoon eyes effect.

9. Use the Warm Golden Hour Colors to Add Positive Energy
Colors are a strong compositional tool in photography that can be used to convey mood. One of the main traits of the golden hour is its characteristic color palette: yellows, oranges, reds.
All of these are warm colors (between 1000 and 4000 on the Kelvin colour-temperature scale). Warm colors evoke positive feelings such as happiness, excitement, and optimism. For that reason, images taken during the golden hours have positive energy associated with them.
It makes your photography look a bit magical, hence the golden hour’s nickname as “magic hour”.
Portraits also benefit from the golden hour because the quality of light makes skin tones look better. The yellow-red hue of the light makes the skin look warmer rather than neutral or cold.

8. Use Creative Side Light
During the golden hour, sunlight hits the subject from only one side. This results in one side of your subject being shadowed. This is why it is also called split lighting.

Shadows add texture and depth to the portrait. They give it a different look than a front light. It also adds a bit of drama, but not as much as when you try this lighting in a studio.
7. Make the Most of Natural Backlight Photography
The light’s angle during golden hour is perfect for some backlight photography. This occurs when the light comes from behind your model/subject. And it gives you a lot of artistic possibilities.
You can get a dramatic effect when the object you are shooting has some degree of translucence. The translucent part of the subject will have a strong light intensity, and the opaque part will be darker. This makes the subject seem to glow.
It is even more evident when the background is dark. The contrast between the translucent and the opaque areas also makes the photo look more dynamic.
Translucent parts can be; hair, feathers, leaves, flowers, etc.

6. Shoot Towards the Sun to Create Silhouettes
The golden hour is a great opportunity to create silhouettes. A silhouette is when the subject of your photo is blacked out, and the background is well exposed. They work especially well with subjects that have an easily recognisable shape.
The high contrast with the subject and the lack of detail make silhouettes a great way to add drama and mystery to your photo. You can create them by shooting towards the light source (in this case the sun) and placing your subject between you and that source.
Exposure is important in order to get nice silhouettes. You need to set your exposure settings so that the brightest part of the image would be at optimal exposure. In our case, we want to capture the sky with all its colors and details. Under such settings, your subject will be extremely underexposed.
One thing that helps me when I am taking silhouettes is to imagine that the most important thing in the photo is the background. Then I expose the image to get it well. I use spot metering mode, and I meter by focusing on the background.

I adjust the exposure accordingly, and before taking the photo, I change the focus to the actual subject I want to shoot. The camera will say that it is underexposed, but that’s not a problem, we already have the settings the way we want them.
5. Have Fun With Starburst
Starburst is one of my favourite optical effects. Here’s how to create them.
First, set your aperture to a high value (ideally f/16 or f/22). Then,set the shutter speed and the ISO to underexpose the image by two stops. The sun will be in the frame. If you don’t underexpose it, you might end up with too much light in your photo.
Starburst is easier to get if you have the sun as small as possible. In other words, if the sun is a bit covered by something. When the sun is high in the sky, it might be difficult to find objects that can hide the sun. You might find yourself limited in terms of angles and perspectives.

But since the sun is in a lower position during golden hour. You can get interesting starburst then. You can use your model to cover the sun. Be creative and have fun! But be safe too. Don’t look directly at the sun. The lens concentrates the light just like a magnifying glass, so don’t use the eyepiece if you don’t have protection!
Instead, you can use the screen display and don’t forget to consult your camera manual for details.
4. Get Out Early to Avoid the Crowds
If you like taking photos of empty landscapes, early golden hour is a perfect time to take photos. Most people venture outside later. During these early hours, you can enjoy the beautiful golden hour light, a calm location and some privacy.
Another thing to take into account is cleanliness. In most places, cleaning is done at the end of the day or at night. If you wake up early, chances are that you will arrive at a clean location.

3. Use Long Shadows as Part of the Composition
Shadows add texture and detail to the image. They give a sense of volume and depth. During the golden hour, due to the position of the sun, you will have long shadows. You can use these to emphasise elements in the photo such as sand dunes, grooves etc.
You can also take photos of the shadows of your models. And you can use the shadows as a photo composition element. Shadows can balance the warm reds and yellows from the sun with their darker colours.
You should also remember your own shadow because it might get in the way and ruin the photo. This is especially important if you want to take photos with the sun behind you. Just be aware of your shadow and make sure to check where it is before you press the shutter release.
If your shadow is in the image, move around and place yourself so that your shadow falls outside of the photo frame. Unless you want to take creative photos with your shadows!

2. Make Everyday Sights Magical
Everything under this light seems beautiful and dreamy. You can use this to your advantage and take beautiful photos even when your subject might not look so spectacular. Dry vegetation, lonely trees, old fences, empty paths – these can all turn into photography subjects.


If you want to give a sense of nostalgia to your landscape pictures that might otherwise look barren or hard, I recommend you take photos during the golden hour. It adds gold tints and soft light effects that will make the image easier to relate to.
1. Capture the Most Beautiful Sunrises and Sunsets
I have always loved sunrises and sunsets. And since becoming a photographer, the number of sunrise and sunset I’ve witnessed has increased. It’s easy to miss these in our daily lives. We’re tired, or sleeping in, or busy doing other things.
Chasing the golden hour will give you the motivation to jump out of bed to catch that magical light. And you won’t regret it.

You will see beautiful scenes, and you will capture them with your camera. You can also bring your friends, family or even dates to keep you company. Or you can venture out yourself and enjoy some well-deserved peace and quiet.
Landscape photography tips: conclusion

What is landscape photography?
Landscape photography is the photography of natural scenes, such as mountains, prairies, beaches, forests, and more.
What makes a good landscape photograph?
The best landscape photos are well exposed, feature beautiful light, and include a beautiful composition.
Is landscape photography easy?
With the right knowledge, capturing great landscape shots isn’t too difficult. It often does take perseverance, though!
Final Words
Landscape photography is incredible. It’s a great – and accessible – way to enhance your enjoyment of the outdoors and improve your overall photography skills. It’s a rewarding blend of preparation, skill, and luck. There’s not much more thrilling than when all the pieces come together, and you make a beautiful landscape photograph.
Shooting during the golden hour has a lot of advantages. You can emphasise textures and get creative with long shadows. Try some backlight photography or have some fun creating silhouettes.
You will also enjoy some beautiful warm colors. Just take your camera and get ready to catch the golden lights of the sunrise and sunset!
More Samples of my work


Resources
Nationalgeographic.com, “landscape photography.” BY Robert Capute; petapixel, “landscape photography: the ultimate guide. ” BY Jeremy Gray; photography-school.com,, “landscape photography: 23 surefire tips.” BY Darren Rowse; digitalphotomentor.com, “How to Do Panoramic Landscape Photography with the Gear You Have.” By Matt Chesebrough; expertphotography.com, “13 Tips for Shooting Golden Hour Photography.” By Hillary Grigonis; dstromphotography.com, “making a photograph– the four pillars.” BY Ralph Nordstrom;