


Make underwater photography a part of your world.
Capture underwater images beneath the waves. This is how to photograph marine life, coral reefs, and adventurous humans under the sea.
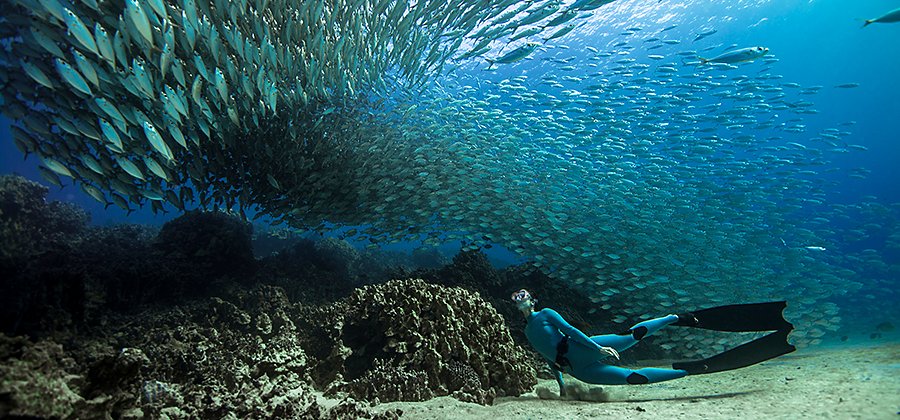
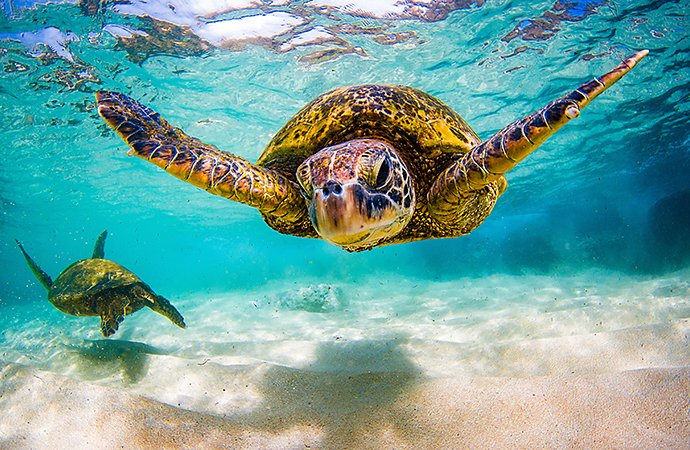
Image by Jim and Alicia Ward
What is underwater photography?
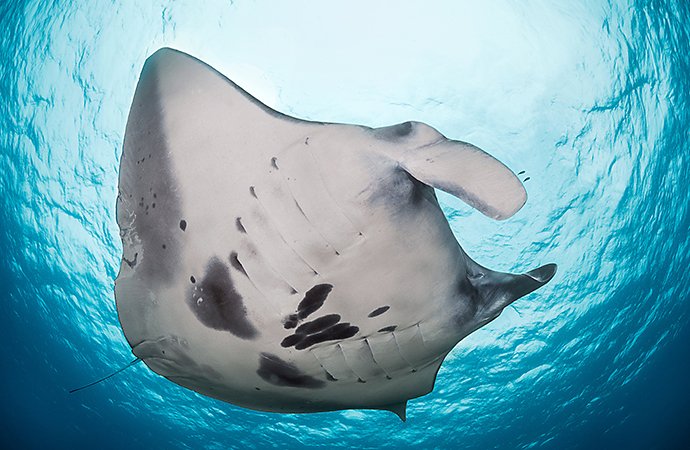
Underwater photography is a world of possibility, from coral reefs off the coast of Indonesia to sharks swimming in the clear waters of the Bahamas to scuba divers encountering manta rays.
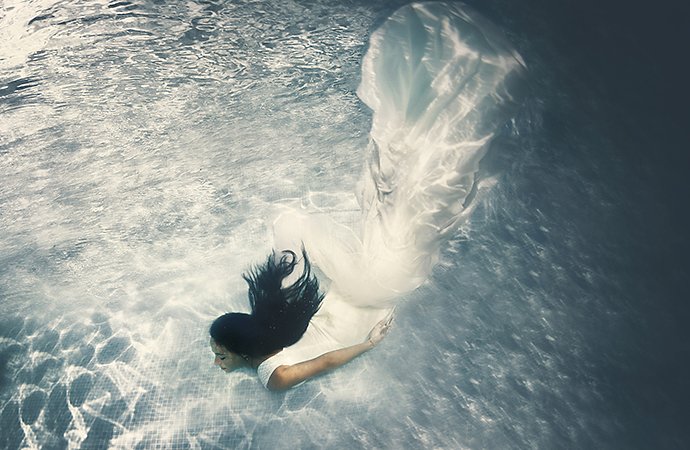
Nature photos are just the beginning, though. “Underwater photography isn’t just about taking pictures of fish and reefs and sharks and dolphins,” says photographer Joseph Esser. “There are many more different avenues.” Esser specializes in underwater wedding photography. His photos often depict couples in their wedding clothes, submerged or floating in a tropical, sun-filled sea with their clothes billowing around them.
“It’s not just taking pictures of wildlife anymore,” says Esser. “It’s people. It’s mermaid costumes. It’s bikinis. It’s models and couples.”
Underwater photography is a unique photographic genre that often requires the use of scuba gear, but can also be done while swimming, snorkeling, in an underwater vehicle, or by using automated cameras. While underwater imaging requires lots of specialized equipment and techniques, the payoff is worth it. Underwater photographers have access to many amazing subjects, including fish and other marine life, cave systems, shipwrecks, aquascapes, diver portraits, and more.

Staying safe with underwater photography.
Safety is the most important thing to keep in mind for an underwater photographer. “If you’re swimming in a pool, that requires a different set of skills than swimming in an ocean,” says Esser. “A lot of what we do is free swimming or free diving. You have to have a basic comfortability with your own skills.” Even swimming or snorkeling in shallow water can present certain challenges, so be sure to be comfortable with your environment before diving in.
Even on the calmest day, the chance of something going wrong in the ocean is never totally zero. Underwater photographers who take pictures of people should always get their subjects to sign liability waivers prior to a shoot.
Concern for safety also includes the safety of the animals and environment you’re photographing. Underwater photographers have to know about the animals that they’re documenting and recognize signs of fear or stress. Those signs might not always be obvious. “Pilot whales will flex their pectoral fins at you. Dolphins will blow bubbles,” says Alicia Ward, who, along with her partner, Jim, takes pictures of underwater wildlife. “People will think, ‘Oh, it’s waving at me,’ or, ‘It’s blowing bubbles,’ but these are signs of distress.”
Respect the sea life and critters around you, and make sure the fish and coral are just as beautiful when you leave as when you found them. “If you can’t walk away from an exchange feeling like you didn’t stress out an animal, you shouldn’t have taken the photo,” says Jim Ward.
The right gear for underwater photography.
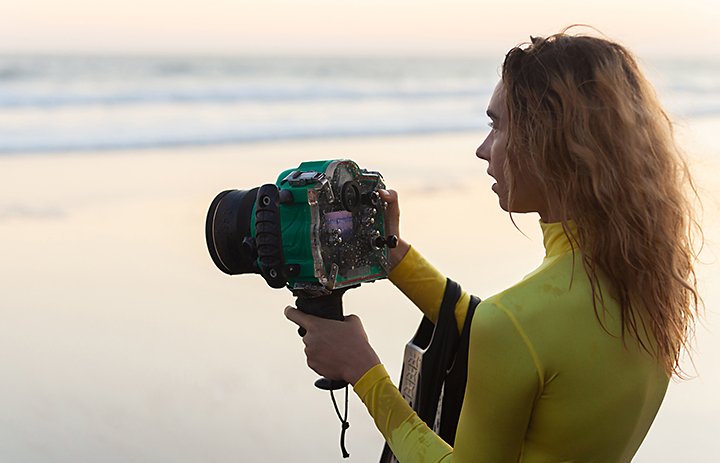
Both underwater photographers and their cameras need to be outfitted with the right gear for a photoshoot. “I usually have a pair of fins and a nice mask that isn’t going to fog up,” says Esser. “I use a DSLR camera with underwater housing that allows me to shoot with full access to my controls.”
Every camera is an underwater camera once you give it the right housing. Underwater housings can be either buoyant or non-buoyant, depending on the needs of the shoot. If you’re in shallow water and want to bob near the surface, buoyant housing is the way to go. If you’re scuba diving into the depths and need your camera to sink, you’ll want the non-buoyant type.
Some cameras, like GoPros and newer iPhones, are waterproof to a certain depth. These digital cameras take excellent photos, but they are not as flexible or as powerful as a DSLR from an established manufacturer, like Canon, Nikon, or Sony. And most professional photographers will want more than what even the best point-and-shoot can offer.
Probably the most important gear you can have, though, is just above the water. If you’re far away from dry land, be sure to have someone else on a boat just above you in case the tide turns and you need an assist.
There are many different camera options for underwater photography. For casual shooters or those who want a one-time solution, check out the Fujifilm Quicksnap 800 Waterproof Disposable Camera. For more serious shooters, we stock lots of underwater housings that can transform your everyday point-and-shoot, SLR, or mirrorless camera into an underwater camera.
If you’re snorkeling or shooting in shallow water, you can use more affordable waterproof pouches that resemble heavy-duty zip-lock bags with glass lens portals. Some pouches can go as deep as 30 feet. If you’re shooting in deeper water, you need a hard-shell housing to protect your camera. Hard-shell housings are specifically made for certain camera models so that you can control your camera’s exposure and functions with ease.
Underwater photography tips.
The majority of underwater photographs are taken while scuba diving, so being a certified scuba diver is a good idea. Displaying good diving technique also improves the quality of the images, since a calm, skilled diver will not disturb marine life or the environment as much as an inexperienced diver.
Shooting under water means you have to take into consideration a whole new set of variables. Atmospheric conditions under water are going to dictate the clarity of your image. On a calm day with clear water, you’ll be able to get good wide-angle shots of your underwater subjects. But if you’re shooting in low light or there’s a lot of sediment, you’re going to have to get closer to your subject.
Strobes and other light sources can be helpful, but they are also very situational. “There are instances where having strobes has been helpful,” says Alicia Ward. “Like diving at night or deepwater diving.” Strobes, though, are one more piece of electronic equipment you’ll have to waterproof. Additional light sources also open up the potential for backscatter — that is, particles that reflect light back to the source. Be mindful of your conditions before you decide to use lighting. If you’re shooting during the day or close to the surface, try to pack lightly and rely on natural light as much as possible.
If you are using natural, ambient light, different times of day will present different opportunities. “The best light for us is similar to that on land,” says Alicia Ward. “In early morning or late afternoon, you get that golden light that comes from the side.”
Achieving proper lighting is one of the primary challenges underwater photographers face. Even in crystal clear water, light levels drop off significantly starting at just five feet deep because most of the light reflects off the water’s surface. In addition to light loss, the white balance of the ambient light becomes increasingly blue as you descend, which diminishes the vivid colors of your subjects. For these reasons, you should use flash if taking pictures at depths greater than five feet. It’s also very important to get as close to your subject as possible to reduce the amount of backscatter (small water particles) and white-balance issues in your photos. Other considerations include the direction of the lighting, the best time of day to shoot, and what specific lighting gear you need for your shoot.
A wide-angle lens or fish-eye lens is often your best bet for getting pictures of sea life. Aquatic animals won’t hold still for your shot, so take as many as possible, shoot quickly, and worry about composition in post-production. With a wide-angle lens, you’re more likely to capture that colorful fish or fleeting manta ray somewhere in the frame. Crop your images and make them adhere to the rule of thirds when you’re on dry land and editing in Adobe Photoshop Lightroom.
Try a fast shutter speed and high ISO.
Shooting quick and wide also means having a fast shutter speed and high ISO to avoid motion blur. Esser recommends an ISO of around 500.
Autofocus could get your camera trained on bubbles or rocks, leaving that jellyfish you wanted to photograph as just a blurred thing in the background.
Get your settings in order above the water.
Lastly, set up everything you need before going beneath the waves. “Make sure you set up everything before you get in the water,” says Esser. You don’t want to have to adjust your camera settings when you’re below the surface.
Becoming an underwater photographer.
Underwater photography can be a major opportunity for professional photographers. Being able to take your camera into the watery part of the world makes you a more flexible and adventurous photographer; it’s a great way to improve your skills in general. If you can photograph sharks and manta rays, you can definitely do weddings. If you can color-correct for briny depths, you can probably manage the white balance on a headshot. “Get creative, have fun,” says Esser. “There’s no real wrong way to do it, and the more you shoot in the water, the better you get.”
In this guide to underwater photography, we’ll explore all there is to know about this fascinating genre.
What’s more, we’ll take you through the practicalities of selecting and operating the right kind of gear and essential equipment.
There’s a lot more involved in this than a quick dip with a point and shoot – it takes a considerable effort and investment to make it work.
By navigating and mastering this challenging photographic experience, you’ll soon be showing off stunning underwater shots.
If you’re eager to take a plunge, navigate down to our underwater photography tips for a quick summary of the most important advice.
Types of Underwater Photography
Underwater photographers can specialise in any number of different genres when shooting marine life, the environment in which they live, or underwater images in general.
Here are a few of the most common types of underwater photos:
Shooting macro photography underwater can be just as challenging and rewarding as shooting it on the surface.
As it turns out, in most underwater photography, you end up close to your subjects. With a dedicated macro lens and the right amount of lighting, you can capture stunning and detailed shots of the tiniest of sea creatures.
Underwater Fashion Photography
This fascinating style of underwater photography involves a fashion model floating or swimming in a body of water. The model often wears a swimsuit or some form of clothing that’s not usually worn underwater.
The water pulls at the fabric and scatters the model’s hair in an ethereal way that can result in stunning underwater photos.
Scenics and Wide-Angle Shots
This is one of the most popular forms of underwater photography as the images are packed with narrative and wonder. These shots generally include wide underwater scenes – captured with a wide-angle lens – and feature outcroppings, corral and even shipwrecks.
Over/Under Images
You’ll have seen images where half the scene is under the water and the other half is above.
Over/Under images are very challenging to get right due to water drops on the ‘over’ half of the lens. Plus, exposing the scene for both the bright sky and dark sea is tricky.
Wildlife
The oceans and waterways of the world are teeming with wildlife and much of it we never get to see. However, aquatic wildlife can be photographed in a dramatic and elegant fashion. Tropical fish, whale sharks and seals make the ideal subjects in an underwater photo.
Most underwater photography is conducted for pleasure, but some styles have a more serious nature. Underwater photography can be employed for reasons including technical, scientific and surveying.
Work of this nature is especially essential in documenting the impacts of climate change.
Underwater Drone Photography
Definitely a niche pursuit but nevertheless gaining in popularity, specialist underwater drones are tethered to a remote control to allow photos and videos to be captured at depths of up to 100m. See our guide: Are underwater drones worth it?
How Much Money Does an Underwater Photographer Make?
Working out the earning potential of an underwater photographer is tricky.
For those that have diving skills and qualifications, you may consider specializing in a subcategory. Being an underwater photographer (as a sideline to scuba diving) for a survey company could prove a rewarding choice. For example, your brief may be to capture images for the construction of a deep-sea oil rig.
Alternatively, you could take a purely artistic approach and capture macro or scenic underwater images to then sell as stock photography. These images could be used in print and online publications such as the one you’re reading right now.
Your best work may be purchased by a gallery or you could hold an exhibition of photographs for sale. People with an affiliation with the ocean or local waterways are willing to spend money on images for their homes and workplaces.
As a rough estimate, Marine Insight revealed in 2011 that a professional photographer shooting underwater images could expect between $35,000 and $60,000 for their work.
Fundamentals of Underwater Photography
It’s essential to point out that while anyone can purchase an underwater camera and take a dip, you need some important skills to really get started in the genre.
For shallow work, you should at the very least have good swimming skills and some experience in snorkeling.
For those that want to go into deeper waters or even further out to sea, you need a little more than a good camera. It’s critical to your safety to first invest in dive training and adequate equipment. This must take place before you consider buying an underwater camera or stepping foot in the ocean.
Aside from knowing the skills of the best scuba divers, there are some other fundamentals involved in planning an underwater photography experience.
It’s surprising just how dark it can get underwater – so the clearer the water, the more visibility you’re going to have and the more light that’ll filter down from the surface.
Saltwater is often best, as is the need for calm waters so that ground elements are not churned up.
It’s critical to know how different surface water can be to varying depths. Currents can be swift and deceiving and a pain to work with when shooting over/under shots. Use local weather sources to understand the tides and currents.
The underwater world is home to some of the most feared creatures on earth. That’s one of the reasons why research is so important.
Personally I don’t know what compels anyone to go looking for sharks intentionally. Regardless, you should do your research on what species you’re likely to encounter on your dive trips.
On top of that, consider how to actually manage encounters with any unexpected sea life. And don’t forget that some dangers can lie underfoot or take the form of shells and coral.
As with land-based wildlife photography, be careful not to impact the natural environment. Keep a respectful distance and don’t disrupt a habitat. Above all else, do your research on the environment, inhabitants and how to manage them.
Next: how to operate your camera properly. Once you put a camera in an underwater housing and put on diving gloves, it’s impossible to change some of your settings. So take the time to fix your camera settings first.
The last fundamental is understanding where and when to dive and get optimal shots. You’re going to need as much light down there as possible, so shooting at midday will help illuminate your subjects. If not, then you’re going to need additional lighting.
After all of the above, it’s finally ok for you to get in the water with an actual camera! At the end of the day, the most important fundamental to underwater shooting is to know your limits.
What Equipment Do You Need for Underwater Photography?
Aside from the safety gear required for diving and snorkeling, you’re going to need some essential photography gear to get that stunning shot.
As with any genre of photography, the basics remain unchanged – camera, lenses and lighting. You’ll also need an underwater housing if you’re serious about joining the other successful underwater photographers.
Camera
If you’ve spent any time on our site you’ll have noticed that there’s a huge range of cameras available for beginners and pros.
When it comes to underwater photography, though, you’ll need something that’s a little more than splash-proof.
While some basic point-and-shoot camera claim to be suitable for underwater photography, you’re better off investing in a dedicated kit.
Shooting on the surface is much different from shooting underwater – for starters, being able to change settings and control the camera is complicated when underwater.
A purpose-built underwater point and shoot such as the Olympus Tough TG-6 is ideal. It’s waterproof to 50 feet (15 meters) and goes deeper with the additional waterproof housing.
The controls are designed with a diver in mind as they’re easier to manipulate. Also, if you want to branch out into underwater video, it shoots in 4K and Full HD.
Most professional underwater photographers will opt for a DSLR or mirrorless cameras. These generally have far greater low light and focus performance resulting in brighter and crisper images at deeper depths.
But using one of these cameras, you must have a specialty underwater housing that can cope with the pressure. Also, you can’t use the viewfinder so you have to shoot from the rear LCD screen.
If you want to keep your feet dry while examining the underwater world, you may also find our guide on the best underwater fishing camera useful too.
An excellent choice is the Sony a7R Mark IV – a 60MP full-frame mirrorless camera perfect for underwater work. Of course, it’s going to need a good quality lens and housing – we’ll cover those in a minute.
If you’re looking to turn pro, it’s also worth considering some dedicated underwater cameras, although these can be rather expensive.
Before we move on to lens choices, let’s take a quick look at the best camera settings:
Aperture: To capture all elements of a scene in full focus, you need an aperture of around f/8. If you want to let in more light and obtain a strong subject separation, you should go with f/2.8 to f/4.
Shutter speed: Regardless of being on the surface or deep underwater, you’re constantly moving. You need a faster shutter speed and I would recommend starting at around 1/250.
ISO: Cranking up the ISO to combat low light when underwater is going to result in image noise and loss of quality. Try to keep this as low as possible and invest in additional lighting instead.
Autofocus: As there’s a lot of movement and your subjects are likely zippy, go with a continuous AF or tracking mode to nail image sharpness.
Burst mode: Using the continuous shooting mode will go a long way to ensuring you capture at least one great shot of a shark just before it eats you. As your subjects are moving fast you can select the best shot from a range of shots.
Shoot in RAW: The most important settings is to shoot in RAW. This way you’ll have all the image data captured by the sensor for post-processing. The more data, the more likely you’ll extract details from over and underexposed areas.
Lenses
If shooting with a DSLR or mirrorless camera, you’re going to want a good quality lens for underwater photography.
One of the most important considerations is the aperture of the lens. The wider the aperture, the more light is permitted to pass through the lens and hit the image sensor.
What’s more, shooting with a wide aperture results in gorgeous subject separation.
If you’re shooting macro images, then you need a macro lens that fits your camera and the underwater housing. 1:1 ratio macro lenses are best as you’ll be sure to capture all of the amazing detail of your subject.
Also, a longer macro lens gives you a little more working distance between you and the subject.
As for general underwater photography such as capturing scenes and wildlife, a general wide-angle lens is ideal. Nothing too wide as your images will have distorted subjects. With a suitable wide-angle lens, you can capture enough of the subject and background to form a unique composition.
Something like a 24mm f/1.4 is often considered the best lens for underwater photography, although a zoom can be flexible too – something like the Sony FE 16-35mm f/4 which works well on the aforementioned Sony a7R Mark IV.
Being a short zoom, there’s both a wide-angle for larger scenes and a little zoom reach for more compressed compositions. Plus, being an f/4 allows a wide enough aperture without creating too fine a focal plane.
Underwater Housings
If you’ve spent a small fortune on a camera and lens, or want to use the gear you already have, you have to keep it dry.
Like most camera accessories, underwater housings come in a range of styles and from a range of manufacturers. I would always recommend to go with the best brand and model – do your research.
Make sure that the housing is specifically designed to fit your camera and lens and also check the depth rating.
The housing doesn’t only have to keep your gear dry, it also has to grant access to essential camera and lens controls. Buttons and dials that interact directly with your system while inside the housing are a must.
Ikelite offers a great set of reliable underwater housings for digital cameras. They’re a company that manufactures precision underwater photography gear including housings, lighting and much more.
Going back to our Sony camera example, Ikelite make the 200DL Underwater Housing for Sony Alpha a7R IV. Plus, they offer a range of accessories just for this housing to optimise your experience.
Lighting
The final gear consideration is additional lighting. Keep in mind that while it may be full daylight on the surface, the instant you enter the water the light begins to fade. The deeper you go, the darker it will get, so you won’t be able to rely on natural light like you would on the surface.
For incredible underwater shots among the coral reefs, you’re going to need additional lighting.
Fortunately, there’s a range of lighting kits available just for underwater photography. You could use the built-in flash or LED panel on your camera, but this can cause water particles to flash and ruin your image.
The best solution is to purchase lighting that sits outside of the housing. These lights can be strobes or even constant light sources that are also waterproof, triggered by your camera and connect to the housing.
Once you have your kit assembled, you must take the time to get to know it out of the water. Actually, you want to know it backwards and almost be able to control it blindfolded.
Remember, being underwater is dark plus you’ll be wearing a bulky mask and breathing apparatus – shooting is complicated enough without trying to work out your settings.
15 Tips for Better Underwater Photography
Now that we’ve looked at the specifics of this exciting genre, here’s a selection of underwater photography tips that will get you diving from the surface to the depths in no time – just don’t forget your camera!
1. Find the Best Camera for Underwater
The one you choose is up to you. If you want to use the one you have then check if there’s an underwater housing to suit your camera and lens.
For beginners, I would recommend getting an action camera like a GoPro or the point-and-shoot camera described earlier.
If you’re considering starting from scratch with a brand new camera and lens, my best tip is to do your research and invest wisely to suit your skill level.
2. Master the Water
Before you pick up a camera, ensure you master your level of diving or snorkeling. Work with a skilled instructor, mentor or diving buddy to build up your skill-set and experience.
Clock up some hours – by the time you’re ready to take your gear into the water, you can focus on the photography on top of not drowning.
3. Study the Marine Environment
If you’re heading to an unknown diving location, take the time to study it in depth (pardon the pun).
This is essential not just for your own safety and experience, but also to be aware of what you can photograph. Understand the environment, wildlife and their habitats. That way you can plan for safety as well as an enjoyable shooting experience.
4. Use Natural Lighting

While using additional lighting is necessary, be sure to optimise the lighting conditions with sunlight. It can add a lot of depth and narrative to your composition.
5. Shoot Black and White
Even though the ocean is packed with colourful and vivid specimens, give black and white photography a shot. Underwater compositions can have a lot of powerful contrast and nothing brings that out better than black and white or monochrome images.
6. Understand Bubbles
Air bubbles can be both a hindrance and an interesting addition in underwater photography. They can be a distraction to an photo featuring sealife or they can add drama and story to see them floating up into the distance. The trick is to be aware of them and try to use them to your advantage.
7. Know the Conditions
Do your homework thoroughly and know the weather conditions as well as the water conditions for your location. Understand the key differences between the experience on the surface of the water versus the depths of the ocean.
8. Stay Safe
Only work within your skill level and comfort zone – going beyond that opens you up to risk, injury or worse. Plus, it’s a sure way to ruin an underwater photography adventure.
9. Enjoy the Experience
Once you’re comfortable with the genre, and you have the necessary diving skills, make the most of the experience. You’re undertaking a photography experience that most of us don’t ever get to enjoy.
Slow it down and take in all that’s on offer – you’ll also be more likely to see interesting composition and subjects. Watch how marine life interacts with their environments and try to predict behaviour to gain a great shot.
10. Get Up Close And Personal
While macro photography requires you to get up close, you should also try to get close to your other subjects. It’s especially important when using a wide-angle lens. The closer you are, the more likely you are to get an interesting and detail-rich shot.
Remember that water filters the quality of the image when shooting from a distance.
11. Compose Your Shot
Consider getting above or below your subjects and be mindful of surrounding and background elements. A photo of a school of fish or sharks shot from underneath delivers amazing silhouette-style shots. Equally, a tropical fish in front of a reef is more interesting.
12. Choose The Right Lighting
Natural light from the sun will only cut it for a few meters down. Be prepared to dive deeper and have your external lighting set up and ready to fire with the camera on the forced flash setting.
Even a diving light can add essential light to a subject or scene, though be mindful not to overexpose your photos with excess lighting. Depending on the lighting you use, you’ll also need to check your white balance settings.
Lastly, with the use of connective arms, you should keep the flash away from the housing so as not to cause light to reflect inside the housing.
13. Get the Correct Exposure
While it’ll take some time to get right, learn how to correctly expose photos while underwater.
Even though it may be tricky to view, enable the in-camera histogram so you can correctly expose your photo to prevent highlights and ultra-dark shadows.
While you can correct some of these in editing software, some details can never be recovered. Also, don’t be afraid of using contrasting elements in your images, as they’re often the most striking.
14. Build Up Your Experience
When starting off, work at a local beach, watering hole or even the local pool – plenty of dive classes start off in a pool. That way you can get accustomed to the diving process and using photo equipment while underwater before you have to contest with sharks and currents.
15. Practice Makes Perfect
Take the time to set up all of your gear and practice all of the necessary functions with your diving gloves on.
Practice how to power on your gear, change settings, operate lighting and compose images while wearing a mask. If you want to really nail it down, do it all blindfolded again and again so you don’t even have to look at your camera to operate it.
Underwater Photography FAQs
How do you start underwater photography?
Start by getting some basic equipment (like a waterproof camera or camera housing) and practicing in shallow waters. Experiment with different settings and photography techniques to get comfortable under the water. Be sure to do your research and read up about safety and what’s required for deeper diving.
Is underwater photography safe?
Shooting underwater has its dangers, so always put safety first. Invest in dive training and adequate equipment. If working with models for underwater shoots, consider their safety as well: plan carefully and ensure you have help available in case of any sticky situations.
Can I use DSLR underwater?
Yes, but you’ll need to buy a special underwater housing to protect it. An advantage of an underwater housing is that you can use your existing camera and lenses and not have to invest in a different camera system.
Final Thoughts
I applaud both your lack of fear and your determination to participate in underwater photography. As I said, it’s a genre that only a few of us get to experience.
I hope you’ve found this underwater photography guide useful in your journey. With the right skills, equipment and knowledge, you’ll be capturing awe-inspiring underwater photography before long.
I have included some of my photos below:


Equipment for Underwater Macro Photography
Macro Lenses
If you are shooting with a compact camera, you don’t have to worry about switching lenses, because your lens is fixed. For micro-four thirds shootes, the Panasonic 45mm macro lens or the Olympus 60mm macro lens will be your best choices. If you are shooting Sony APC-S sensor size or full frame, like a Sony A6500 or a Sony A7r III, you can use the Sony 50mm macro lens, or the Sony 90mm macro lens – I prefer the 90mm.
For cropped-sensor DSLR shooters, you can use a 60mm or 100/105mm macro lens. The 60mm macro lens is easier to start off with. If you are using a full-frame DSLR camera like a Nikon D850 or a Canon 5D Mark IV, then you will want to use the Nikon 105mm VR macro lens, or the Canon 100mm macro lens.
Strobes / Video Lights
Although you can use your internal flash for macro subjects, I strongly recommend getting one or two strobes. One is ok, but two is better as it will be easier to reduce backscatter and reduce shadows. Some people will also decide to get a powerful video light instead, as it allows them to use automatic exposure modes. The downside is that it limits you to very close subjects, and you have the possibility of camera shake blur.
Wet Diopters
To advance in your underwater macro photography, I consider a wet diopter, also known as a wet macro lens, a must-have piece of underwater photo equipment. They usually screw onto the end of your port, although there are flip-adapters and bayonet adapters available for certain underwater housings. Diopters come in different strengths, although more powerful is not always better, as the stronger diopters are more difficult to use. If just starting out, I would get a +5, +6 or +7 wet diopter.
Subject – choosing a macro subject
Taking great macro underwater photos starts with research. Where can I find good subjects? What dive sites and what depths are they at? Will I need a wet macro lens? Do searches on the internet, ask divers who have been there before. If possible, use a guide who specialized in macro subjects. Next, look at photos that have been taken at these locations. What subjects are producing the best photographs, which backgrounds and compositions look the best, what can you improve on. Try to previsualize the shots you would like to get, image how the light should fall on your subject, whether the background will be blurred or in focus. Based on your research, and imagined shots, decide on which lens or lenses to take on your dives.
When you start your dive, you should have an idea of what you are looking for, the type of habitat it lives in, and what depth ranges it is at. so you find a subject, now what?
If another photographer is shooting the subject, be careful not to get too close, or to cause silt to flow towards them. Keep your distance; watch the direction of the current and your silt. Try to get in their line of vision so they know you are often interested. See if there is another subject nearby you can shoot while waiting for them.
You must be able to evaluate the potential of a subject. Some subjects you will want to pass over because there is no chance of a good moment or presentation. This is something that comes with experience.

Bright colors make for great macro subjects. Janolus nudibranch.

Ribbon Eel from Anilao, Philippines. Focos on the eye is vital for macro subjects. When you see a cooperative subject, don’t leave it, be sure to stay until you get an excellent photo
Moment – when to take the photo
To get good at underwater macro photography, it’s time to think about moment and presentation. You want to watch your subject. What is it doing, will it exhibit any behavior? Does it change position, yawn, or ambush fish? Is it carrying eggs? Opening / closing its mouth? Try to imagine what the best possible moment to capture will be. Sometimes the subject will be a beautiful slow-moving nudibranch all by itself. You may think there is no good or bad moment for this subject. But even for a nudibranch, there is often a best moment, when its gills are fully out, if it has gills.

It can take a long time to get a macro subject in the right position – in this case, with the background completely filled with the crinoid. F13, 1/200th, ISO 200, 60mm lens in Anilao, Phillipines.
Read further about Photographing Marine life behavior
Presentation – Composition, lighting, and focus in underwater macro photography
I want to capture the subject in the best possible presentation. I will think about 6 things – composition, strobe position (lighting), background, focus, exposure, and depth of field.
Composition – I will try to get low, and evaluate different compositions, such as head on, fill the frame, diagonal, shoot from underneath. Sometimes the best composition can really take work. Try a few different compositions.

It took a long time to get “low” beneath this soft coral crab on the left for the right composition.
Strobe position – based on the texture of the subject, and the water visibility, I will think about my strobe position. Do I want front lighting, side lighting, backlighting do i have to worry about backscatter Do I need to position my strobes for a black background? I almost always have my diffusers on, giving the light a softer look that looks better in macro photography. You can review strobe positon examples here.

One strobe from the side helped me light this anemone the way that I had wanted to.
Background – what color do I want my background to be? Do I want it black, blue, green? Is it in focus or blurred? Is there a colorful object nearby that I can get into the background? Do I need to carefully move the subject to a better background, and can that be done without stressing the subject? Sometimes lembeh sticks are used to carefully reposition crabs or shrimps. don’t use your dive gloves, they may injure or stick to the subject. Do not risk injuring a subject or causing it to flee its habitat just to get the shot you want.

Eubranchus nudibranch. Getting a black background helps make the subject stand out. You need to have nothing immediately behind the subject. Nikon 105mm VR lens, D810, subsee +10 diopter

Focus – you will want to usually focus on the eyes or rhinophores. Lock focus on them and recompose. If your camera has a moveable focus point, use your arrow keys to move your focus point to where you want it. You may need to do this often if the composition changes, or your subject moves. this will help avoid a bull’s-eye composition also. Depending on the subject and how easily my camera is focusing, I will switch between C (continuous) and S (single-shot) focus modes. Luckily my housing allows me access to this switch. C mode allows me to shoot without the camera “locking” focus, which can be difficult when shooting supermacro.
To keep the eyes of this goby on the left in focus, I moved my focus point to where I wanted it, and moved in quickly for the shot, keeping the focus point on its eye.
Exposure – you need to check your display and/or histogram to ensure a proper exposure. With my TTL converter I almost always have a proper exposure, but sometimes I’ll need to adjust my TTL converter up or down. If you are shooting manual, you’ll adjust your strobe power up or down. A TTL converter is a big help in shooting macro. You really don’t need to worry about exposure the majority of the time. I think people shooting macro without TTL are at a big disadvantage.

I took my time with this hairy squat lobster to get a good diagonal composition from corner to corner, and to get the eyes in focus. Having TTL meant I didn’t have to worry about exposure, and I could focus on the other aspects of presentation.
Depth of field – this is related to the background. How much DOF do I need, or want, for the composition that I have chosen? Do I want to blur the background? Is the ambient light so strong I need a small aperture to help block it out? (This is common in clear, shallow water at mid-day). All these factors will help determine the proper f-stop to use for the shot. Review the f-stop and depth of field examples if you need to. Remember – there is no best F-stop for macro photography. A large aperture (small f-stop) will blur the background, and a small aperture will bring more of the background into focus.

F13 was a good choice for this photo of a Catalina goby, who I was fairly close to, taken with a nikon 105mm lens. The entire face is in focus, but the rear is nicely blurred. F25 would have had a very different effect.
Take your time, think carefully about these items, and don’t forget to check your LCD. The better you become as a photographer, in general you will spend more time with subjects you feel are special, waiting for the right moment, and experimenting with your presentation.

After finding a unique subject for underwater macro photography, it was perfectly presented showing just enough of its habitat to convey the sense of camoflauge it has developed. Portrait composition, slight diagonal line and black groundground all helped it come together. Photo by Keri Wilk. The black background was possible because there was nothing behind the subject. The frogfish was on sargassum floating at the surface of the ocean in shallow water.

When you find a great subject like this, you want everything to come together. F20, ISO 320, 1/320th, 60mm lens + 1.4x teleconverter. I carefully composed the image so the focal point was on the eyes of the large shrimp, the shrimp was on a diagonal line, and it almost filled the frame. F20 ensured a good depth of field while retaining detail. Strobes were fairly close in to reduce shadows and maximize the great colors.

Patience waiting a long time for the right moment, great single-strobe lighting from the top (note the shadows), and excellent focus and composition all helped make this a great Harlequin shrimp photo. F16, 1/125, Nikon D200, 60mm lens. Photo by Uwe Schmolke.
After the shot, underwater etiquette
If there was another photographer waiting for the subject, find the photographer. Show them exactly where the subject is before leaving the scene. if the subject is very small, you may need to show them on the viewfinder first. Be careful that you don’t loose the location of a subject; this is where a lembeh stick will come in handy. Plant the lembeh stick next to the subject, so you can retrieve another photographer and bring them to the exact location. Read more about underwater photographer etiquette. Your lembeh stick can also be used to stick in the ground when a current is sweeping you towards another dive taking a photograph. This way you can stay out of the way without kicking up silt.
Many underwater photographers get frustrated attempting underwater supermacro photography. However, for those who persevere and practice, the rewards are great. With the right equipment (diopter or teleconverter), the right conditions (no surge), lots of bottom time, and the right subject (think small!) – supermacro underwater photography can produce extraordinary photographs.
Supermacro with Point and Shoots
Macro photography in compact cameras is accomplished two ways – by purchasing a camera that allows very close focus (2cm or less), or by purchasing macro “wet lenses”, which are diopters that allow for closer focusing. Two of these wet lenses are often stacked on top of each other for extreme magnification.
Wet macro lens
The Subsee +10, Bluewater +7, and Nauticam CMC-1 macro lens, are all popular macro lenses (wet diopter) for compact cameras. Two of these are stacked together, and can be added or removed underwater. These are strong, high quality diopters, and they can also be used with a dSLR. Reefnet makes the Subsee adapter for most dSLR ports and a couple compact camera ports. You can read more about wet lenses.
dSLR Supermacro Underwater Photography
Macro photography with a dSLR is usually accomplished with a macro lens, which can achieve 1:1 magnification. Canon 60mm, Canon 100mm, oly 50mm, nikon 60mm, and nikon 105mm lenses are examples of these lenses. Cropped sensor dSLR’s allow their users to full-frame objects that are 24mm across or less. Full frame dSLR users must use additional teleconverters or diopters to achieve this effect.
If you are a Olympus user, your main choice will be a Oly 50mm F2.0 macro lens with a 1.4x or 2.0x teleconverter.
Super Macro photography – introduction
Using diopters or teleconverters to achieve greater than 1:1 magnification is called super-macro photography. At this range, DOF is very small, and auto-focus may be hard to achieve. Most photographers will focus in 1 of 3 ways: 1) switch to continuous focus mode, 2) focus at the maximum magnification, switch to manual focus mode, and then “rock” until the subject is in focus, or 3) purchase a focus ring and manually focus using the focus ring. Having the ability to switch between C, M, and S (continuous, manual, single-servo) focus modes via your UW housing is a very nice feature when performing super-macro photography.

Tamron 1.4 teleconverter & Canon 58mm 250D +4 dual-element diopter
Diopters, or Close-up lens
A diopter, also called a close-up lens, acts like a filter, and screws onto the front of the lens. A diopter allows for greater magnification by shortening the effective focal length of the lens, and reducing the working distance of the lens. The effective focal length of the lens is reduced. Where teleconverters maginify the image the same amount on all lenses, diopters will give different magnification on different focal lengths. So the magnification a diopter gives on a 150mm lens will be greater than that on a 60mm macro lens.
Advantage of using a diopter
No loss of light, which means bright viewfinder, no loss of auto-focus
Disadvantage
You lose the ability to get infinity focus, resulting in a reduced focal range. The stronger the diopter, the more the focal range is reduced.
Wet Diopters – Woody’s, Macromate, Subsee, Dyron
“Woody’s diopter”, the “macromate”, the Dyron Double Macro M77, and the “subsee” are wet diopters that can be placed over a port, that will allow for increased magnification by reducing the minimum working distance. The macromate and the Subsee are stronger diopters, but much more expensive. Woody’s diopter can increase magnification up to 25%, where the macromate (+8) & subsee (+10) can increase magnification up to 100% & 125% respectively on a 105mm lens. These figures will be different on other focal lengths, as I discussed above.
Please note that when using a wet diopter, it’s important that the camera lens is as close as possible to the port, to reduce the amount of air between the camera lens and the wet diopter. These diopters are best used with a 90mm focal length or longer, otherwise you will be focusing too close to your port. Still, some people do use a Woody’s diopter with a 60mm lens.
A big advantage of a wet diopter is that is can be removed during the dive, so you don’t have to shoot only supermacro on that dive.
SubSee: http://www.bluewaterphotostore.com/products/search/results/taxonomy%3A157
Dyron +7 Lens: https://www.bluewaterphotostore.com/dyron_77mm_macro_lens
You can read my review of the SubSee adapter and diopter.
Learn about shooting super macro with stacked diopters.

Blenny, uncropped, with SubSee wet diopter. Photo by Keri Wilk. The depth of field in this shot is very small, so it took several shots to get the eyes in focus. The blenny was in a tube, so to prevent the background from being illuminted, the strobes were at the side pointed slightly towards the camera housing. D300, 105mm lens with SubSee, dual Ike-125s without diffusers.

Nudibranch Rhinophores, Nikon D300, 105mm lens+subsee diopter. F25, 1/250th, ISO 200, Channel islands, USA
“Dry” diopters
A high-quality diopter such as the Nikon 5T/6T, which are no longer made, or a Canon 500D/250D is a small lens that is screwed onto the end of a macro lens. This will allow increased magnification by reducing the minimum working distance. There is very little image degradation with these high-quality diopters. These diopters are called “dual element” or achromatic diopters. B&W, hoya and tiffen also make cheaper diopters, but you may see some loss of IQ with these diopters.
The disadvantage of “dry” diopters is that the diopter must be used for the entire dive, and the lens will no longer focus at longer distances. Only small subjects will be able to be shot during the dive. A port extension may be needed to prevent the diopter from hitting the glass of the port.
Try to get a diopter called “two element” or “achromatic” like the Nikon or Canon versions, they are better quality than the one element diopters. Remember, when searching on-line, they are sometimes under “close-up lens”.
Diopter strength, and possible magnification over 1:1 on a 100mm lens
Canon 500d +2 20-30%
Nikon 4t, 6t +3 30-40% (discontinued and not easy to find)
Canon 250d +4 40-50%
Cheaper, single-element diopters can introduce chromatic aberrations, which can be corrected in photoshop or some RAW editors.

Garibaldi eggs, 105mm lens with Canon 250D diopter, F18

Conch eyes, Anilao, Phillipines, photo by jeff de guzman. f22, 1/160th, ISO 100, Canon 400D, +2 dry diopter, woody’s wet diopter
Teleconverters
A teleconverter acts like a magnifier, and is placed in between a lens and the camera body. It magnified whatever lens is placed on it. More precisely, a teleconverter enlarges the center portion of the image until it fills the frame.
A 1.4x teleconverter magnifies all images by 40%, a 1.7x teleconverter by 70%, and a 2.0 teleconverter by 100%. The disadvantage is loss of light and loss of image quality. With a 1.4x teleconverter, you loose 1 stop of light. With a 2x, you lose 2 stops. To avoid image degradation, only use a teleconverter on a prime lens. There will be no noticeable loss of sharpness with a 1.4x teleconverter and a F2.8 lens. A larger port or port extension will be needed to accommodate the teleconverter. Not all teleconverters will allow you to autofocus, so do your research.
Example: Nikon 60mm lens + Kenko/Tamron 1.4x teleconverter

Colemani shrimp, shot with a 60mm lens + 1.4x teleconverter. F20, 1/320th

Nudibranch gills, nikon 105mm + 1.4x teleconverter. This is a good combo when you want to shoot very skittish subjects, and also do some supermacro. F14, 1/320th, ISO 250
I often use a tamron 1.4x tele with my Nikon 60mm lens, housed in a 105mm macro port. Maximum magnification is 40% greater than 1:1. The lens acts like an 85mm lens, which is perfect for smaller fish, and at maximum magnification has the same working distance as my 60mm. Autofocus works perfectly fine with this setup, although it auto-focus gets a little difficult at maximum magnification if you don’t have a bright focus light.
Note: using a “dry” diopter or a teleconverter will make you need an extension ring if you don’t have enough room in your port.
Which brand teleconverter?
You can get either the Tamron SP AF (make sure it’s the SP AF, not the standard) or the Kenko Teleplus 300 Pro. Both are exactly the same, made by the same manufacturer, simply rebranded and colored differently.
Teleconverter pros & cons
Pros – entire focal range of a lens is useable
Con – loss of light, therefore slightly dimmer viewfinder, auto-focus doesn’t work as well. with a 1.4x tele, you lose 1 stop of light. 1.7x, 1 1/2 stops. 2x teleconverter, you loose 2 stops of light.
Cons – teleconverters magnify all defects of a lens (noise, artifacts, lack of sharpness, etc.), so they must be used on a high-quality lens that has better resolution than your sensor; you will lose some resolution and contrast with a 1.4x teleconverter. You’ll also lose some auto-focus speed, especially on a 100-105mm lens, it can get quite noticeable in water that is not bright.
note – in general you should use teleconverters on prime lenses, not on zoom lenses.
On a prime lens, you shouldn’t notice any loss of IQ with a 1.4x teleconverter. You might notice a small loss of IQ with a 2x teleconverter.

Goby on a coral, D2x, 105mm lens + 2x teleconverter at F29. Photo by Rand McMeins.
Extension tubes
I don’t recommend using these, I think it is better to use a diopter or teleconverter. The extension tubes will make your port needs much longer, and you have to deal with loss of light. However, to use a teleconverter on the Canon EF-S 60mm lens, you need to use the Canon 12mm extension tube.
Supermacro Photography recommendations and tips:
Supermacro photography is when you take a photograph at greater than 1:1 magnification. One definition is if you are taking a photo that is less than 24mm across, you are shooting supermacro.
Best choices for supermacro with a dSLR:
– Use a cropped sensor dSLR
– Use one of the following combinations:
Olympus 50mm or Nikon/Canon 60mm macro lens
I recommend a teleconverter. I suggest starting off with a 1.4x teleconverter, although some people try the 2.0x. The Canon EF-S 60mm lens will not autofocus with a teleconverter. It will work if you place a 12mm extension tube in between the 60mm lens and the teleconverter, but use a good focus light to help with the auto-focus, you loose a little more light because of the extension tube making auto-focus even more difficult.
100 or 105mm macro lens (or longer focal length)
I recommend a wet or dry diopter (or combination of the two). A 100/105mm lens with a +2 dry diopter and a Woody’s wet diopter is a combination that works well. You can also go for a stronger wet diopter (mentioned above) if your budget allows, which will give additional magnification.
Here’s some basic information on comparing shooting a 60mm with a 105mm lens.
See the diopters section above for wet & dry diopter choices.
I do not recommend using a 50mm or 60mm lens with a diopter, unless it’s only a +2. The working distance is very small, the subject will be very close to your lens port. This will make lighting difficult, it will scare the subject and make it difficult to get a correct composition.
Some people also have combined teleconverters and diopters for increased magnification. Make sure your port is long enough.
Supermacro with a micro-four thirds camera
There are 2 macro lenses available – the Panasonic 45mm macro, and the Olympus 60mm macro lens. I would use a wet +5 or +7 diopter with the Olympus 60mm macro lens, for great photos of really tiny subjects! The 60mm macro will give you a little more working distance than the 45mm macro.
SuperMacro Underwater Photography Advice
Before you go out and start buying all these diopters and teleconverters, make sure you have lots of practice taking photos at 1:1 magnification. Supermacro can be very difficult, and first you should take some photos at the maximum magnification of your lens, to see if that is magnification enough.
For your first time, you can try focuses the lens to its closest focusing distance, that turning off the autofocus on the lens. For the entire dive, you can rock back and forth to get in focus. This will ensure all of your shots are at the maximum magnification of your macro lens.
When shooting supermacro, you are often shooting at very small apertures, such as F22-F32. You may need to bring your strobes closer to your subject to get sufficient strobe power to light the subject at these small apertures.
Depth of Field
Some of us learn in landscape photography that the depth of field lies one third in front of the focus point, and 2/3 behind. That is only true in certain cases. In macro photography, the depth of field lies equally in front and behind the focus point. In supermacro, the depth of field will be very small, so choose your focal point carefully, and use at least F16, even for a flat object. Some people shoot at F36, F40, or F57. If you are worried about diffraction, see my diffraction test results.
Lighting and Focusing Tips
When doing any kind of photography close to 1:1, there is loss of light due to the lens elements being moved further away from the camera sensor. Because of this, the viewfinder will be slightly dimmer, so use a good focus light if possible.
Many TTL systems will underexpose when doing underwater supermacro photography, so make the appropriate adjustments, or switch to manual strobe power.
Lighting can be difficult, for even front lighting I suggest moving your strobes close in directly against your ports, pointing straight ahead. Here are some strobe position examples. To bring out detail in the subject, use side-lighting by pointing your strobes inward toward your port.

Tiny frogfish taken in Anilao, Philippines. Sidelighting helped to bring out the detail in the frogfish.
Resources
Shotkit.com, “Guide to underwater photography. “; adobe.com, “make underwater photography a part of your world.” BY Joseph Esser, Alicia Ward and Jim Ward; uwphotographyguide.com, “Underwater Supermacro photography.” by Scott Gietler; uwphotographyguide.com, “Macro photography preparation for taking great photos.” By Scott Gietler;